
Viz World User Guide
Version 17.0 | Published January 24, 2018 ©
Navigator Container Plugin
![]()
The plugin can be found in the folder: Viz Artist 3: Built Ins -> Container Plugins -> Maps.
The Navigator plugin enables the user to create realistic animations from one point to another on the map (for example fly over a flat map or globe). It is also used for navigating on a map (moving the camera) to a defined location using pan and tilt values.
Note: Only containers with a NavFinder plugin will be refreshed.
Note: Orthographic cameras are not currently supported by Viz World.
This section contains information on the following plugin editor views and buttons:
Camera
Position
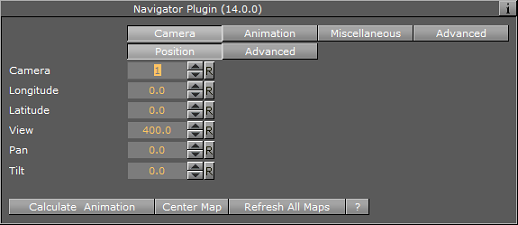
The Position button displays the camera position parameters.
-
Camera: Defines the camera that will be affected by the position parameters.
-
Longitude: Defines the Longitude camera position on the map/globe.
-
Latitude: Defines the Latitude camera position on the map/globe.
-
View: Defines the Camera’s view distance from the map.
-
Pan: Defines the Camera’s pan value.
-
Tilt: Defines the Camera’s tilt value
Advanced
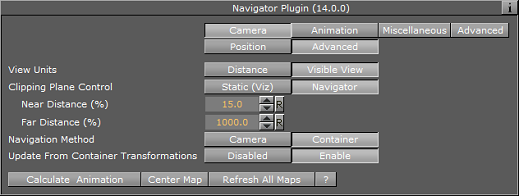
The Advanced button displays the advanced camera parameters.
-
Roll: Sets the roll value of the camera. This parameter is enabled only if the Keep The Horizon Horizontal parameter is set OFF.
-
Keep The Horizon Horizontal: When set ON, the horizon will always be horizontal and roll movement will be disabled.
-
View Units: Sets the way the number entered in the View field (see Position) will be treated. Distance defines the number of Viz units from the camera to the map. Visible View is based on the view (i.e. how many km/miles and so on) you see in units defined by the 3D Map Setting Plugin plugin.
-
Clipping Plane Control: Defines the distance range that will be drawn by the camera. Objects located closer to the camera than the _Near _parameter and objects located farther that the _Far _parameter will not be drawn.
-
Static (Viz): Draws the objects within the clipping plane values defined in Viz. For Viz 2.x see Setup->Camera->Camera Clipping Plane. For Viz 3.x see Scene Settings->Renderer->Camera Clipping Plane.
-
Navigator: Adjusts the clipping plane values according to the camera position. This is automatically done by the Navigator plugin based on the Near Distance and Far Distance parameters.
-
-
Near Distance (%): Defines the percentage of the camera distance from the map, which will be used as the Near distance of the clipping plane.
-
Far Distance (%): Defines the percentage of the camera distance from the map, which will be used as the Far distance of the clipping plane.
-
Navigation Method: Allows you to select whether the camera or the container should be moved when a map changes position. If you select camera, the camera will move when you reposition the map, potentially moving other objects out of frame. If you select container, you will move the container instead of the camera keeping other objects in view as the camera will be still. In other words you are moving the base map instead of the camera in order to see other parts of the map. Setting it to container also means you do not have to use the front layer using two cameras in order to achieve the same effect as when moving the container. Also you will not have to reload borders and other elements on the map as it can be preloaded once for the base map. Note that you can only do this with a flat map (not a globe).
-
Update from Container Transformations: Used in interactive mode. When enabled and the navigator container is moved or scaled, the values (lat, long, distance) in the Navigator plugin are updated.
Animation
The Animation button displays the camera animation parameters. There are two parameter tabs: Basic and Advanced.
Basic

-
Number of Hop Points: Sets the number of key frames (hops) used in the animation.
-
Hop Duration Mode: Defines the time gap between two key frames.
-
Fixed: Uses the same duration as set in the Hop Duration parameter for all hops.
-
Auto: Automatically calculates the duration of the animation between hops. Minimal hop duration will be based on the Hop Duration parameter and the Hop Min Time parameter.
-
Manual: Disables the Hop Duration parameter. Enables the user to set hop duration manually in the stage editor.
-
-
Hop Duration: Sets the animation length, between one hop to another, in seconds.
-
Hop Min Duration (%): Sets a minimal time for each hop when Hop Time Mode is set to Auto.
-
Stop Type: Defines the animation behavior at each hop.
-
Disabled: Enables the animation to only use stage properties.
-
Stop Points: Enables the animation to stop at each hop point and wait for a continue command.
-
Pause Points: Adds a pause point to each hop. An additional parameter, Pause Time, will be added to define the pause length in seconds.
-
Flyover: Simulates a flight pass over the hop points in a spline path, using the Flyover Minimal Height parameter. When selected, additional parameters will be enabled.
-
Per Hop: The user will set the hop stop type in the NavFinder plugin. Different stop types can be set for each hop.
-
-
Stop At First Hop: Defines whether a stop point will be added to the first hop (the beginning of the animation). The parameter is enabled only when using Stop Points or Pause Points as the Stop Type value.
-
Pan & Tilt Animation: Enables or disables the pan and tilt values of the camera of each hop in the animation. When enabled (On) this setting will enable the Pan and Tilt values for the NavFinder plugin.
-
Progress Profile: Defines timing profile between stop points of animation. Smooth option causes the animation to ease in and out of hop points.
Basic - Flyover

-
Flyover Path Profile (Stop Type is set to Flyover): Defines flying curve profile (curvature) of animation path.
-
Lag On Point: Similar to "Flyover Path Profile" button, but defines timing profile of the flyover animation.
-
Flyover Minimal Height: Sets the minimum flyover height in centimeters.
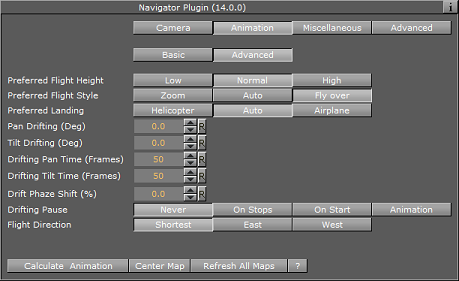
Advanced
The Advanced tab:
-
Preferred Flight Height: Defines the camera height that will be used in the animation between the hops.
-
Preferred Flight Style: Defines the camera movement between the hops.
-
Zoom: Enables linear movement from hop point to the high point and back into the next hop point.
-
Auto: Calculates the movement according to distance, height, and so on.
-
Flyover: Enables a smooth movement from one hop to another.
-
-
Preferred Landing: Defines the animation behavior when approaching the hop points.
-
Helicopter: Uses a steeper approach to the hop point.
-
Auto: Calculates the approach according to distance, height, and so on.
-
Airplane: Uses a flatter approach to the hop point.
Note: The drifting options allow camera pan and tilt drifting during the animation. This option is used to give the animation movement a kind of satiate feeling.
-
-
Pan/Tilt Drifting (deg): Defines the amount of pan/tilt change for each cycle. The cycle is defined by the parameters Drifting Pan Time (Frames) and Drifting Tilt Time (Frames).
-
Drifting Pan Time (Frames): Defines the time to complete a full turn of the pan.
-
Drifting Tilt Time (Frames): Defines the time to complete a full turn of the tilt.
-
Drift Phase Shift (%): Defines the offset between the pan movement and the tilt movement.
-
Drifting Pause: Defines whether the drifting should stop at the start point or during stop points. If Never is selected drifting will not stop.
-
Flight Direction: force the direction of the flight. Default is the shortest route to the next hop. If East or West is selected, flight route will be set according to the selected option.
Miscellaneous
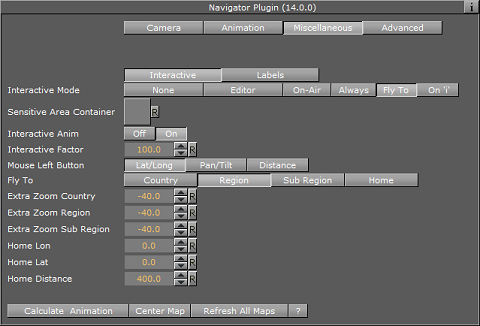
The Miscellaneous button displays the editor view for setting interactivity and label related parameters.
Interactive
-
Interactive Mode: Defines the interactive behavior of Viz. Available modes are None, Editor, On-Air, Always Fly To and On “i”.
-
None: Disables interactive mode.
-
Editor: Enables interactive mode during scene editing.
-
On-Air: Enables interactive mode when Viz Engine is in On Air mode.
-
Always: Enables interactive mode during scene editing and when Viz Engine is in On Air mode.
-
Fly To: Defines destination properties. Available Fly To options in Interactive mode are Country, Region, Sub Region and Home. Country makes the camera animate to the country in which the mouse was clicked. Animation will stop when the camera reaches a distance from the country as defined by the Extra Zoom Country parameter. Region makes the camera animate to the region in which the mouse was clicked. Animation will stop when the camera reaches a distance from the region as defined by the Extra Zoom Region parameter. Sub Region makes the camera animate to the sub region in which the mouse was clicked. Animation will stop when the camera reaches a distance from the sub region as defined by the Extra Zoom Sub Region parameter. Home makes the camera animate to the position defined by the Home Lan, Home Lat and Home Distance parameters.
-
On “i”: Enables interactive mode during scene editing and when Viz Engine is in On Air mode, when pressing the “i” key while using the mouse to navigate.
-
-
Interactive Anim: When enabled (On), user activated animation from the current map position to the current selected hop is enabled. This animation is triggered by the user in the NavFinder plugin, by pressing the Fly To Map button. The Fly To option will enable the user to select a point on the map, by clicking the mouse, and the animation will run from the current camera position to the selected point.
-
Extra Zoom Country: Defines the extra zoom value added to the camera animation when animation destination is a country. The camera will zoom in to the selected country until the bounding box of the country will fill the render window. The extra zoom will define an additional zoom value to the final camera position calculations.
-
Extra Zoom Region: Defines the extra zoom value added to the camera animation when animation destination is a region. The camera will zoom in to the selected region until the bounding box of the region will fill the render window. The extra zoom will define an additional zoom value to the final camera position calculations.
-
Extra Zoom Sub Region: Defines the extra zoom value added to the camera animation when animation destination is a sub region. The camera will zoom in to the selected region until the bounding box of the sub region will fill the render window. The extra zoom will define an additional zoom value to the final camera position calculations.
-
Home Lon: Defines a longitude value for a home point.
-
Home Lat: Defines a latitude value for a home point.
-
Home Distance: this parameter defines a distance from a home point.
Labels

-
Labels: Defines the label behavior. The Labels setting will override all labels (in all levels of the hierarchy) under the navigator container.
-
Overlay: Places labels on a plane in front of the map (see Label It for description). When this mode is selected an additional parameter will enabled, Label Camera, which defines the camera to be used for the labels.
-
On Map: Places labels on the map.
-
Advanced
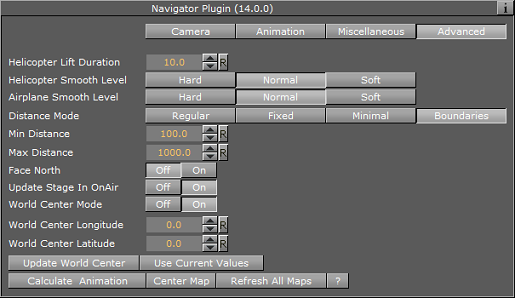
The Advanced button displays additional animation parameters.
-
Helicopter Lift Duration: Sets the time, in seconds, for the helicopter to go out from a hop point to the high point in the middle.
-
Helicopter Smooth Level: Sets the animation smoothness between one hop to another. This parameter will affect the animation path when a helicopter flight is simulated.
-
Airplane Smooth Level: Sets the animation smoothness between one hop to another. This parameter will affect the animation path when a Airplane flight is simulated.
-
Tilt Smoothing: This parameter is enabled when the Pan & Tilt parameter in the animation tab is enabled. When set to On, an additional parameter, Tilt Smoothing Rate, is enabled. Set the required smoothing value for the tilt animation,
-
Distance Mode: Defines how the camera distance from the map during the animation and at the hop points will be calculated:
-
Regular: Sets the distance that is calculated by the Navigator plugin based on the hop locations and distance from map as set by the user.
-
Fixed: Sets a fixed distance for the camera while animating between the hops and at the hop point. When set to fixed, User selected distance at the hop point is ignored.
-
Minimal: Sets the minimal distance to which the camera will descend at the hop points and during the animation. If the calculated distance is larger than the minimal value, the camera will use the calculated distance.
-
Boundaries: Enables you to define a minimal and maximum distance.
-
-
Min Distance: Sets the minimal distance value.
-
Max Distance: Sets the maximum distance value.
-
Face North: The camera will always face towards the map’s north.
-
Update Stage in OnAir: Defines whether the stage will jump to the hop position when updating a map in OnAir mode.
-
World Center Mode: Offset the world center to use the values entered instead of the center of the base map.
-
World Center Longitude/Latitude: The values you would like to use to set the world center.
-
Update World Center: After changing the values you need to press this to update all plugins.
-
Use Current Values: Take the current values from current camera position and use them.
-