
Viz World User Guide
Version 17.0 | Published January 24, 2018 ©
Label and Go
![]()
The plugin can be found in the folder: Viz Artist 3: Built Ins -> Geom Plugins -> Maps.
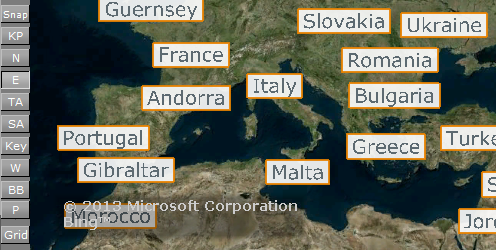
The purpose of Label and Go is to draw many labels on screen. Its main area of use is interactive scenes, but it can of course be used for regular scene design as well.
Traditionally, label drawing has been done by copying a design multiple times. This method gives you full control over the label’s look, but limits the number of labels which can be used as every label is at least 2 containers. Also, if the number of labels exceed 500 containers it may become a performance issue.
Label and Go gives less options for design, but since all design is done for one container performance is still good using 70000 labels.
Notes
-
All data sources may select from 10 different designs.
-
There are currently no limits as to how many Label and Go plugins can be used by one scene.
-
Label collision is calculated and taken into account. Other types of labels (e.g. design using the Street Labels plugin) are not taken into account.
-
Label and Go currently works on flat maps only.
The options are divided into three tabs, Global, Design and Communication, and this section contains information on the following topics:
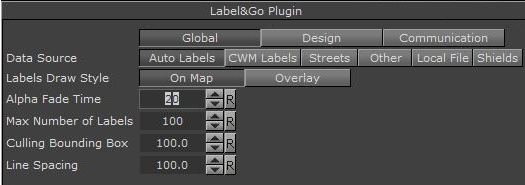
Properties - Global
-
Data source: Defines the type of source the plugin should render. Label and Go supports the following data sources:
-
Auto labels: Labels of the entire world.
-
CWM labels: Labels created by the CWMClient plugin.
-
Streets: Street labels (created by the 3D Road Manager or CWMClient plugin)
-
Other: Currently Viz World supports KML plugin.
-
Local file: Shape file which contains names and geo positions.
-
Shields: This is based on street data and currently only supports Tom-Tom data for the USA. It allows the designer to set designs for road types such as highways, interstates, etc, and to use an iconic representation of the street instead of the street name. During import of the street data, a CSV file is created under plugin\data\maps\DesignMappings which contains all the types of shields found in the data. The Mapping column in this file can be edited in order to map the shield types to specific user designs, and then the Label and Go plugin is used to read the file.
-
-
Labels Draw Style:
-
On Map: Will place the labels on the same camera as the navigator camera
-
Overlay: Will place the labels on the second camera (normally front layer)
-
-
Alpha fade time: Time (fields) for new labels to appear or disappear
-
Max number of labels: Max number of label to render including all the labels so far (other Label and Go are taken into account aswell)
-
Culling bounding box: Option to scale the real bounding box to avoid too many labels on screen
-
Line spacing: Line spacing when using 2 lines
Properties - Design
-
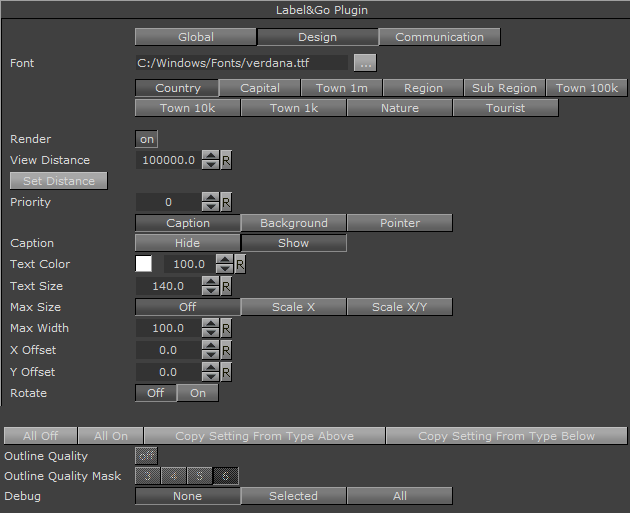
Font: Sets the font used by all labels.
-
Label Type: Select from the default types of labels when using auto-labels on Data Source (Country, Capital, etc).
Using POI-1, POI-2 and so on, allow you to define the name of the style, for example: Earthquake, Explosion, etc -
Render: Enables (On) or disables (Off) rendering of the selected label design type (e.g. Country, POI-1 and so on).
-
View Distance: Sets the distance from where the label style should be visible
-
Set Distance: Sets the View Distance property based on the current distance of the map
-
Priority: Overwrites the default priority which is based on type and town size
-
Caption/Background/Pointer: The Caption, Background and Pointer properties are different for each type of design, and are described in the separate lists below.
-
Buttons:
-
All Off: Turns off all labels, except the one currently edited.
-
All On: Turns on all labels.
-
Copy setting from type above/below: Copies the settings from the label type above/below.
-
-
Outline Quality : Quality when background is set to outline ( not work will fix )
-
Outline Quality Mask : Select the mask to use so it will not interfere with the scene regular makes.
-
Debug : Draw a green rectangle around all/current labels. (useful to see the bounding box).
Caption
-
Caption:
-
Hide: will display only the pointer of each label
-
Show: Will display both the pointer and the text of each label
-
-
Text color: Sets the color of the text.
-
Text Size : Sets the size of the text. Text size influences all sizes.
-
Max size: When set to either Scale X or ScaleXY it will limit the size of the text on either X or XY axis.
-
Max width: Sets the maximum width the text should take and will scale the text either on X or XY based on the Max Size setting.
-
X/Y Offset: Allows to offset the text on XY from its lat/long.
-
Rotate: When working with streets, the labels can be rotated to follow the street, when set to OFF they will not be rotated.
Background
-
Background : Defines the background type for the text (none/rectangle/image/outline).
-
Size : Sets the size of the background in relation to the text in percent (%).
-
Image : Sets a background image for the text.
-
Background color : Sets the background color.
-
Outline color : Sets the outline color.
-
Outline width : Sets the outline width.
-
Background Fixed Size, Background X, Background Y: When set to fixed size it lets you define the X Y size of the background.
Pointer
-
Point: Sets the type of point.
-
Caption position: Sets the position of the label in relation to the point.
-
Point Color: Sets the color of the point.
-
Point Size: Sets the size of the point.
-
Point Distance (%): Sets the distance of the label in relation to the point in percent (%).
-
Point BG: Enables (On) or disables (Off) the Point BG properties.
-
Point BG Color: Sets the points background color.
-
Point BG Size (%): Sets the points background size in percent (%).
Properties - Communication
-
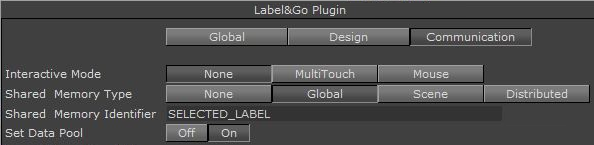
Interactive Mode: This property is here for backwards compatibility only. The recommended way is to use the MTButton plugin instead. (For more information on MTButton, see the Viz Artist User’s Guide).
-
Shared Memory Type: Changes between Scene-, Global- and Distributed-Shared Memory.
-
Shared Memory Identifier: Sets the Shared Memory key name.
-
Set Data Pool: Enables the distribution of the data to a DataPool structure using the same name as the Shared Memory Identifier.
Example
dim Variable as string dim array as Array[string] \qMy data separated my new line dim data as String = GetParameterString("Data") data.Split("\n\r", array) \qDepending on label@Go setting Variable = "LABELANDGO_" Variable.Append("ADDLABELS")Scene.Map[Variable] = array
Working with Label and Go
To create a simple Label and Go scene
-
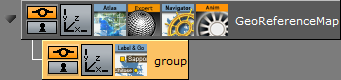
Add the Atlas plugin to your scene tree
-
Add the Navigator plugin to the same container as the Atlas plugin
-
Open the Navigator editor, click Miscellaneous and set Interactive Mode to Always
-
Add a sub container to the GeoReferenceMap
-
Add the Label and Go plugin to the new container
-
Click the Scene Editor’s E button
-
E: Enables the handling of interactive script/plug-in events. Interactive scripts and plug-ins are those related to mouse or keyboard actions.
-
-
Click the scene and zoom in and out with your mouse to see the labels appear
-
Open the Label and Go editor to test the settings
To use Viz Config for interactive communication
When using MTButton for interactivity together with Label and Go:
-
The input method from Viz Config will be used (e.g. Win 7, PPI, TUIO, mouse)
-
The clicked label on the map will be published to shared memory
Note: For more information on MTButton, see the Viz Artist User’s Guide.