
Viz World User Guide
Version 17.0 | Published January 24, 2018 ©
3D Border
![]()
The plugin can be found in the folder: Viz Artist 3: Built Ins -> Geom Plugins -> Maps.
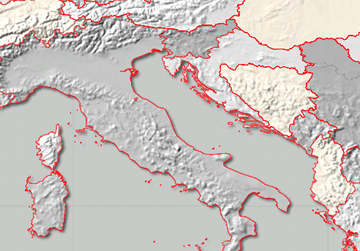
The 3DBorder plugin is used for applying graphic designs to the border data retrieved by the 3D Map Setting Plugin scene plugin. Each 3DBorder plugin is used to filter and define which borders will be drawn.
Note: When adding a 3DBorder plugin to a container, a 3D Line Shader plugin will be added automatically to the same container. The 3D Map Setting Plugin plugin has to be added manually when using the 3DBorder plugin.
The Data tab is used for defining which borders will be displayed by the plugin. The Width tab is used for defining the border width and other graphical related attributes. The Outline tab is used for adding an outline to the borders. The Effect tab is used for defining an animation of the border. The Advanced tab is used for defining general parameters of the border.
This section contains information on the following plugin sections:
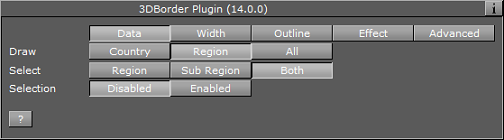
Data
-
Draw: Sets the border type that will be drawn by the plugin. Available options are Country, Region and All.
-
Country: Draws country borders only. When Country is selected, additional options are made available: Country, Coastline and Both (see Select).
-
Region: Draws region borders only. When Region is selected, additional options are made available: Region, Sub Region and Both (see Select).
-
All: Draws all available borders retrieved by the 3D Map Setting Plugin plugin.
-
-
Select: Displays the available Country or Region options when either of those two options is selected.
-
Country: Draws inland country borders only.
-
Coastline: Draws country coastline borders only.
-
Both (Country & Coastline): Draws both inland and country coastline borders.
-
Region: Draws region borders only.
-
Sub Region: Draws sub region borders only.
-
Both (Region & Sub Region): Draw both region and sub region borders.
-
-
Selection: Defines whether the plugin will use the selected regions in the map (received from the CWMClient plugin) or not. If enabled, only the borders of the selected regions in the map will be drawn. If disabled, all borders will be drawn according to the plugin settings (country, region, and so on).
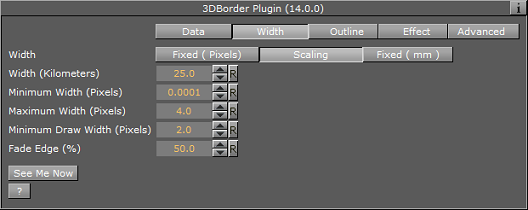
Width
-
Fixed (Pixels)– Uses a fixed width when drawing the line. This parameter will cause the line to maintain the same width regardless of camera position/distance. Available parameters are Width and Fade Edge.
-
Width (Pixels): Sets the line width in pixels.
-
Fade Edge (%): Sets the percentage of softness added to the edges of the line. When set to 0% the line edges will be sharp and when set to 100% the edges will be soft.
-
-
Scaling: When selected, line width will vary according to the camera distance from the map. Available parameters that allow the user to set the line attributes are Width, Minimum Width, Maximum Width, Minimum Draw Width and Fade Edge.
-
Width (Kilometers): Sets the line width in meters on the map. The closer the camera to the map, the wider the line will be drawn.
-
Minimum Width (Pixels): Sets the minimal line width in pixels. If the calculated line width (according to the Width parameter) is smaller than the Minimum Width value, then the Minimum Width value will be used.
-
Maximum Width (Pixels): Sets the maximal line width in pixels. This value will be used when the camera distance is small and the line width should have been larger than the Maximum Width value (in pixels).
-
Minimum Draw Width (Pixels): Sets the minimal line width in pixels. If the calculated line width (according to the Width parameter) is smaller than the Minimum Draw Width value, and larger than the Minimum Width parameter, then the line will not be drawn.
-
Fade Edge (%): Sets the percentage of softness added to the edges of the line. When set to 0% the line edges will be sharp and when set to 100% the edges will be soft.
-
-
Fixed (Mm)– Uses a fixed width, in viz units, when drawing the line. This parameter will cause the line to maintain the same width regardless of camera position/distance. Available parameters are Width and Fade Edge.
-
Width: Sets the line width in pixels.
-
Fade Edge (%): Sets the percentage of softness added to the edges of the line. When set to 0% the line edges will be sharp and when set to 100% the edges will be soft.
-
-
See Me Now: Calculates (when width is set to scaling) the width needed for the line to be visible at a given distance.
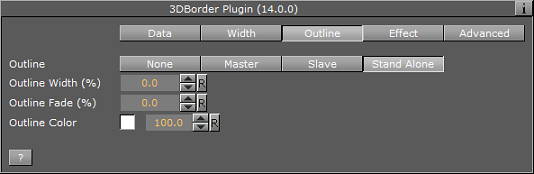
Outline
-
None: No outline to the borders is drawn by the plugin.
-
Master: Acts as the master plugin for outline behavior. Other 3DBorder plugins can be set as clients of this plugin. The same outline attributes will be applied to borders drawn by the master plugin and by all other slave plugins. When selected, the Outline Width (%), Outline Fade (%) and Outline Color parameters are also available.
-
Slave: Draws the outline according to the defined outline in the master plugin above it in the scene hierarchy. All other parameters will be disabled, displaying the master’s values.
-
Stand Alone: Defines the outline parameters for the borders drawn by this 2D Label plugin only. When selected, the Outline Width (%), Outline Fade (%) and Outline Color fields are also available.
-
Outline Width (%): Sets the width of the outline, as a percentage of the border width, where 0% is the border width.
-
Outline Fade (%): Sets the percentage of softness applied to the outline edges.
-
Outline Color: Sets the color of the outline and the alpha value of the outline.
Note: The hierarchy structure is important when using the master/slave outline configuration. The master plugin should always reside as the first container in the group of 3DBorder containers. An Expert plugin should be added to the map (above the 3D Roads containers) and Z-Buffer Draw should be set OFF.
Effect
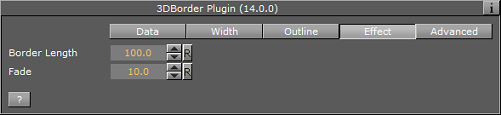
The Effect tab is used for creating an animation on the line size. After the line object is created, it can be animated by setting keyframes of the length parameter.
-
Border Length: Sets the line length, where the value 100 represents 100% of the line length.
-
Fade: Defines the softness that is added to the line edge as the length animation advances. When the length is 100, the end of the line will not be affected by the Fade parameter.
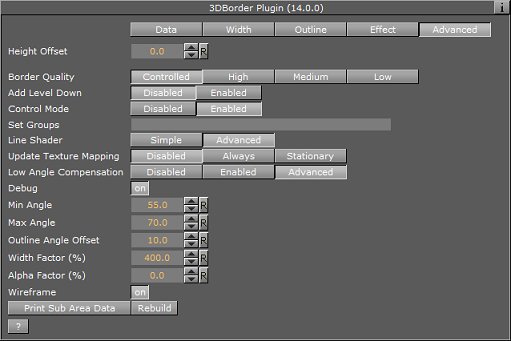
Advanced
The Advanced tab is used for defining general parameters for the 3DBorder object.
-
Height Offset: Offsets the borders from the map (on the fly).
-
Border Quality: Selects the quality of the border line:
-
Controlled: Border quality is calculated by the navigator distance from the border object.
-
High: Uses high quality when drawing the border line (performance will be slower).
-
Medium: Uses medium quality when drawing the border line.
-
Low: Uses low quality when drawing the border line. Border line will look pixelized when zooming into the map.
-
-
Add Level Down (Shape File): Defines whether the sub region borders will be drawn with the region borders, or if regions will be drawn with countries.
-
Control Mode: Defines whether the 3DBorder object is externally controlled by the 3DBorderControl plugin or not. Border objects are controlled by groups.
-
Set Groups: Set the group number for the object.
-
Line Shader: Line shader has 2 variants. The first is Simple with less options (and better performance), while the second is more Advanced and allows for more options (but at the cost of performance).
-
Update Texture Mapping: Should the texture coordinates be updated based on line width.
-
Low Angle Compensation: Lines become too thin at low camera angles as a result of the perspective distortion. When that happens, there are not enough pixels to support a smooth, anti-aliased line, and the lines look jagged and aliased. This mode compensates for that by both widening the lines and applying transparency when they are viewed at too low angles.
-
Debug: Enables debug messages in the console
-
Min Angle: If the angle between the camera and the ground below the line is lower than "Min Angle", then line width and transparency will not be changed.
-
Max Angle: If the angle between the camera and the ground below the line is higher than "Max Angle", then the line width is increased by the "Width Factor" and the transparency is scaled by the "Alpha Factor". If the angle is between Min Angle and Max Angle then the width and transparency are interpolated.
-
Outline Angle Offset: For outline width, apply an offset to the angle calculation in order to make the outlines affected at higher angles than the lines themselves
-
Width Factor (%): A factor for modifying line width when applicable.
-
Alpha Factor (%): A factor for modifying line alpha when applicable.
-
Wireframe: Shows the border object as a wireframe.
-
Print Sub Area Data: Print to the console all the sub regions in the plugin (used for elections).
Rebuild

The Rebuild button triggers the plugin to redraw the borders according to the plugin parameters. Some parameters are updated as the parameters are changed and do not require a rebuild command, but it is good practice to rebuild the borders after setting the parameters.