
Viz World User Guide
Version 17.0 | Published January 24, 2018 ©
Label It
![]()
The plugin can be found in the folder: Viz Artist 3: Built Ins -> Container Plugins -> Maps.
The LabelIt plugin is used for managing 3D labels and place indicators. The plugin creates a hierarchy under its container for adding a caption, body and pointer objects.
This section contains information on the following information:
Caption
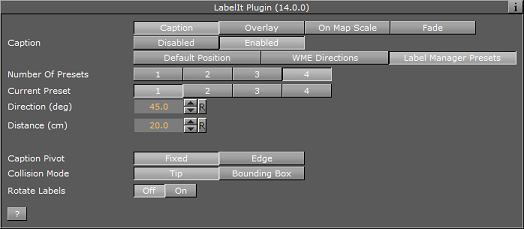
Captiondefines the relation between the label components (text and pointer). When disabled, duplicated labels will use the label design exactly. When enabled the labels will use the following options:
-
Caption Pivot: When caption is moved (rotated along the tip) the two options, Fixed and Edge, define the connection point between the caption and the body. Fixed sets the connection point to be the center of the caption. Edge sets the connection point to depend on the correct rotation. If the caption is above the tip, the connection point will be the middle lower side of the caption. If the caption is on the right side of the tip it will be on the left side of the caption. For example: A line moving from the tip to the center of the caption and where it crosses the caption bounding box is the connection point.
-
Rotate Labels: Defines whether labels, created in Viz (3D labels), will be rotated like the labels in the Map Editor. If set to Disabled, all labels will be displayed horizontally. If set to Enabled, labels that were rotated in the Map Editor will also be rotated in Viz.
-
Caption Source: The options Default Position, WME Directions, and Label Manager Presets include the properties described below.
Default Position
This will be used when adding labels in WME when no direction is selected.
-
Direction (deg): Sets the angle of the label in relation to its geographic position.
-
Distance (cm): Sets the distance of the label from its geographical position.
-
WME Offsets Distance: Enables the WME to offset the distance (default ON). When disabled (OFF) only the direction offsets from WME is used and the distance ignored.
WME Directions
This allows you to set and fine tune offsets for every direction available in WME. When selected, the labels will be placed as they were placed on the map in the Map Editor. When manually set inside WME they will always take priority over the presets and Default Position settings.
The default pointer direction (angle) and default distance between the pointer and the label is set by the map label parameters and used by the Map Editor (WME). If the direction and distance are changed while using the WME the Default Direction and Default Distance values will be ignored.
-
WME Compass Rose: Corresponds to the available directions inside the WME, as shown in the following image.

-
Direction Offset (Degrees): Values for fine-tuning the position of the label
-
Distance (Viz units): Distance offset for fine-tuning the position of the label
Label Manger Presets
When this is selected, the LabelManager plugin will use the defined presets to place the labels over the map. The LabelManager plugin will optimize the label position such that the labels will not overlap.
-
Number of Presets: Defines the number of label position presets available to the user (one to four presets). This parameter will be enabled only when Caption Mode is set to Controlled.
-
Current Preset: Selects the preset number to be configured, using the Direction and Distance parameters. Each preset should be selected and the label position should be adjusted.
-
Direction (deg): Sets the angle of the label in relation to its geographic position.
-
Distance (cm): Sets the distance of the label from its geographical position.
-
Collision Mode: Defines how the labels will be placed when an overlap or collision between two labels occur. With Tip, the pointers of overlapping labels can cross or touch, but no overlap of label bodies are allowed. With Bounding Box, a bounding box is calculated around the entire label (label body and pointer). An overlap between labels bounding boxes is not allowed.
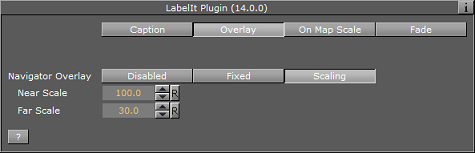
Overlay
Navigator Overlay defines how the label will be displayed over the map. Available options are Disabled, Fixed, Scaling, Near Scale and Far Scale.
-
Disabled: Places the label on the map using its geographical referencing.
-
Fixed: Places the label by keeping its geographical referencing but using a different camera (either with dynamic image or with a front layer). The label size will remain fixed.
-
Scaling: Places the label by keeping its geographical referencing but using a different camera (either with dynamic image or with a front layer). The Label will scale trying to imitate the camera movement.
-
Near Scale: Defines the maximal size of the label on the screen (that is when zooming in what will be the final size of the label).
-
Far Scale: Defines the minimal size of the label on the screen (that is when zooming out what will be the final size of the label).
-
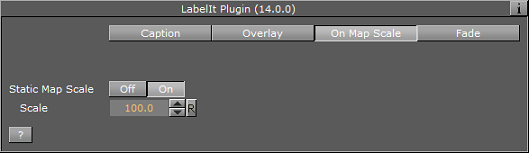
On Map Scale
-
*Static Map Scale: *Defines a scaling factor for the duplicated labels on a static map without camera movement. When disabled (Off), no scaling will be used.
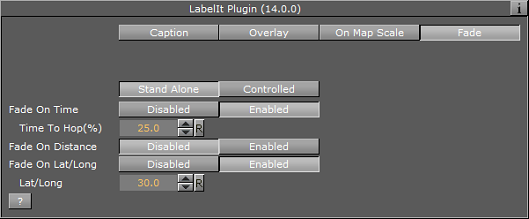
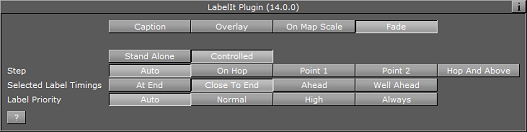
Fade
Stand Alone
-
Fade: *Defines the fade effect parameters to be used with the duplicated labels. Available options are *Stand Alone and Controlled. Stand Alone enables the user to define the fade parameters of the labels, while Controlled can be enabled to define the fade parameters when working with the Label Manager Plugin plugin.
-
Fade On Time: *Defines a label fade effect, beginning at a relative point to the defined hop duration. An additional parameter will be enabled, *Time To Hop, defining when the fade will occur.
-
*Fade On Distance: *Defines a label fade effect, beginning at a relative distance from the hop final location.
Note: The Fade On Distance parameter is enabled only if Overlay is set to Scaling.
-
Fade On Lat/Long: *Defines a label fade effect, beginning at a Longitude and Latitude offset from the hop final location. An additional parameter will be enabled, *Lat/Long, defining the offset from in degrees.
Controlled
-
Step: Controls when the label will fade in and out in relation to an animation. In general the fade can be based on the camera distance (for example; capitals are in view when distance is below 1000KM) or on timing in relation to the hop:
-
Auto: When a label is of type point (added by the user) it will fade in and out based on distance to hop. If the label is of type place/region it will be faded in and out based on the distance set in Label Manager Plugin plugin. If the hop is not close enough for the label to show and the label was added by the user it will be faded in based on hop timing and not distance.
-
On Hop: Links the fade to the hop timing.
-
Point 1/Point 2: These are reserved for labels where the distance is configured by the Label Manager Plugin plugin.
-
Hop and Above: Turns on at the hop and stays on thereafter.
-
-
Selected Label Timings: Sets one of the timing options for the fade to occur:
-
At End: The label will fade after the animation stops and before it continues.
-
Close To End: Fades the label just before the animation stops and just after the animation continues.
-
Ahead: Fades the label before the animation stops and after the animation continues.
-
Well Ahead: Fades the label long before the animation stops and long after the animation continues.
-
-
Label Priority: Sets the duplicated labels priority. This parameter is used when the number of labels on the screen is high and not all of the labels can be displayed. The priority levels define which labels will be displayed and which labels will be hidden:
-
Auto: Priorities are set by the Label Manager Plugin plugin.
-
Normal, High: Priorities are set to normal and high.
-
Always: Labels will always be displayed.
-
Practical Use
When adding a LabelIt plugin, three containers will be added under the LabelIt container: CAPTION, BODY and TIP. Drag a text object under the CAPTION container. The BODY container is the pointer’s body and the TIP is the pointer’s end.
IMPORTANT! A text object under the label design must be named “label” to receive the name of the object from the CWMClient plugin.