
Viz Artist User Guide
Version 3.14 | Published October 30, 2020 ©
Dexter

Dexter is a macro-based text-ticker tool that generates static horizontal text crawl and vertical text rolls. The Dexter editor is organized in five sections, Control, Design, Text, Trigger and Stopper. When adding the plug-in, two sub-containers are also added; Animation (visible) and Templates (hidden). In addition, it has a set of scripting possibilities.
Note: This plug-in is located in: Built Ins -> Geom plug-ins -> Default
This page contains the following topics and procedures:
Common Parameters
These buttons are found top right of the Dexter editor and are not active in control mode:

-
Control: See Dexter.
-
Design: See Design Parameters.
-
Text: See Text Parameters.
-
Trigger: See Dexter.
-
Stopper: See Stopper Parameters.
-
Info: Shows the delimited borders defined by the mark settings.
-
Update: Applies the changes on the already existing containers.
-
Build: Rebuilds all objects.
-
Clear: Clears the text objects.
Control Parameters
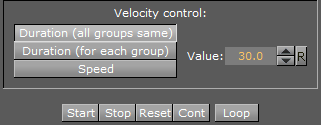
Use the Control section to start, stop, continue and reset the scroll/roll. It also contains buttons to select the velocity mode and speed of the ticker.
-
Start: Starts the animation.
-
Stop: Stops the animation.
-
Reset: Resets the animation.
-
Cont: Continues the animation.
-
Loop: Loops the scroller/crawl.
The velocity control defines how the speed of the crawl/roll is to be calculated.
-
Duration (all groups same): Makes all group use the same amount of time to crawl/scroll from start to end. The duration is measured at the group containing the longest text string.
-
Duration (for each group): Makes all groups use exactly the same time. As a consequence, longer text strings scroll faster than shorter ones.
-
Speed: Makes all groups scroll at the same speed, as a consequence long message takes longer to scroll than shorter messages. The speed unit is pixels per frame divided by ten.
Design Parameters
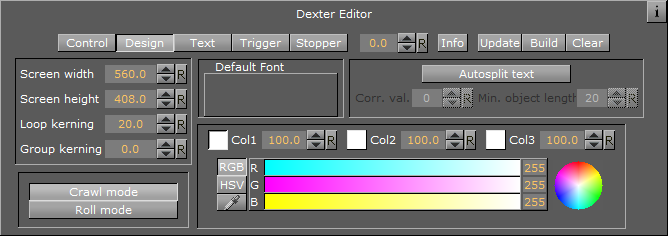
In the Design section of the Dexter editor, the range of parameters determines how the text shows:
-
Screen width: Sets the width of the screen used for placing the text objects and culling. Possible values range from 20 to 4000.
-
Screen height: Sets the height of the screen used for placing the text objects and culling.
-
Loop kerning: Defines the spacing between two loops. Possible values range from 0 to 1000.
-
Group kerning: Sets the vertical distance between group items.
-
Crawl mode: Creates a normal horizontal scrolling text.
-
Roll mode: Creates a vertical scroll.
-
Default Font: Shows the default font. To load a font, drag it from the Server Panel and onto the font drop zone. To unload a font, simply drag it to the trashcan. This must be set to get any text unless you specify a font in the macro and all text are executed with macros.
-
Autosplit text: Splits long text objects into smaller text objects for better performance when enabled.
-
Corr. val.: Adds the correction value to the gap between two new objects created when the autosplit feature splits a text object. Although it reads the length of a space character from the font to make a proper placing of the objects, there is a slight difference in length between a split and a non-split text. Therefore, the correction value is inserted to correct text that does not look good because of incorrect placing when the objects are split.
-
Min. object length: Sets the minimum object length for an auto-split object.
-
Col1: Sets the default color 1. To set it, either drag a material from the Server Panel onto the col1 icon, or use the color editor below.
-
Col2: Sets the default color 2. To set it, either drag a material from the Server Panel onto the col1 icon, or use the color editor below.
-
Col3: Sets the default color 3. To set it, either drag a material from the Server Panel onto the col1 icon, or use the color editor below.
Text Parameters
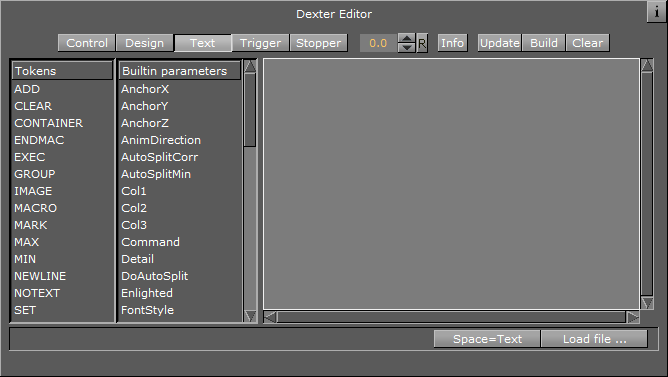
The Text Editor contains the text area where you enter the script commands. It also contains a list of all tokens and parameters. By clicking on a token or parameter, you automatically insert it into the script text at cursor position.
-
Space=Text: Forces the parser to interpret spaces at the beginning of a line/after a token has ended as legal text (in its default state those spaces are abandoned).
-
Load File: Allows you to browse for a script file. The default extension for the file is .edx. The script file must contain a macro script with standard syntax. When the file loads, the contents are written onto the text field.
Trigger Parameters
-
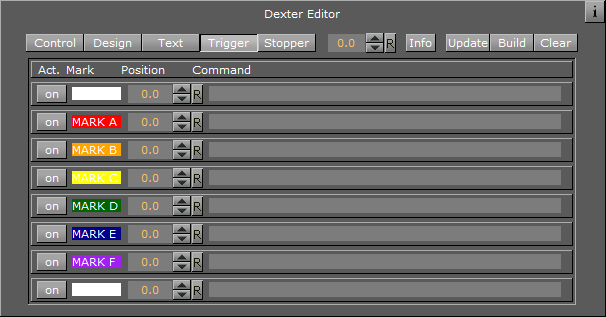
Act.: Evaluates the marker when set to On.
-
Mark: Determines the name of the marker for orientation.
-
Position: Sets the marker position where an event should occur.
-
Command: Runs the Viz command at the determined place.
The concept of marks and triggers allows you to send commands to Viz Artist/Engine when the animation reaches a certain position. To make it work you need to define two items:
First of all, mark the trigger positions in the text crawl/roll. This is done using the token <MARK>.
Animation starts<MARK A>here.
There are six marks, named A, B, C, D, E and F, that can be put wherever desired in the text. If Info is enabled, a representation of the mark is visible on-screen.
In addition to the six user-definable marks, there are two marks that are created automatically, named BEGIN and END. They are located at the beginning and end of the crawl/roll. Please keep in mind that the END mark is located before all the containers created for the loop feature and that marks are not looped.
After setting marks and building the crawl/roll, trigger actions must be specified. All eight marks are listed in the trigger section of the editor. The on/off switch left to the mark name is used to set that mark active/inactive. The position value right to the mark name sets the position where the triggering should occur (value 0 is at the end of Dexter’s bounding box. When animation is running and the mark in the text reaches this position, the specified command is triggered. If you switch on Info you see a line representing the trigger position. Switch it on and watch the marks and lines interacting to see how this works. Right to the trigger position you find a text field where you can enter the command which should be sent to Viz Artist when a mark triggers. You may use every command available via external control, for example you may change values in Viz Artist, start animations, execute plug-ins, and so on.
First you may issue two or more commands when a mark reaches its trigger position. Simply split them using a ; character (semi-colon). Also you may use the DEXTER location to send pseudo-commands to Dexter.
Currently two such pseudo-commands are implemented: The first one is DEXTER*STOP, which stops Dexter’s animation, the second one is DEXTER*PAUSE X, where Dexter stops the animation for X seconds (of course this is a floating point value, so DEXTER*PAUSE 0.5 is also possible) and continue with the same speed as before.
Note: These two pseudo-commands are not supported by Viz Artist command interface; they are only available using Dexter’s trigger feature. Dexter supports the THIS_SCENE pseudo location as well; you may want to use this to refer to objects/animations in the local scene.
Stopper Parameters
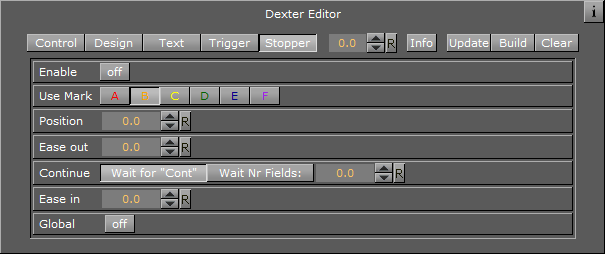
-
Enable: Evaluates the markers when set to On.
-
Use Mark: Uses the given position.
-
Position: Sets the position of the Ease-Out and Ease-In range.
-
Ease Out: Determines the last position of a text object during movement.
-
Continue
-
Wait for "Cont": Makes the text object wait until an continue Viz command is sent.
-
Wait Nr Fields: Makes the text object wait for a specified number of fields. Consider that two fields comply one frame.
-
-
Ease In: Slows down the text object and waits for a continue signal or until the number of fields are reached.
-
Global: Stops global or local to a certain group.
The Stopper is an extension to the triggering ability of Dexter. It allows you to create ease in/out animations at defined points along the crawl/roll.First you need to create a set of marks using the <MARK> token to define the stop points in your text. Then open the Stopper page in the Dexter editor and check the Enable button.
Select which marks to use. If you have defined your stop points using the <MARK C> token you need to select C here. If you enable Info you see a representation of the animation curve in the editor. Using the position, ease in and ease out slider you can move and alter that animation like you need. (Please keep in mind that the ease out part of the animation is executed before the ease in part: although usually it is the other way round. But here we do not want to start an animation smoothly and then stop it, we want to stop it first and then restart it again).
Using the continue switch you can select what Dexter should do after the animation has stopped: Either wait a certain number of fields or wait until the Continue button in the Control section is pressed. If you have more than one group in crawl mode you may want to check the Global as well. If it is checked, all groups halt as soon as a marker in any group reaches the stopper position. If it is unchecked only the group that contains this marker is stopped.
Dexter Parameters
|
Name |
Type |
Function |
|
text |
string |
This is the script Dexter uses for building the text. |
|
screenw |
float |
Screen width (used for placing the text objects and culling) 20/4000. |
|
screenh |
float |
Screen height (used for placing the text objects and culling) 20/4000. |
|
time |
float |
Animation length (in seconds) or animation speed 1/500. |
|
file |
string |
File name (default extension .*). |
|
loopmode |
bool |
Loop on or off. |
|
loopkern |
float |
Defines the spacing between two loops (global) 0/1000. |
|
groupkern |
float |
Defines the spacing between two groups (global) 0/1000. |
|
showarea |
bool |
View the culling area on or off. |
|
doautosplit |
bool |
If on, it splits text objects into pieces. |
|
autosplitcorr |
float |
Correction value for autosplit feature -1e6/+1e6. |
|
autosplitmin |
int |
Minimum number of characters for split text objects 0/100000. |
|
time-line |
float |
Value for preview control (works if animation is stopped) 0/1000. |
|
deffont |
string |
Default font (e.g. Peak/AvantGarde/AvantGarde-Book). |
|
col1 |
unsigned long |
Default color value. |
|
col2 |
unsigned long |
Color value #2. |
|
col3 |
unsigned long |
Color value #3. |
|
durmode |
int |
Selects animation mode (duration/speed) 0/2. |
|
roll |
bool |
Switches between vertical (0) and horizontal (1) animation. |
|
trigonbegin |
bool |
Turns on/off trigger BEGIN (see 2.6). |
|
trigona |
bool |
Turns on/off trigger A. |
|
trigonb |
bool |
Turns on/off trigger B. |
|
trigonc |
bool |
Turns on/off trigger C. |
|
trigond |
bool |
Turns on/off trigger D. |
|
trigone |
bool |
Turns on/off trigger E. |
|
trigonf |
bool |
Turns on/off trigger F. |
|
trigonend |
bool |
Turns on/off trigger END. |
|
trigposbegin |
float |
Position of trigger BEGIN -100000/100000. |
|
trigposa |
float |
Position of trigger A -100000/100000. |
|
trigposb |
float |
Position of trigger B -100000/100000. |
|
trigposc |
float |
Position of trigger C -100000/100000. |
|
trigposd |
float |
Position of trigger D -100000/100000. |
|
trigpose |
float |
Position of trigger E -100000/100000. |
|
trigposf |
float |
Position of trigger F -100000/100000. |
|
trigposend |
float |
Position of trigger END -100000/100000. |
|
trigcombegin |
string |
Command for trigger BEGIN. |
|
trigcoma |
string |
Command for trigger A. |
|
trigcomb |
string |
Command for trigger B. |
|
trigcomc |
string |
Command for trigger C. |
|
trigcomd |
string |
Command for trigger D. |
|
trigcome |
string |
Command for trigger E. |
|
trigcomf |
string |
Command for trigger F. |
|
trigcomend |
string |
Command for trigger END. |
|
status |
bool |
While animation is running, this parameter is set to 1 (read-only). |
Boolean values can either be 1 (on) or 0 (off). Color values are four byte unsigned integers, byte 0 = red, 1 = green, 2 = blue, 3 = alpha.
Script Programming Parameters
|
Name |
Default value |
Function |
|
AnchorX, AnchorY, AnchorZ |
0 |
X, Y and Z position of a new text object. |
|
AnimDirection |
Default |
Animation direction, set to anything but “Default” to reverse animation |
|
AutoSplitCorr |
0 |
Correction value for autosplit feature |
|
AutoSplitMin |
20 |
Minimum number of characters for split text objects |
|
Col1, Col2, Col3 |
255/255/255/255 |
Holds the color value from the gui/external control (parameter Col1) |
|
Command |
- |
Sends a command to Viz Artist/Engine. |
|
Detail |
Auto |
Sets detail/fontstyle of text objects (see above). |
|
DoAutoSplit |
0 |
Enables/disables auto-split feature. |
|
Enlighted |
0 |
Set to 1 if you want enlighted text. |
|
FontStyle |
- |
Sets the font used to create text objects (e.g. Vizrt/AvantGarde/AvantGarde-Book). |
|
GroupKerning |
- |
Sets horizontal spacing between groups (like Jump). |
|
Jump |
0 |
Sets horizontal spacing between groups. |
|
LastContainer |
- |
Holds the container number of the last created container. |
|
LastX, LastY |
0 |
If a new text object is created, the last X and Y position are stored here. |
|
MarkOffsX, MarkOffsY |
0 |
X and Y offset for marks (see Dexter). |
|
Material |
255/255/255/255 |
The material used for creating text objects. |
|
ObjectKerning |
5 |
Sets spacing between two text objects. |
|
RollAlign |
C |
Align groups in roll mode. values are R/r (right), L/l (left) and C/c (center). |
|
RollBorder |
0 |
Sets left/right border for groups (if aligned left or right in roll mode). |
|
Scaling |
20 |
Sets scaling in percent (20 means a scaling of 0.2). |
|
ShadowDirection |
320 |
Direction of shadow. |
|
ShadowDistance |
10 |
Distance of shadow |
|
ShadowMaterial |
204/204/204/204 |
Material of shadow. |
|
ShadowSharpen |
0 |
Controls Sharpen parameter for the shadow of the selected font. |
|
ShadowZOffset |
-1 |
Z offset of shadow. |
|
Sharpen |
0 |
Control Sharpen parameter of selected font. |
|
SoftShadowLevel |
1 |
Level of soft shadow (1-4). |
|
Step |
15 |
Sets the amount AnchorX is increased on a newline (see newline logic). |
|
Template |
- |
Sets template to be used for creating text objects (see Script Programming: Templates). |
|
TextKerning |
0 |
Adjusts text kerning (in text object). |
|
UseShadow |
0 |
Set to 1 to enable shadow. |
|
UseSoftShadow |
0 |
Set to 1 to enable soft shadow. |
|
WordSpacing |
0 |
Adjusts word spacing (in text object). |
|
XScaling, YScaling, ZScaling |
20 |
Scaling value for X, Y and Z axes. |
Color values are described in the form r/g/b/a with decimal numbers (base 10). Col1 is also used as the default color value (Material is initialized with this value). Material can also hold an existing material in the material pool, e.g. “Vizrt/Artdeco/artdeco.0” (see Col1, Col2, Col3 in Dexter).
Detail can have one of the following values: 1, 2, 3, 4, 5, 6 or T. 1 through 6 are detail levels, T means texture font. Every other value (like the default “Auto” is interpreted as detail level auto) (see Detail in Dexter).
Script Programming Tokens
|
Name |
Syntax |
Function |
|
ADD |
<ADD Parameter Value> |
Adds Value to Parameter (see example below). |
|
CLEAR |
<CLEAR Parameter> |
Clears Parameter (sets it to ""). |
|
CONTAINER |
<CONTAINER Path> |
Inserts a container into the text (see example below). |
|
ENDMAC |
<ENDMAC> |
Ends macro definition (nested macros are not allowed). |
|
EXEC |
<EXEC Name> |
Executes the macro Name. |
|
GROUP |
<GROUP> |
Begins a new group of containers. |
|
IMAGE |
<IMAGE name> |
Inserts an image in the text. |
|
MACRO |
<MACRO Name> |
Defines the macro Name. |
|
MARK |
<MARK Type> |
Sets a mark (see Dexter). |
|
MAX |
<MAX Parameter Value> |
If Value is higher than Parameter then Parameter = Value. |
|
MIN |
<MIN Parameter Value> |
Works like MAX but takes the smaller value. |
|
NEWLINE |
<NEWLINE> |
|
|
NOTEXT |
<NOTEXT> |
See Dexter. |
|
SET |
<SET Parameter Value> |
Sets Parameter to Value. |
The ADD token adds either a string or a float to one. If either Parameter or Value are strings, the two strings can be combined to one. If both are floats, an arithmetic addition is done.
For example:
<SET Test Vi><ADD Test zrt>results in “Vizrt”, but:
<SET Test 5><ADD Test 6.3>results in Test holding the value 11.3.
The CONTAINER token is used to define a container path for inserting a container into the text. A container path may either look like “1/3/2/3/1” (the same system as used in the GUI), “$Containername” or “#Containernumber”.
<CONTAINER 1/3/2/4> <CONTAINER $$Sphere> (or: <CONTAINER “$Sphere”>) <CONTAINER #307>The MARK token sets a mark that can be A, B, C, D, E or F.
The GROUP token begins a new group of containers. Instead of writing <GROUP> you may leave one line empty as this has the same effect. Use groups for making lines in roll mode.
Script Programming Syntax
The syntax consists of tokens and text. <tokens> are surrounded by <>, e.g. <ENDMAC>. Spaces are used to separate tokens and arguments. Text is everything that is not bracketed. Tokens can be everywhere in the text, e.g. Viz is <SET Material 234/34/58/114>great is valid. You do not need to write every token in a new line. Nested tokens are not allowed. A macro cannot execute itself.
In addition to the tokens, there is the escape character $:
-
$Parameter inserts the value of Parameter in the text
-
$_ inserts a space character in the text (for use in tokens)
-
$< inserts a < character
-
$> inserts a > character
-
$$ inserts a $ character
The $ character can be placed in tokens and in the text, e.g. $<Dexter$> says:
<SET Text Hello><ADD Text $_World>$TextInside tokens you may use double quote characters to insert text.
<SET Text “This is a text”>Any $ characters and spaces within two double quote characters are ignored from parsing and executing. Two double quote characters are interpreted as one:
<SET Name ""Harry"">Script Programming Templates
You can define templates for the creation of text objects. Under the Dexter container you find a container named “Templates”. Under this container you can create a set of template containers. These can hold animations, plug-ins, key, alpha, etc. Give every template container a unique name. To access it in the script, you need to set the Template parameter to the name of the template you want to use:
<SET Template AlphaKey1>After you set the Template parameter, Dexter uses this template container as basis for every text object. To switch this behavior off set Template to its default value (which is ""):
<CLEAR Template>Caution: Certain parameters (like material) are overwritten by Dexter after the container has been created from the template.
Script Programming Newline Logic
The token <NEWLINE> (see Dexter) describes a new text object, which is separated from the previous one. Every newline moves AnchorX (see AnchorX, AnchorY, AnchorZ in Dexter) a bit further, depending on the value of Step. This token is inserted internally to prevent you from typing <NEWLINE> over and over again.
The following text
One Twois converted to
One <NEWLINE> TwoNo newlines:
-
From the beginning of the script until the first occurrence of text.
-
After a line that doesn’t contain text (if the line is empty a new group is created).
-
After the tokens MACRO, ENDMAC and NOTEXT, and the last newline before those tokens are deleted.
For example:
|
Lines |
Explanation |
|
|
No new lines because no text occurred. |
|
<SET Camera Bobby> |
No text, no new line. |
|
Return of the |
Here is the first new line. |
|
Killer Tomatoes II |
No new line because of token MACRO in the next line. From here on there are no new lines until the end of the MACRO. |
|
<MACRO SetDir> |
No new line because there is no text in the line. |
|
<SET Director Jimmy> |
|
|
<ENDMAC> |
|
|
<EXEC SetDir> |
|
|
Director: |
New line. |
|
$Director |
New line. |
|
<SET FontStyle Arial> |
No new line because there is no text in the line. |
|
Camera: |
New line. |
|
$Camera |
|
|
<NOTEXT> |
The <NOTEXT> token does not add new lines before the next text item occurs (see Script Programming: Tokens). |
|
x |
New line. |
|
y |
New line. |
|
<SET Material $Col2> |
No new line because there is no text in the line. |
|
z |
New line. |
|
1<NEWLINE>2 |
New line for 1 and 2. |
The macro SetDir in the example above can be used as follows without creating a newline:
Hello<EXEC SetDir>WorldThe same rules applies to automatically inserted GROUP tokens (see Script Programming Tokens).
Script Programming Triggers
The concept of marks and triggers allows you to send commands to Viz Artist/Engine when the animation reaches a certain position. Therefore you need to define two items:
-
First is setting a mark in the text. You have six different marks to place wherever you think they are useful, together with the automatically created BEGIN and END mark this gives you a total of eight marks.
-
The second items are the triggers, where you have as well eight different triggers. While marks are set with a token in the text, triggers can be defined in the trigger section of the Dexter editor or using external control. You can define a position and a command for every trigger. When the corresponding mark reaches the trigger position, the command is issued to Viz Artist/Engine.
Note: Only marks and triggers of the same type work together! If for example mark B reaches the position of trigger D, nothing happens.
Marks are set using the MARK token, for example: Animation starts exactly{{<MARK D>}}here!
User defined marks are numbered A through F and are color coded in the trigger editor and as graphical symbols when show area is turned on. In addition to the user defined marks there are the automatically created marks BEGIN and END, which are inserted at the beginning and ending of the crawl/roll. The commands being issued do not have to be numbered, this is optional. If you do not provide a number, -1 is added before the command is sent to Viz Artist/Engine. you can as well define more than one command, separate them by a semicolon character.
You may invoke two internal commands using the trigger function with the DEXTER* location: stop and pause.
DEXTER*STOP DEXTER*PAUSE XNote: X is the time in seconds.