Viz Artist User Guide
Version 3.14 | Published October 30, 2020 ©
Create an Advanced Animation
Once you have mastered Create a Basic Animation, where the position of a cube is moved, you can move on to more advanced tasks. This section provides some additional procedures, so that a cube can continue its journey rightward, rotate while moving, and gain a nicer appearance by adding color to it.
This section contains the following procedures:
To Edit the First Key Frame
-
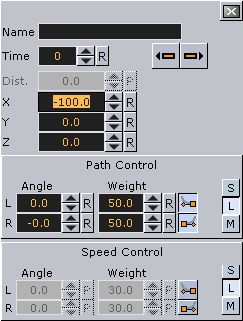
Enable the Key Frame Editors.
-
Select the Key Frame at the far left in the Dopesheet Editor.

-
In the Key Frame Editors, set the Position to X = -100.
To Edit the Second Key Frame
-
Select the Key Frame at the right in the Dopesheet Editor.
-
In the Key Frame Editors, set the Position to X = 0.
Tip: Set the position either by typing in the input box, using the up/down buttons, or clicking the R (reset/default setting) button.
When playing the animation now, the cube still slides rightward, but from a point at the left part of the Scene Editor to the center.
-
Click the Play button in the Time-line Editor.
To Create an Additional Key Frame
-
In the Time-line Editor, set the time-line field to 100.
-
In the Scene Editor, drag the cube to the right, so that it shifts to a different position.
-
Set an additional Key Frame.
-
Click the Play button in the Time-line Editor. When playing the animation now, the cube slides rightward from a point at the left part of the Scene Editor, through the center, and all the way to the right part.
To Add a Stop Point
-
Select the required Director.
-
In the Time-line Editor, set the time-line field to 50.
-
Create a stop event.
-
Click the Play button in the Time-line Editor. When playing the animation now, the cube slides rightward until it reaches the center of the Scene Editor, and then come to a halt.
To Create Key Frames for Rotation
-
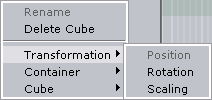
Right-click the Cube actor in the Stage Tree.

-
In the menu that shows, click Transformation > Rotation.
A rotation channel and two Key Frames are added.
To Modify the Rotation Settings
-
Select the Key Frame at the right in the Dopesheet Editor.
-
In the Key Frame Editors, set the Rotation to X = 360.
-
Click the Play button in the Time-line Editor. When playing the animation now, the cube slides rightward until it reaches the center of the Scene Editor, while rotating all the while before coming to a halt.
To Run the Animations Independently
-
Create a Director at the root level of the Stage Tree.
-
Rename the new Director to Rotation.
-
Drag the rotation channel to the new Director.
The Stage Tree and should now look like this:
When playing the animations now, the output depends on which Director is selected. If the Default Director is selected, only the position animation is played. If the Rotation Director is selected, only the rotation animation is played. Selecting both/all Directors plays both the position and rotation animations.
To Add and Animate a Material
-
Create a Material and define its color.
-
Drag the Material to the Container in the Scene Tree.
-
In the Scene Tree, click the Material in the Container. The Material Editor is shown.

-
In the Time-line Editor, set the time when you want the Key Frame to be created.
-
In the Time-line Editor, click the Set Key button.
-
Change the material’s color.
-
To create the next Key Frame, in the Time-line Editor, click the Set Key button.
-
Click the Play button in the Time-line Editor. The cube now has a color that changes as part of the animation.