Viz Vectar User Guide
Version 1.0 | Published May 07, 2020 ©
The Home Page
Having discussed sessions, let’s go on to consider how sessions are created, and how you choose which one to work on. These items, along with a few other top-level functions, are found in the Home Page.
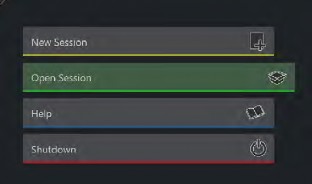
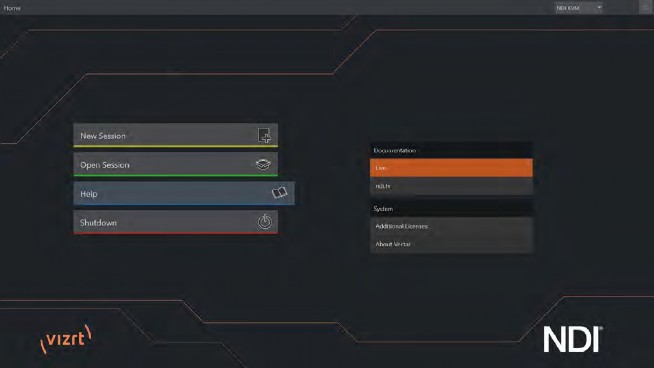
This primary screen is the first thing you encounter after launch. It is dominated by the main menu shown below:
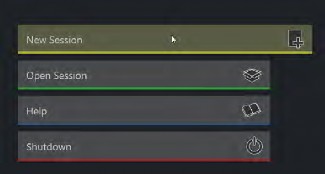
Choosing a link from the menu updates the right-hand pane of the Home Page to provide options and controls related to your choice. For example, the first thing you will likely do on launching a brand new unit is create a session.
In anticipation of this, the New icon is pre- selected automatically whenever there are no existing sessions. This results in the relevant session options being displayed at right, as shown in the home page.
New (Session)
Clicking New on the link populates the pane at right with expandable Session Name and Settings, and Video Settings control groups.
Session Name
A name box for your session is listed above the options pane at right. You can click in this field to modify the default name (which is the current date) using the keyboard.
Session Settings
Volume
Note: When using internal IsoCorder™ capture modules to record multiple sources, you may assign more than one volume to capture duties. Sessions track recorded clips too, providing easy access to them for live use.
A menu labeled Volume appears in this group. Your selection designates a primary hard drive for the session and its associated content to be created and stored on by default.
Suitable storage volumes that are detected are listed in a drop-down menu when you click on the Volume control.
You can select any volume shown as the session drive, though external drives are not recommended for active use as session drives.
Template
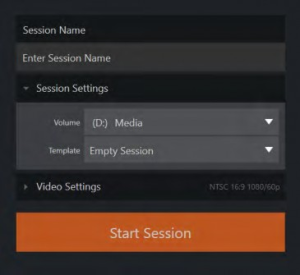
The Template drop-down menu lists all sessions currently available on the system. If you select an entry, the session you create subsequently retains all settings of the source session.
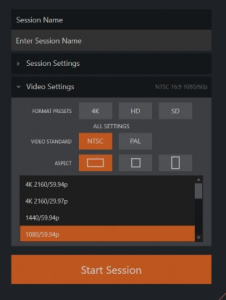
Video Settings
Designate your local video standard in the Video Settings group. Select NTSC or PAL video according to your locale. Then continue to choose between the following options:

-
Choose traditional landscape, square or vertical Aspect for the session.
-
Select a video format (such as 1080/59.94p) from the list below.
-
Having made your selections, you would normally click the Start Session button at lower right to launch the Live Desktop. But first, let’s explore a few other features of the Home Page.
Titlebar Tools
Eject

An Eject button at the top-right corner of the page allows you to safely disconnect external drives. (Drives can also be ejected from the Live Desktop.)
Note: Media configured as Read Only is not shown for the New or Open (session) features, since they cannot be used for sessions. However, Read Only media can be used for import purposes.
NDI KVM
KVM is an abbreviation for keyboard, video and mouse. There is an NDI KVM menu just left of the Eject button. This feature leverages the NDI® protocol to provide superb KVM functionality, giving you complete control your system from anywhere on the network where you can run the Windows version of NDI Studio Monitor.
To enable this feature, go to the Launch screen’s Home page, and use the titlebar NDI KVM menu to select which operating mode you wish to apply, choosing between Monitor Only or Full Control (which passes mouse and keyboard operations to the remote system).
Use the Security option in this menu to apply NDI Group control to limit who on your network can view the NDI KVM output from the host system. To view the output from the remote system and control it, select the machine’s NDI output in the Studio Monitor application supplied with the free NDI Tool pack, and enable the KVM button overlaid at upper-left when you move the mouse pointer over the screen.
Tip: Note that Studio Monitor’s KVM toggle button can be relocated to a more convenient spot by dragging it with the mouse.
You can select to view or control the User Interface or another Multiview, or both with multiple instances of Studio Monitor open on the receiving unit.
Note, too, that this feature gives you a great way to multiple your Multiviews around your studio or campus. You can even use these displays as video sources for another NDI-enabled system. System audio also passes to the receiver, and you can copy and paste text between the two systems. With the User Interface running full-screen in Studio Monitor on a receiving system, it’s sometimes difficult to remember that you’re actually controlling a remote system. Even touch is supported, meaning you can display the interface on a remote Microsoft Surface™ system or other touchscreen for portable control over your entire live production system.
Open (Session)
If there are existing sessions on the system, the main menu at left on the Home Page defaults to Open. Clicking Open causes the Sessions List to appear at right. This pane lists all sessions stored on currently mounted storage media.
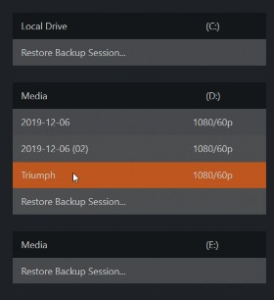
Available sessions are grouped under the names of the storage volume. The listing shows the Session Name and Format for each session, on each drive. Let’s look at the Sessions List briefly before we open a session.
Auto-Launch Session
Normally, a few seconds after launch, Viz Vectar automatically reloads the last session you were in, allowing you to basically power up into the last session unattended. You can, of course, interrupt this process by selecting another session or pressing any key. Advanced users can modify this behavior, either by designating a specific session to auto-launch irrespective of the most recent manual selection, or by disabling the feature entirely.
Important: Modifying this feature requires changes to the Windows® registry. We strongly recommend that edits to the registry be performed only by experienced persons, as the system can be rendered inoperable if this is done improperly.
To do this, add a new value named auto_launch_session to: HKEY_LOCAL_MACHINE\SOFTWARE\VIZRT\XD\ADMIN SCREEN
If you set the value for this key to the name of an existing session that session automatically opens on launch (instead of the last open session). If the specified session does not exist, the auto-launch feature does not proceed, by setting auto_launch_session to “_Disabled” (or some other suitable string) rather than a real session name you can effectively disable auto-launch.
Context Menu
Right-click a session name to open a context menu with two items listed in it: Rename and Delete. Be aware that the Delete function should be used thoughtfully, as it cannot be undone.
All content stored in the named session’s folders are deleted, including imported clips, images and titles, any clips captured to the default session folders.
Note: Content that is not local to the session but which was used in it is not deleted. For example, you may have added still images to your playlist directly from a USB thumb-drive, doing so without actually importing the files into the session. Those external files are not deleted.
Restore Session Backup
In another section of the Launch Screen (Session Page>Manage) there is a feature that allows you to back up the current session to another storage volume.
The Restore Session Backup link at the bottom of the Session List (for each drive) is provided to compliment this feature. To restore a session you have previously archived, click Restore Backup Session, and use the file explorer provided to select a SessionBackup file.
Click Open, and a progress gauge tracks the restoration process. In due course, the newly restored session is added to the Session List for the specified drive.
Tip: Restoring a session that has a lot of content can take considerable time. Be judicious, then, if considering a restoration shortly before a scheduled live production.
Opening a Session
Click or tap a name in the Session List to launch that session and display the Sessions Screen.
Shutdown
This selection provides Restart, Shutdown, and Administrator Mode links. The first two options are presumably self-explanatory, but the latter deserves a bit more discussion.
Administrator Mode
Selecting Administrator Mode from the Shutdown menu on the Home Page icon ring exits the live production environment, and takes you to a new screen that offers various functions and settings having to do with system maintenance and management.
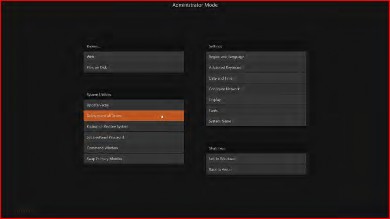
Administrator Mode: It’s worth considering why this mode is provided. Your Vizrt system plays a central role in your video productions. Though technically a computer, it is unwise to expect it to serve dual-duty as both a live production system and for general purpose applications. Administrator Mode serves as a demilitarized zone between the live production system and host operating system. It is important not to burden your system with software or accessories that compromise its performance or reliability. The Administrator Mode screen provides access to key settings and options, while limiting exposure to system options that could have that sort of negative impact.
Browse
-
Web: Opens the default system Internet browser.
-
Files on Disk: Opens a system file window.
System Utilities
-
Enter User Information: Shows a watermark on output before registration, so we encourage you to register early. Among other reasons, doing so serves to identify the unit to Vizrt as yours in case of theft, and also allows you to check for software updates that may have been recently released (The steps in the registration process were outlined in Windows Login).
-
Enter Feature Key: Allows you to enable optional features.
-
Display Serial and Hardware ID
-
Update: Vizrt may periodically provide software updates. Updates can enhance performance, security or even add useful new features. If the unit is connected to the Internet, clicking Update takes you to the Updates and Downloads webpage where you can locate the most recent software version.
Having done so, you can download and run the Auto Updater for the new version, or use the Download Tool which allows you to store the related files on another later transfer to your Vizrt live production system.
Defragment All Drives
Over the course of lengthy use, data on hard drives devoted to audio and video storage tends to become fragmented, which degrades playback performance. Defragmenting corrects this condition.

You could think of your hard drive as being like a shelf in your library. As time goes along, the shelf fills with books. Some are quite large, others smaller – just as media files may be larger or smaller. As time goes along, you decide to remove books you have finished using from the shelf, in order to make room for new additions. You remove a book here, another there, opening up gaps between the remaining books. This makes some shelf space available by creating gaps between the remaining books. Sadly, another large new book may be too big to fit in any one of the gaps.
A foolish librarian might tear the new book into smaller sections, just big enough to fit into the open spaces on the shelf. This would obviously be unwise. When you wish to refer to the book later, you will waste a lot of time locating and assembling its sections before you can access it. How much better it would be to slide the remaining books closer together, combining all the free space first. Unfortunately, computers are foolish librarians. They tend to want to fill in all the gaps in their storage areas, even if this requires literally shredding your book (in reality, large video files from your sessions) into tiny fragments.
Defragmenting the storage volume has the same effect as sliding the books together, resulting in one or more larger gaps. The result is that the system doesn’t have to frantically search in many different places to assemble the video streams from your recorded session.
Tip: Defragmentation can sometimes take considerable time, so it’s not something you want to begin just before an important event.
-
Backup or Restore System: Provides a complete set of Backup and Restore features are available to help in the event of an unforeseen problem. We strongly encourage you to protect against any unforeseen occurrence by using the Backup feature soon after registering.
-
Set Live Panel Password: Configures the password for access to the web pages and network control features provided by the unit.
-
Command Window: Opens a system command line window, allowing you (among other things) to use advanced commands to manage your system and network settings.
-
Swap Primary Monitor: Shows the Live Destkop on the monitor designated as primary.
Settings
-
Regions and Language: Opens the system language control panel.
-
Advanced Keyboard: Opens the system keyboard controls panel.
-
Date and time: Opens the system keyboard controls panel.
-
Configure Network: Opens the system network controls panel.
-
Display: Opens the system display controls panel (useful for configuring multiple monitors, among other things).
-
Fonts: Opens the system font management console, allowing you to add that new font your client wants you to use for their title pages.
-
System Name: Modifies the current name when the Change button is clicked. It can be very useful to modify the default name by which your system is identified on the network. This is especially true when more than one unit might be on the same network. The System Name feature opens the System Properties console’s Computer Name tab.
Shutdown
-
Exit to Windows: Leaves Administration Mode screen and displays the standard system desktop.
-
Back to Vectar: Exits Administration Mode, and return to the Launch Screen.
Help
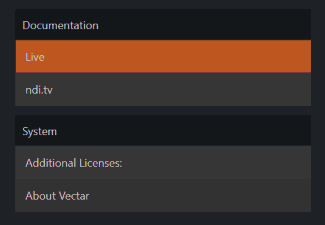
Select the Help icon to reveal links to open manuals and other information. The primary User Guide is found here, as well as documentation for other software.
Click the Additional Licenses Agreement link to review end user license requirements, or the About link to list software version information, credits and acknowledgments.