Viz Vectar User Guide
Version 1.0 | Published May 07, 2020 ©
Configuring Audio
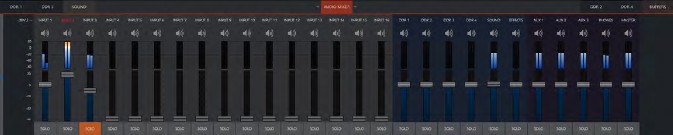
Click the Audio Mixer tab (centered in the lower third of the Live Desktop) to reveal audio features, including configuration controls for all internal and external audio sources and outputs, including streaming.
In addition to internal sources and outputs, the Audio Mixer supports sixteen external multi- channel audio connections, each of which can be assigned to a nearly endless list of audio source types.
Each input and output has its own control column with Volume slider(s), VU meter(s), and other convenient features. An identifying label sits at the top of each control panel. Roll the mouse pointer over the label to reveal a Configuration button (gear) at right which, when clicked, opens the Configuration panel for the input.
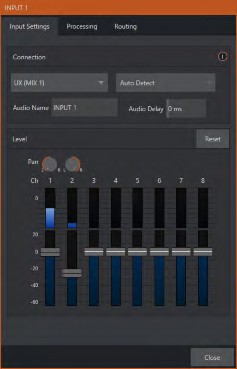
In this later panel, click the Connection menu to display options for an input. The local hardware inputs are listed in the Local group as IN 1, IN 2, etc.).
Local connections can be assigned to listen to an SDI embedded audio source connected to the corresponding video input, or analog audio inputs provided on the backplane.
Choosing a local hardware source causes another menu to be displayed at right, which is where you can choose whether to connect to sound from the Embedded (SDI) or analog hardware input (at Line or Mic level).
Note: Analog audio levels conform to SMPTE RP-155. The maximum input/output level is +24 dBu and the sample rate is 48 kHz.
Beyond this, you have the option of assigning the input to sound delivered over the network from any NDI or other supported network audio source (such as Audinate’s Dante™ sources; requires a third-party driver) available on the system.
Tip: Most numeric controls in the interface can be reset to their defaults using Shift + double-click on the control knob. The default value for Gain sliders is 0dBVU.
Returning to the Input Configuration panel, note that it holds both basic and advanced audio features. In the former category, a single multi-channel volume fader appears below the VU meter for each source and output. On first launch these are at minimum gain level; after adding sources, adjust the faders as required.
Audio Headroom
In digital audio systems, levels exceeding legal values are clipped (uniformly assigned the maximum value). This results in audible issues that cannot be easily corrected later. For this reason, it’s customary to configure normal operating level (also referred to as the alignment level, and sometimes, nominal level) well below the clipping limit – sufficiently so that occasional excessively loud sounds (say, loud laughter or applause) can be accommodated without risk.
This range above between nominal level and the highest possible level is commonly referred to as audio headroom. What is considered a suitable headroom allowance can vary from one locale to another, in different industry applications, and even in individual studios. Vectar follow well- established audio conventions, providing 20dB of headroom above nominal level (+4dBu at 0dB on the VU scale).
Tip: Confusion can sometimes arise because different calibration scales are common in various audio realms, and even for different device types and software.
For example, analog mixers commonly show levels on VU scales indexed as just described. In contrast, digital devices and editing software usually display levels in dBFS (Decibels Full Scale) with 0dBFS – the absolute maximum signal level that can be recorded – at the top. VU meters have selectable indexing, allowing you to view a traditional dB VU scale or dBFS as you please (see Output and Primary Bus Controls).
Whatever scale you choose, use Volume controls (and, for Mic connections, the Gain controls in the Configuration panel) to avoid over-modulation. The Compressor/Limiter feature (also located in the Audio Configuration panel) is another powerful tool to help you prevent clipping (see Advanced Configuration).