Viz Vectar Plus User Guide
Version 1.3 | Published November 18, 2022 ©
Secondary Command Group
The Command control group in the second stripe (counting from the stripe nearest the operator) also has unique functions, which is why we refer to it as the Secondary Command group.
Secondary Command group Items
NUMBERPAD
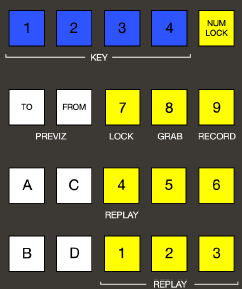
Unlike the primary Command group, the secondary Command group includes a number pad. We’ll discuss basic number input functions soon but, first, observe that certain buttons in the number pads have labels below them identifying alternate functions.
NUM LOCK
This is why (in contrast to additional number pads provided on the four stripe surface in particular), the 0 button in this number pad is replaced by NUM LOCK.
Not surprisingly, when NUM LOCK is lit, all number pad buttons perform simple numeric input. When NUM LOCK is off however (as it is by default) number buttons with alternate labels perform their secondary operation. Let’s discuss these now.
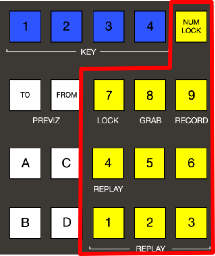
LOCK (7)
With NUM LOCK off, this button lets you lock or unlock other control surface buttons. Pressing LOCK lights all currently locked buttons. While the LOCK button is lit, pressing any other control surface button toggles its locked/unlocked state, preventing unintentional changes.
GRAB (8)
Pressing this button (with NUM LOCK off) triggers the software’s main Dashboard GRAB button.
Tip: The main GRAB feature grabs stills from selected primary (MIX) outputs, as configured in the interface. To grab other Switcher sources (excluding M/Es), hold down the CTRL button on the control surface while pressing any KEY row button for the desired source.
RECORD (9)
Pressing this button (with NUM LOCK off) triggers the main Dashboard RECORD function. You should be aware that, to prevent unintended interruptions in recordings, you must hold SHIFT while pressing RECORD on the control surface to stop recording.
Tip: To alert you to this safety measure, SHIFT flashes if you press RECORD alone during capture.
REPLAY (1, 2, 3, 4)
Recent editions of Viz Vectar Plus software provide powerful instant replay workflow for any source with a recorder assigned to it.
When a Recorder is assigned to a source in its Input Configuration panel, and you also enable the associated Instant Replay switch, special replay buttons appear below the corresponding Program and Preview row buttons in the Live Desktop Switcher. Viz Vectar Plus control surfaces provide the same functionality as follows:
-
To perform an instant replay from a Switcher source, hold down the CTRL button while pressing the PGM A/C row button for the source. Double the length of the replay by holding down SHIFT along with CTRL.
-
Or, defer playback of the instant replay as follows:
-
Add the replay clip to the DDR playlist by clicking the source’s PREV B/D row button (rather than the PGM row button) with CTRL (or CTRL + SHIFT) held down.
-
Then, when you’re ready to trigger the instant replay, press CTRL + AUTO to initiate the DDR’s Show On operation.
-
This powerful workflow is ideal for replays from individual Switcher inputs. However, the four MIX outputs (which typically includes Program output as MIX 1) do not appear on the Switcher button rows – so another method is required in this case:
-
Press a button numbered 1-4 in the Secondary Command Group (with NUM LOCK off) to trigger a replay from the corresponding (MIX 1-4) recorder.
-
Hold down CTRL when doing the above to defer playback of the replay clip.
-
Add SHIFT to either of the above to double the length of the replay clip.
Tip: If you execute an instant replay operation while another replay is incomplete, the newer replay angle replaces the former one on output and the duration of the replay is extended.
NUMBERPAD (NUM LOCK ON)
Having covered the alternate (NUM LOCK off) number pad button functions, let’s consider the value of the Number pad in connection with running macros.
-
Any macro can be triggered by pressing a three-digit number sequence on any of NUMBERPAD on the control surface.
-
Open the Macro Configuration panel in the Viz Vectar Plus Live Desktop, and select a macro from the list; click a Listen box at the bottom of the panel, then type a three digit number, such as 123.
-
Each Number pad on the control surface is treated independently. Thus the very same numeric entry can trigger different macros from the number pads in different stripes.
Tip: If you start to enter a number, then change your mind, press any button outside the number pad to cancel the entry.