Viz Vectar Plus User Guide
Version 1.3 | Published November 18, 2022 ©
Media Players
Your live production system includes several integrated media players, providing saving, convenience and opportunities for automation. Media player controls are accessed from the large tabbed panes at the bottom third of the Live Desktop, or from tabs with similar features that appear in the Input Configuration panels of each media player.
As well as sound players (accessed from the SOUND tab), you have DDRs (clip players) and/or GFX (graphics) players and four DDRs.
Media Players can handle numerous media types.
DDRs can display:
-
Video clips: Including motion titles such as scrolls, and longer format movies.
-
Titles and still images: Editable title pages prepared using Photoshop®, CG pages prepared as image files, or other still imagery, photos, graphics and more.
Both sound players and DDRs can play standard .wav or .mp3 format audio files.
Hint: DDR is short for Digital Disk Recorder, a legacy term that is technically incorrect since these DDRs don’t directly support recording.
Playlists
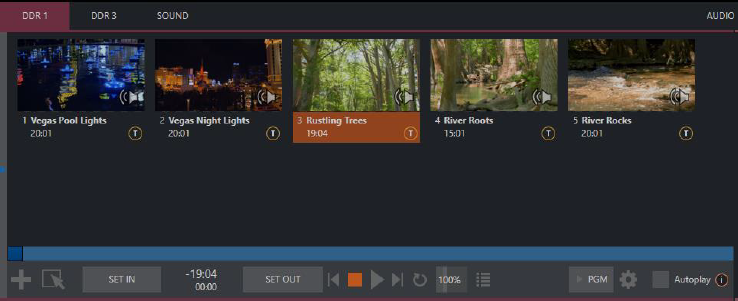
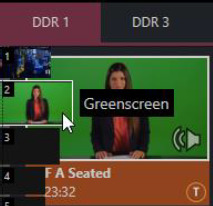
The main feature of all media players is a storyboard-style playlist, used to organize content for use during live productions.
This arrangement offers easily visible thumbnail icons for each entry. A scrollbar to the right reveals long playlists, as required. Icons in the playlist can be re-ordered using the familiar drag and drop workflow. The playlist can also be altered during playback (Note that if the currently playing item is removed, playback stops immediately).
An Alias (by default, the item’s filename) is displayed below the icon, along with the item’s duration.
Tip: The duration shown is the play time after trimming, and thus may be less than the file length on disk. In such cases, the In and Out markers on the Scrub bar (spanning the width of the playlist immediately below it) show the effect of trimming operations, while the full width of the Scrub bar depicts the total length of the file on disk.
Clicking an item selects it. The play position is automatically set to the In Point on selection. Standard SHIFT + click and CTRL + click multi-selection operations are supported, and all selected items are denoted by a white border around their icon.
When a media player is stopped, its output to video monitors tracks selection and trimming operations. The current item is the media player’s output, and appears on monitors dedicated to the player, if any. Only one item can be displayed on output at a time; the frame surrounding the thumbnail icon for the currently displayed item is illuminated. Double-clicking a thumbnail (or clicking the Play button) begins playback from the In Point of the current file.
Tip: Double-clicking elsewhere in the playlist pane opens the Media Browser (hold down SHIFT when clicking to open a system file explorer instead of the custom Media Browser).
Note that even still images and static title pages added to the playlist are given a play duration. The default duration for these items is five seconds. Duration can be adjusted on an item by item basis (or collectively for multi-selected stills or title pages).
During playback, the footer of playlist items illuminates as each is played in turn. When necessary, the playlist pane scrolls to display the icon for the currently playing item. A progress bar is displayed beneath the currently playing thumbnail, and the Scrub bar knob also tracks playback progress.
Tip: Selection status is independent of which clip is playing. Selected items have a white border in the Playlist pane.
Automatic Clip Trimming
Clips (not still images or titles) in a playlist are automatically trimmed to accommodate the addition of transitions between clips when necessary (If there are no unused frames to display during a transition, motion appears frozen during the transition, which is usually undesirable.)
To reset a clip to its full file-length boundaries, press the G key (multi-selection is supported, too).
File Operations
-
Click the Add Media (large +) button at left beneath the playlist pane to open a custom Media Browser. Alternatively, double-click in an empty part of the Playlist pane.
Note: Add Media also supports compatible third-party asset management systems. Hold down the keyboard CTRL key when clicking the + sign to access these tools.
-
Newly-added files become selected items in the Playlist pane.
-
Drag (appropriate type) file(s) from one module’s playlist to another module.
-
Right-click in the Playlist pane to show a menu with context-relevant items from the following list (operations affect selected playlist items):
-
Cut
-
Copy
-
Paste
-
Remove
-
Split at Current Frame
-
Audio Level (clips with sound and audio icons) – note that the default per-clip audio level applied to imported media files can be set in the Dashboard Options menu.
-
Duration
-
Speed
-
Use Current Frame as Icon
-
Angle
-
Automation
-
Edit Title
-
Properties
-
Transcode
-
Add to Export Media
-
Send to > Buffer n (Still image and title icons – see Speed)
-
-
Standard Cut, Copy, Paste and Delete keystrokes are supported for playlist entries.
-
Unplayable (missing, corrupt, or unsupported) file icons are dimmed.
Tip: Multi-selection is supported for most operations, including Set Duration (applies to Still and Title only).
Speed
The playlist context menu item Speed permits you to give each clip a custom playback speed. It’s important to realize that this Speed setting is separate from the Media Player’s primary Speed control, located in the footer, below the Scrub bar. The latter setting applies to all playlist items.
Both Speed settings are applied during playback. So, for example, if you play a clip with both Speed values set to 50%, the actual playback rate is just 25%.
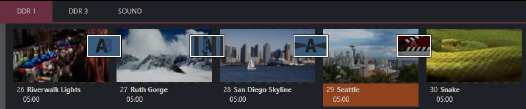
Macro Triggers
We’ve discussed in Input Configuration how you can assign macros to any Switcher source, including Media Player. Beyond this, though, the playlist context menu item Macro Triggers allows every item in a playlist – every clip, still image, audio file or title page – to control its own unique macros.
-
Any macro you can record or create can be triggered automatically on either playback or end of play for any and every individual playlist item.
-
Multi-selection support in the playlist makes it a breeze to assign macros to multiple items.
Tip: You can use this capability, for example, to automatically show titles for certain types of clips and not others, give them different title page types, selectively adjust Proc Amps or apply LiveMatte keying automatically when needed for only certain items.
Transcode
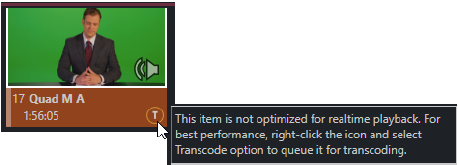
When clips are added to the DDR playlist, their suitability for real-time playback is evaluated. When appropriate, a small T icon is added to the entry’s label, indicating that the item can be transcoded to a more suitable format.
To transcode the clip, select the Transcode option in the clip’s context menu. The process proceeds in the background, and the DDR’s link to the original file is automatically replaced when it is complete.
Note: Transcoding operations support multi-selection.
Properties
Display Name

The Properties panel allows you to edit the Display Name of a file in the playlist. The Display Name fields defaults to the filename, but is a local alias, or nickname. Thus, editing the name does not change the name of the file on your hard drive. Roll the mouse over the icon display name to see the true filename and its path.
Comment
The Comment permits you to supply metadata with the file.
Tip: Both the Display Name and Comment box content for the selected clip are available as DataLink keys, which can in turn be served to live title pages or supplied along with the file to the Publish module.
Trimming Clips and the Scrub Bar
Just beneath the playlist pane is a full-width Scrub bar. The width of the Scrub bar represents the full run time of the current clip or other media file.
-
Drag the knob to change time position.

In and Out Points for newly added Media are automatically adjusted when necessary to accommodate motion when transitions you add require it.
-
To reset the file to its full length, press the G key.
-
To trim a clip manually, move the knob to the desired frame and press I or O on the keyboard (to set the In Point or Out Point, respectively).
During playback, the Scrub bar knob traverses the span between the In and Out Points.
- The duration (taking into account trimming operations) is displayed as a countdown in the upper of two timecode fields at left.
- The lower time display shows embedded clip timecode.
-
Drag the knob to move quickly backward or forward in the clip.
-
Audio is normally muted during scrubbing.
Hold down CTRL to unmute it. -
Hold SHIFT while dragging the Scrub bar knob to increase precision.

Growing files
Quicktime only: Clips that are still being captured, continue to grow even after addition to a DDR playlist. These growing clips, featuring the red recording overlay can be freely extended beyond the bounds of the in and out points they were given when initially added.
It can be very useful to recall that you can easily split clips using either the corresponding context menu item, or the / key.
Time-Shifting
You can use growing clips to time shift your program:
-
Initiate Recording.
-
Add the captured clip to a DDR.
-
Press G on the keyboard to clear its Out Point.
-
Trim the In Point to taste.
-
Assign the DDR to an output.
-
Wait some length of time and then begin playing the clip (All this could easily be performed by a macro, too.)
Alpha Channel Support
For files with transparency, such as 32-bit image files, use non-premultiplied (or straight) alpha channels in Media Players (premultiplied files will not give correct results when overlaid on other imagery).
Tip: Monitors can optionally show a checkerboard pattern behind transparent content.
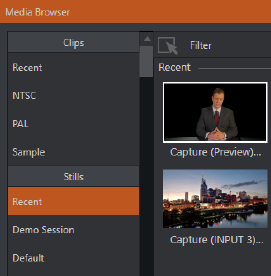
Media Browser
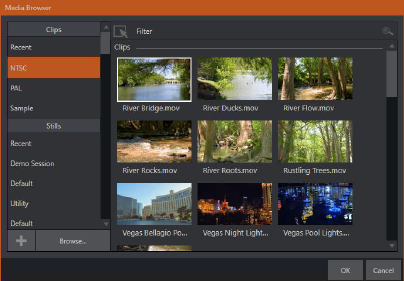
The custom Media Browser provides easy navigation and selection of content on your Vizrt live production system or on the local network. The Media Browser appears anywhere in the Live Desktop that you might wish to select content, transitions or effects for use in your project (such as the Media Players, LiveSet and Transitions sections).
Its layout is principally comprised of two panes at left and right that we’ll refer to as the Location List and File Pane.
Location List
The Location List is a column of favorite locations, grouped under headings such as LiveSets, Clips, Titles, Stills, and so on.
Session and Recent Locations
The custom Media Browser provides easy navigation and selection of content on your Vizrt live production system or on the local network.
The Media Browser appears anywhere in the Live Desktop that you might wish to select content, transitions or effects for use in your project (such as the Media Players, LiveSet and Transitions sections).
Its layout is principally comprised of two panes at left and right that we’ll refer to as the Location List and File Pane.
The Media Browser is context sensitive, so the headings shown are generally appropriate for the purpose for which they were opened. A list of sub-headings appears under these main headings in the Location List. These may correspond to named sessions, or groups of content. When you select a sub-heading, the right-hand pane (the File Pane) is populated.
In addition to locations named for your stored sessions, the Location List includes two notable special entries. The Recent location provides quick access to newly-captured or imported files, saving you time hunting through a hierarchy to find them. The Session location (named for the current session) shows you all files captured in the current session.
Tip: Clips that are being actively captured are marked with a red record overlay. These clips continue to grow, and can be re-trimmed after their addition to DDR playlists or the Publish Queue.
Add Media Location & Browse
Clicking Browse opens a standard system file explorer, rather than the custom Media Browser.
Tip: To jump to the standard system file explorer (rather than the custom Media Browser) from a Media Player, hold keyboard SHIFT while clicking the Add button.
File Pane
Icons appearing in the File Pane represent content located inside the sub-heading selected at left in the Locations List. These are grouped under horizontal dividers named for sub-folders, which allows related content to be organized conveniently.
File Filters
The File Pane view is filtered to show only relevant content.

An additional filter appears above the File Pane. This filter quickly locates files matching criteria you enter, doing so even as you type. For example, if you enter wav into the filter field, the File Pane displays all content at the current location with that string as part of its filename. This would include any file with the extension .wav (WAVE audio file format), but also wavingman.jpg or lightwave_render.avi.
File Context Menu
-
Right-click on a file icon in the right-hand pane to show a menu providing Rename and Delete options.
Be aware that Delete really does remove content from your hard drive. This menu is not shown if the item clicked is write-protected.
Player Controls
Transport controls and playback settings are located directly below the Playlist and Scrub bar.

Time Display
During playback, the uppermost timecode field beside the transport controls displays the current countdown time for active playlist item or for the entire playlist when the Playlist mode button is enabled. (The time show below is the embedded clip timecode.)
-
Left-click the field to type in a timecode, then press ENTER to jump to that point in the file (or playlist).
Tip: The time display and Scrub bar color provides visual indication that the playback is nearing its end. Ten seconds before the end of play for the current item, the digits in the time display and the Scrub bar background turn amber. With only five seconds left, the color changes to red.
Playlist Mode

Normally, Media Player playback stops when the Out Point of the current playlist item is reached (unless Loop is also enabled, in which case playback of the current item repeats until manually interrupted).
-
Clicking the Playlist mode button tells the Media Player to operate in continuous play mode, advancing through the playlist items until the last one has played.
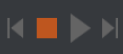
Transport Controls
A simple set of controls beneath the playlist pane provides all playback-related functions:
-
*Previous button – go to previous playlist entry
-
Stop (clicking Stop when already stopped goes to the first frame)
-
Play
-
*Next button – go to next playlist entry
-
(Not shown) – Double-click an entry in the playlist pane to begin playback at the start of that playlist entry
Previous, Next and Presentations
It’s extremely useful to realize that, since transitions can be added between playlist items, pressing Previous or Next likewise employs transitions. Whether playback is underway or stopped, and whether the items are clips or stills, you can use Previous and Next to transition backward and forward between items.
This provides a perfect way to manage presentations using Media Players, hence our inclination to refer to this as the Presentation workflow. With macros (and perhaps MIDI buttons) driving the presentation, this makes it easy to handle control graphics and video for seminars, to update weather graphics, and more.
Tip: In addition, since transitions support transparency, you can queue up a series of titles in a playlist, display it in a DSK, and transition backward and forward between titles interactively using Previous and Next.
Speed

The DDR supports variable speed playback between 25% and 400% of the normal rate (100%). Speed can even be adjusted during playback.
Note: Certain highly compressed video file formats cannot successfully be played back at rates beyond 200%, even though Speed value is set to a higher value.
As is common for numeric input controls in the interface, drag left or right to adjust the Speed value, or click the slider to access a direct entry field allowing you to type a value using the keyboard.
Tip: Press SHIFT while double-clicking Speed to quickly reset to the 100% default.
Loop
Enabling Loop repeats playback continuously (respecting the Single switch state).
Autoplay
When enabled, the Autoplay switch has several important effects. First, it initiates playback automatically when the associated Media Player is placed on Program Out by a (Switcher) Take or Transition operation either directly (as a Switcher row selection) or indirectly: Such as by being displayed via an M/E channel or DSK operation.
If player output is displayed on Program the reverse Switcher transition occurs automatically as the end of play approaches, whether the Out Point of the current item for Single play or the end of the playlist (this behavior is optional for M/Es – see Mix and Effect Modes and File Menu).
Note: Unlike Switcher transitions, the DSK out effect does not occur automatically as the end of play approaches.
In either case, when the Media Player is in standard operating mode (as opposed to Playlist mode), the current play position advances to the next item after playback is automatically stopped.
Show On (…)
Another extremely powerful feature is nestled beside just to the left of Autoplay in the footer of each Media Player. Labeled PGM by default, this feature can target M/Es as well as the Program row of the main Switcher. It provides unique playback and display abilities that make instant replay a thing of joy, as well as serving other purposes. Click the Configuration button (gear) beside the SHOW ON button to display the panel.
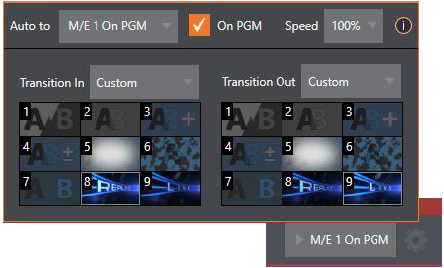
The largest part of this panel contains transition bins for custom In and Out transitions which are used to display the current clip. Select Custom from the Transition In/Out menus to activate these bins. Otherwise, you can select Cut or Current options.
Note that the bin content displayed is synced with the Background transition bin for the target video bus, be it PGM or a designated M/E. Selecting Current uses the current selection in the Background transition bin of the target bus.
Tip: Unlike other transition bins, these icons do not show a + sign gadget on rolling the mouse over them. To replace the effect in slot, modify the content of the Background transition bin of the target you have selected for SHOW ON.
Once configured, clicking the SHOW ON (…) button does the following:
-
Swaps the current BG transition for the main Switcher or a designated M/E for a custom Animation Store (such as "Replay!") or other specified transition.
-
Transitions the current DDR selection in on the main Switcher’s PGM row, or the A row of an M/E.
-
Plays the clip (overriding the DDR’s own Autoplay setting, if necessary).
-
Transitions back to the original program using a custom transition (such as "Live!) when done.
-
Swaps the Background Transition back to the original selection.
Tip: Using Replay complementary features, SHOW ON functionality can be triggered by adding a clip (with custom length and speed defined in the Replay menu) from any source being captured to a DDR. Thus a single button click or number pad key press can trigger all of this.
M/E on PGM
In a variation on this operation, the On PGM switch, which is available whenever the target is an M/E, provides a different mode of operation. In this case, the output of the Media Player is immediately selected as the top row source of the target M/E, and the M/E is transitioned in on the main Switcher’s PGM (Program) row.
This unique feature allows you to use the main Switcher to display the Media Player output – including instant replays – with KEY layers (such as scorebugs) composed above it.
MEMs
Another very useful feature of Media Players is the MEM Bin, which provides quick and convenient access to stored playlists. MEM slots also store the state of various Media Player controls.
To display the bin, roll the mouse pointer to the (nearest) side of the screen in a tabbed Media Player or the Audio Mixer tab (for Sound and Audio, MEM slots are presented on the left side of the screen only).
When you change playlists by selecting another MEM slot, it’s almost as though you are accessing another Media Player. Use MEM slots for quick access to different categories of content for use during a live presentation, playlists prepared for different clients, or for completely different programs you produce. MEM slots can be named and can also display a small representative image (taken from the first entry in the playlist). As you move the mouse over a MEM slot icon it expands, providing an enlarged view of that playlist item’s first frame. To populate a new MEM slot, click a blank icon.
To name a MEM slot, right-click it to open a context menu, and select Rename. Other menu options include Delete, Export and Import (the file is saved with the extension .pst).
Previewing MEM Slots
At times you may wish to preview the contents of a different Media Player MEM slot without disrupting playback of the current playlist. When a clip is playing, a small white play indicator is shown over the icon for the currently selected entry in the fly-out MEM slot bin.
If you select a different MEM slot while the current clip continues to play, the playlist bin view updates, but the original item continues to play. The transport controls (Play, Stop, etc.) at the bottom of the tab remain *dedicated to the active playlist – that is, the one actually playing, rather than the one currently being previewed in the tab.
To change to the previewed MEM slot immediately – ending playback and display of the current item – you can do so by any of the following means:
-
Double-click an icon in the previewed playlist.
-
Or press Stop twice, and then Play (playback of the active item ends with the first Stop command; the second sets the playhead to the start of the current item in the new playlist).
Normally, pressing Stop a second time when a clip is playing resets the playhead to the start frame in the same clip. The exception above occurs only when you are previewing the content of a different MEM slot during playback.
Network Sharing
Default media file folders are maintained for each session. This approach makes it easy to locate items using the Custom File Browser, and is also convenient for other file management purposes.
The default media locations for the active session can be made accessible across your local network. Share Media Folders and Buffers in the File menu is on by default, and allows network clients to update media in the active session, even while live. The following session media locations are dynamically shared:
-
Audio
-
Clips
-
Stills
-
Titles
-
Buffers
Note: Several non-session dependent locations in the main application folder are also shared. This allows applications running on external systems to export directly to the local system. These network shares are unaffected by the Share Media Folders and Buffers setting.
When suitable content is added to these shared folders, the Media Browser provides immediate access to it. Select the session name (under Clips, Stills, etc.) in the Location List at left to reveal the updated files in the File pane at right.
This is wonderfully convenient but should be approached with a measure of common sense. Network bandwidth has fixed limits. Be judicious when transferring large files while live. You may be using the network for many purposes – Including streaming, or NDI video feeds from a 3Play® or other third-party software, as well as any unrelated traffic on the network.
Note: Transferring very large files across a network can time-consuming and impacts both disk access and network resources. When these resources are already heavily taxed, dropped frames on streaming or video outputs, or sluggish response to controls may result. We strongly urge you to gather media assets before starting your live productions.