Viz Vectar Plus User Guide
Version 1.3 | Published November 18, 2022 ©
Record
Vizrt live production systems provide a great deal of flexibility when it comes to capturing your program, selected elements of it, and a wide array of internal and external sources (with embedded timecode). Using IsoCorder™ technology, Viz Vectar Plus delivers powerful recording capabilities.
As Viz Vectar Plus' primary outputs are configurable, you can use them to capture Program, Program (Clean), individual Switcher sources, M/Es, and more.

Recording is easily enabled and disabled by clicking the large RECORD button in the Dashboard.
During capture, a nearby time counter tracks the length of clips recorded with the current base filename, and a horizontal VU meter beneath the button assures you that you are capturing audio.
Note: It is not necessary to interrupt recording to add a clip that is being captured to a DDR playlist or the Publish Bin. Clip icons show a red recording indicator on clips currently being captured in playlists, the Publish Bin, and in the Media Browser.
Record Configuration
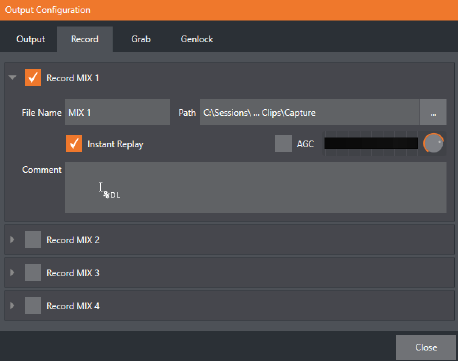
Before you begin recording, you will want to determine what to record, where to record it to, and so on. To support IsoCorder’s flexible ability to capture almost anything, settings and controls for recording are provided in the individual Input Configuration panels as well as the Output Configuration pane. Click the Configure button (gear) for the control panel of the source you wish to configure to access these settings.
Capture Controls
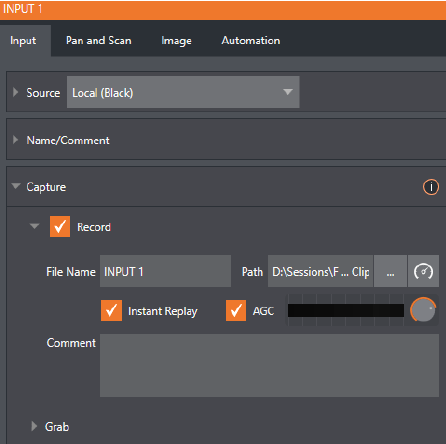
Whether you are setting up a recorder for a video input or output Mix, the Capture control group features are the same.
-
A switch at the top is used to enable or disable the recorder.
-
Filename and path text boxes appear just below.
-
A convenient Drive Speed Test button appears to the right of the Path field. Click it to open a utility that lets you evaluate the speed and capacity of your storage volumes.
Note: The same source cannot be selected for multiple recordings. For example: IN 1 cannot be selected as the source for two recorders.
Filename and Comment
IsoCorder uses the source name to supply the default filename for each recording (names are numerically incremented automatically as well), but these can be edited. Conveniently, DataLink key system allows you to insert dynamic values from real-time production sources into the filename.
For example, every recorded or grabbed file can automatically incorporate a date stamp, identify the input selected on the Program row at the time of capture, and so on. This is useful not only in locating files from specific sources later, but also when posting media to social media services using the Export feature.
Note: IsoCorder captures a low resolution preview file along with the high-quality recording. We do not recommend deleting or moving these supplemental files when using the recordings on a Vizrt product, as doing so results in higher resource usage during live production.
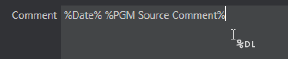
The Comment entry can likewise use DataLink values, and in turn can be used to provide metadata to title pages that refer to the captured clip’s comment.
Path
Click the three dots at right beside the Path field to select from available storage volumes as targets for the recording.
Caution: It is recommended that any single drive be tasked to capture one or two video sources at most. A warning message is displayed if you exceed this number when assigning Destination settings. You are allowed to exceed this limit, however, when you are confident that very fast volumes are capable of handling the load.
Audio Level
The Audio Level control lets you set the volume independently for each source you capture, and feature a convenient AGC option (Automatic Gain Control).
File Format
IsoCorder records a high-quality Quicktime file (you can use the Transcode function in Export to supply files in a number of different formats, when necessary).