Viz Vectar Plus User Guide
Version 1.3 | Published November 18, 2022 ©
Macros and Automation
Macros smooth out your workflow, reduce complex operations to a single button press, and make it easier to produce sophisticated programs.
-
Macros provide many opportunities for both workflow streamlining and creative applications. Macros can also reduce or eliminate operator errors.
-
Macros can automate most operations. Preload and play content, modify audio settings, automate complex switcher sequences or perform synchronous operations.
-
Record any sequence of events as a macro and play it back with one click, a keystroke, control surface operation, or Hot Spot.
Working with Macros
The usefulness of macros places them prominently in the Dashboard at the top of the Live Desktop, the Macros menu.

Creating a Macro
To create a macro
-
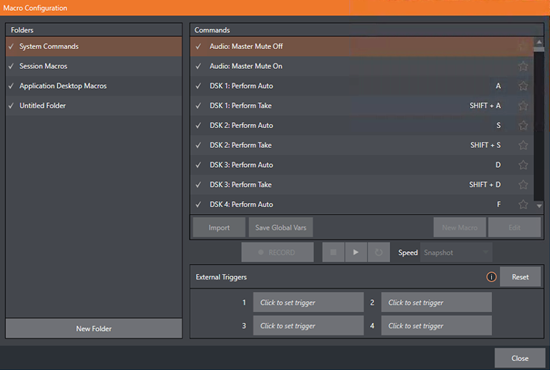
From the Dashboard (menu bar at the top), click Macros > Configure Macros to open the Macro Configuration menu.
-
Select a folder in the Folders panel.
This will contain the new entry (or add one, with New Folder below). -
Click New Macro (below the Macros bin on the right).
-
Define the macro by clicking Record button at the bottom of the panel.
-
Perform the sequence of operations you wish to include in the macro.
You can use mouse, keyboard, and Control Surface operations. -
When finished, click the Stop button to complete recording.
-
Test the new macro by clicking the Play button.
Notice that an animated bar in the background of the macro entry in the list tracks playback progress.
You can modify the playback rate using the menu next to the Record button. You can even set macros to loop using the button at extreme right.
Tip: You can record a macro that includes other macros. Depending on your order of operations, you may need to re-highlight the newly recorded macro in the list to show its Stop control (to end macro recording).
Macro Variables
Using a variable name, rather than fixed name, a macro can easily be repurposed. When the value assigned to the variable is changed (either within the macro or by another method), the macro can rapidly be empowered with a new task.
For example, suppose you have a macro that sends multiple shortcuts to DDR1. By replacing DDR1 with a variable name, the macro can retarget the shortcuts.
Variables also support expressions, allowing values to be updated by operands and more.
Conditional (IF) and comparison expressions (=,>=, etc.) are also valid, as are string operations (such as LEN, TRIM and SUBSTRING), wildcards, and conversion to and from DataLink keys and values.
Both global (per session) and local (valid during execution of their parent macro) variables are supported.
Global Variables
Global variables can be invoked in any macro you execute.
-
They can be created and their values can be set or modified in two ways:
-
Using the convenient Configure Global Variables dialog (in the Macros menu).
-
Use the shortcut “set_global_var” with a value like “myvar=4” (both without quotation marks)
-
-
Global variable names and values persist within a session - even after you shut down the system.
-
A Save Global Variables to Macro option is in the context menu of the Macro Configuration (right-hand pane).
There is also a Save button below the settings. -
Global variables are saved for export, editing or later recall.
Local Variables
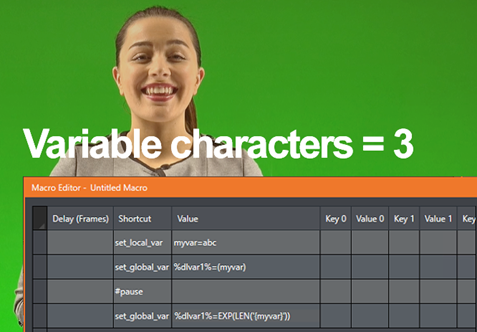
Local variables are not persistent. They existing only during the execution of a macro.
They are exclusively created and populated using the shortcut command set_local_var within a macro.
Note: It is recommended to use unique variable names. If a local variable and a global variable have the same name, the local one is used.
-
Although a local variable is only useful in the macro it is defined in, there is an important exception: Local variables extend to macros run by the same parent macro.
This lets you write ‘generic’ macros with targets or values to be provided later.
For example, a macro might include a shortcut like ddr{DdrNum}_play, with no value supplied DdrNum.
However, if you run this macro from one which does provide the value, the child macro derives the necessary value for DdrNum from the parent. -
Outside the defining macro and those it spawns, though, local macros have no lifecycle’
-
You can use a single local variable name in simultaneous macros with different values.
Tip: It can be useful to convert a global variable to a local one.
For example, you might want to increment a value as a macro runs without affecting the global variable's value.
You can do this by copying the global value to a local variable, and referring to the local variable on subsequent lines.
Conversely, a similar approach allows modifying of a global value once a macro begins, without effecting the local variable.
Speed and Snapshot Mode
Speed
![]()
-
Speed menu settings enable modifying the playback rate of your macro.
Snapshot
When you choose Snapshot as the macro’s speed, you essentially force it to jump to its end result as fast as the system can get there.
Snapshot mode is very useful for macros that configure the system to a particular state.
As an example, you might want to quickly disable LiveMatte for all media players at once. The possibilities are endless.
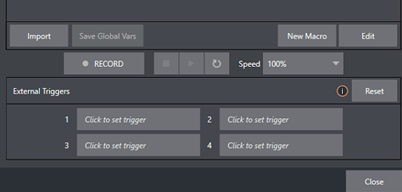
Triggers

The External Triggers control located near the bottom of the Macro Configuration panel allow you to configure one or more ways to launch macros. For example, select a macro, click in one of the Trigger boxes, and then press a suitable keyboard shortcut to assign it to that macro.
Live Panel Builder
The LivePanel Buttons add both the convenience of presetting macros and ease of editing, without leaving the user interface.
-
Right click your mouse over any viewport to display the context menu.
-
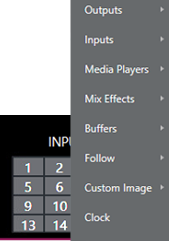
Hover your mouse over LivePanel and eight preset options appear.
Configuring LivePanel Buttons
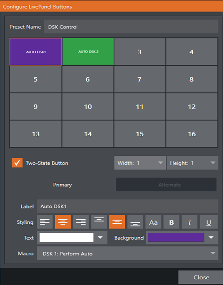
To configure Live Panel buttons
-
Right-mouse click over the viewport showing the preset buttons.
-
From the context menu, select Configure.
-
Edit the size of the buttons, styling properties, the color of the buttons and/or text as required.
Usage Notes
-
You can select the Width and Height of your buttons.
Changing the size will 'absorb' other buttons, but they will not lose their properties. -
The Two-State Toggle Button checkbox enables toggling on/off your macro with a single button push.
-
The Label and Styling options provide many background color choices.
A Choose Image option can be a helpful to remind yourself of what is on your viewport. -
In the Macro field, you have the option of using System Commands or Application Desktop Macros from the pull down menu.
For further details, see section LivePanel.
Managing Macros
The Macro Configuration panel contains management features for Folders, Rename, Clone, and Hotkey assignment, as well as Import and Export (use these last two to copy macros to other units, and for backup).
Tip: Viz Vectar Plus features unlock additional and very useful import/export file format options for macros, including JSON, Excel (.xlsx), and even a working Javascript (.js) example.
Automation
Macro triggering and automation features are also described in sections Input Configuration, Media Players, and Advanced Configuration.
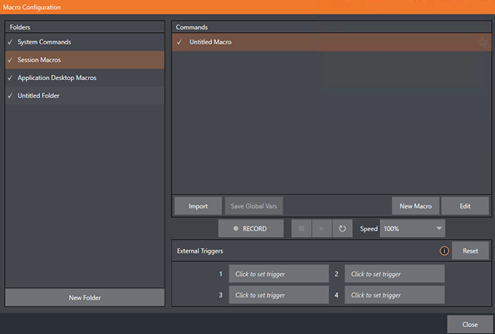
Session Macros
It’s easy to keep macros designed for use with a specific production organized and accessible, thanks to the Session Macros folder in the Macro Configuration panel. Macros in this group are exposed within that session only (or new ones based on it, if the operator uses template sessions).
Macro Calls to Integrated Systems
You can use macros to send commands to external systems.
Sample Setup: Viz Vectar Plus to Viz Trio
Viz Vectar Plus can connect to a Viz Trio system, to control CG graphics. Viz Vectar Plus communicates with Viz Trio through commands over NDI.
Tip: For some general background on how to integrate with external system through NDI, refer to the NewTek publication Automation & Integration Guide.
-
Most setup is performed on the Viz Trio side.
For details on how Viz Trio handles macros, please refer to the Viz Trio User Guide. Specifically section Working with Macro Commands over a Socket Connection. -
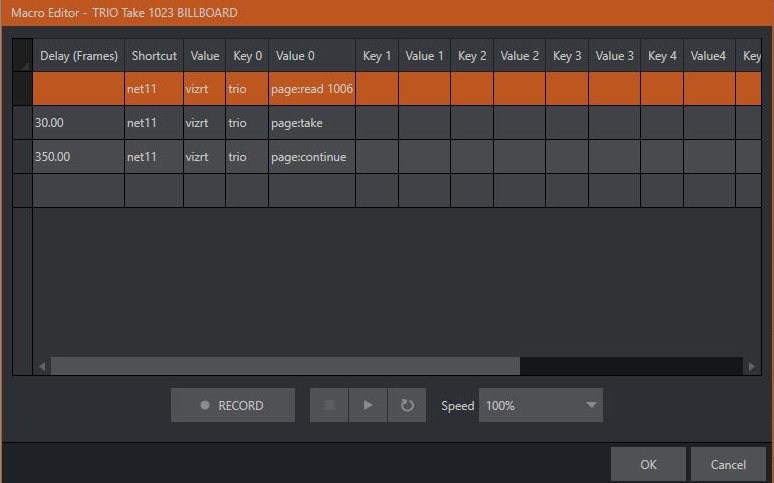
The net shortcut entry in Viz Vectar Plus macros can be used to send commands over a specific NDI input. The workflow is:
-
A Viz Engine (either Program or Viz Trio Preview) is set up to output NDI.
-
In Viz Vectar Plus, the NDI output from the Viz Engine is assigned as one of the inputs.
-
The Macro system in Viz Vectar Plus can be used to send commands via the NDI streams of the inputs.
-
-
As an example, if the NDI output from the Viz Engine is on input number #11 in Viz Vectar Plus, the shortcut entry net11 can be used to address this NDI stream.
-
Value: vizrt
-
Key: trio
-
-
The value of the key is the command to send to Trio.
-
On the Viz Engine side, the Viz Trio commands are forwarded to a Viz Trio client on localhost (or to the one specified in configuration).
Viz Engine configuration
-
If the Viz Engine receiving the macro commands is the Viz Trio local Preview engine, no configuration is needed.
-
If another Viz Engine (for example, on Program) is receiving the macro commands from Viz Vectar Plus and these commands will be sent to a Viz Trio client on another host,
the configuration on this Engine must specify the host address of the Viz Trio client:
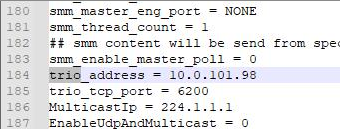
The relevant config settings in the *cfg config file for the Viz Engine are:
- trio_address = 127.0.0.1
- trio_tcp_port = 6200

Note: Viz Trio requires an additional license.