Viz Vectar Plus User Guide
Version 1.3 | Published November 18, 2022 ©
Export
In today’s broadcasting world, a single program feed may be inadequate or inappropriate. Viewers consume media from multiple sources, often simultaneously. A live online presence is critical for many productions with little or no traditional broadcast following.
Publishing supplemental content such as backstage feeds, locker room interviews, pre and post-game chatter), through Internet sites like Facebook®, YouTube®, Twitter® provides further opportunities for brand extension and monetization.
-
The Export feature enables a broadcaster, networks and corporate users to publish clips and stills from ongoing events like syndicated sports, entertainment or news programming direct to social media.
-
Presets for your social media accounts and other publishing targets simplify distribution of selected content to multiple sites, even while production and recording is still underway. Ideal for concerts, galas and sport events.
-
The Export feature supports both transcoding and distribution to local or networked storage for archival or post production purposes.
This section contains the following Export topics:
The Export feature is similar to Streaming.
Setting Up Export
Export Presets
On the menu bar at the top of the screen, click the Configure gear next to the EXPORT button.
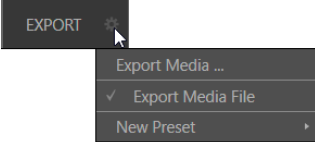
Preset List
-
Below Export Media is a list of any presets configured as export targets (initially this list shows only the default Export Media File entry, a transcoding preset which cannot be deleted).
-
Each preset listed in the menu can be checked or unchecked.
When you add media files to the Export bin, the check-marked entries determine which Export targets are automatically assigned to them.
You can manually modify the presets for each item in the Export bin.
Tip: When the mouse pointer is over a preset in the Export menu, two gadgets are shown at right; the Configuration (gear) icon allows you to modify the preset, and the X removes it from the list.
To create an Export preset
-
Click New Preset to display a sub-menu listing various supported export targets (for example, Twitter or Facebook).
-
Select an item to open a dialog menu.
-
Create a custom preset.
For most external sites (social media sites or FTP sites), the dialog requires you to enter account credentials.
Typically, a user name and password for your social media accounts, as well as FTP servers. -
Credentials are tested when you press OK, and report an error if not OK.
-
Your new preset appears in the Preset list.
Social Media Sites
Export can publish media to Facebook, Twitter, YouTube, and many more sites and services. Other connections will be continually added.
Transcode, SMTP, and FTP
-
The options Transcode, FTP and SMTP handle various file conversions and publishing to local (or networked) storage volumes, or as email.
-
These are useful output alternatives, effectively providing live export methods that do not force you to wait until production ends.
This can be invaluable for collaboration, whether local or remote. -
Transcode exports provide options to re-encode video in different formats before sharing. Select suitable options for your target device or application.
-
For SMTP, replace the dummy email server entries with those of your own mail service.
Watermarking
To avoid unauthorized of use private or copyrighted media, you can add a watermark before exporting it to public sites.
To create a watermark
-
Click Watermark in the footer of the various Export preset configuration panels.
-
Select a suitable overlay image
-
The image you select is composited onto exported video or still image files.
It should normally be a 32-bit still image file (supported formats include popular formats such as PNG and Targa) that positions the watermark correctly in the frame taking into account the resolution and aspect of exported files.
Exporting Media
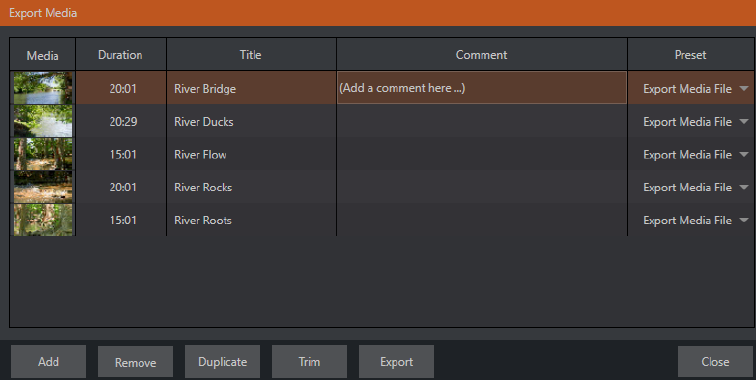
Here you manage the list of clips and still images you wish to export.
To export media
-
From the Dashboard, select File > Export Media.
-
Click the Add button in the footer to open a Media Browser.
-
Select (and multi-select) content you wish to export.
You can choose items from your current session or another location. These files are added to the bin, but they are not exported at this point.
Tip: You can add and upload files that you are currently recording (before pressing Stop). These files are in the virtual Session Recordings folder that the media browser displays for the session.
Metadata

-
Information is displayed for each media file added. This included:
-
File name (or alias, in the case of files added from a media player playlist)
-
Duration
-
Preset (depending on settings, multiple entries pointed at different destinations may be added in one operation).
-
-
The Comment column allows you to add remarks that are sent along with the upload to sites that support this.
Click in this column to enable keyboard entry, or navigate to it and start typing. Press ENTER or click elsewhere to end editing. -
Type in the Title column entry to change the title supplied for the file to social media accounts, but note that this has no effect on FTP or Transcode preset operations.
Presets
-
The Preset column provides a menu allowing you to change the export preset or add multiple targets for each individual item in the Export bin.
A checkmark beside a preset indicates the target is active. -
Preset selections can vary from one item in the Export bin to the next.
-
If no checkmarks appear here, the entry on that row is not fully configured, and are ignored by the Export processor.
List Management

-
Remove: Deletes entries from the Export bin, without affecting the source files.
-
Duplicate: Clones selected entries. You may prefer this way of publishing an item to multiple targets (over adding multiple checkmarks to the Preset column for a single entry) at times.
For example, the encoding settings for one target may involve longer processing than you want to allow at the moment. Using a duplicate entry, you can defer processing that entry until a more convenient opportunity. -
Trim: Opens a trimmer pane for adjusting In and Out points for clips you plan to share (some file formats do not support trimming).
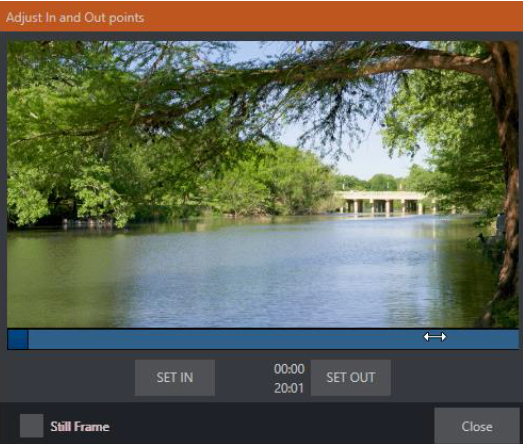
Clips that are added while still being captured can be retrimmed while still growing.
Tip: Checkmark Still Frame selects a frame as a thumbnail, converting it to a JPEG image file on upload.
Export: An On and Off pilot light. When lit, the Export processor is activated, and is either watching for qualifying Export bin entries ready for exporting, or actively processing those that are ready to go.
![]()
Note: The Export button is linked to the larger Dashboard Export button, which performs the same action.
Other Add-to Methods
Once you have configured your Export presets, check-marked one or more in the Export menu, and decided whether to add checks to Stills, Clips, or both in the Auto Queue menu, you have configured a typical preset. However, there are additional sources you can add:
-
You can add either stills or clips to the Export bin from the playlist of a media player.
-
You can automate adding custom titles and comments.
Grab, Record as well as the Media Players all support individual custom Names and Comments, which supplies the corresponding metadata for your Export Media additions.
-
The Name and Comment fields for Grab and Record features also support DataLink.
This lets you automatically supply unique and meaningful information to social media sites along with your Export uploads.
You can also mix DataLink keys with literal text, to produce comments that embed things like the current time, the current score of a game, or the name of the person on camera at the moment into coherent sentences.