Viz Vectar Plus User Guide
Version 1.3 | Published November 18, 2022 ©
Live Story Creator
Live Story is a powerful and flexible natural language automation system.
You can use it for simple tasks like a convenient teleprompter for your show’s talent. Coupled with the NDI Studio Monitor included in the free NDI Tools bundle, this is a great feature.
However the feature set offers more complex controls, like automating an entire show.
Overview
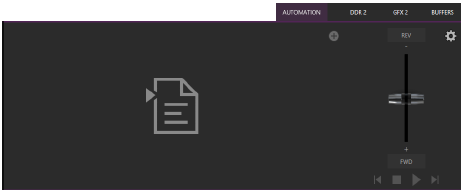
When you first open the new Automation tab, located at right below the main Switcher (near Buffers), there is an empty script pane and some controls.
Click or tap the + (plus sign) gadget below and to the right of the tab to open a File Explorer. Here you can navigate to a location where you have previously stored a .docx file such as those created in Microsoft Word (or compatible software with similar features).
Examining the tabbed Live Story panel from left to right, you’ll see:
-
An (x) gadget at upper-left. Click this to unload the current script (.docx file).
-
The eyeline control is a white caret (triangle) control that can be dragged up and down to adjust the position of the similar eyeline indicator on a teleprompter display.
-
The script pane, or canvas, displays the content of the .docx document, as interpreted by Live Story.
-
Colors and font styles have special meaning: Generally, text shown as yellow and italicized is not meant to be read aloud.
-

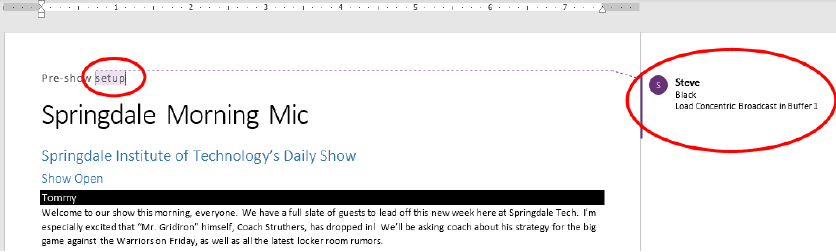
For example, in the image above, the first line (“Pre-show setup”) is used to issue a command to place Black on output before the show begins. The line has Word’s Subtitle style applied to it, indicating it is not intended to be read aloud. Live Story shows this in yellow italics. The word “setup” is blue in the script pane, despite also being in Subtitle style in the document. This is because the command we inserted to cause black to be shown on output is in a comment applied to this word in the document.
Blue identifies commented text in the document, and comments can be used to issue commands.
Tip: Move the mouse pointer over the blue text in the script pane to see a tooltip showing how Live Story Creator has interpreted your comment.
Notice that the show’s title (“Springdale Morning Mic”) is displayed in yellow, too. Live Story recognized this is as the SHOW TITLE because the Title style is applied to this text it in the document.
-
Document styles can trigger corresponding actions, too. For example, the Title style can automatically display a specially prepared LiveGraphic™ animation to introduce your show, all without any manual intervention.
Note: The SHOW TITLE animations require the latest LiveGraphics content to be installed. The Broadcast templates in the updated content include a special Show Open preset specially prepared for this purpose.

-
In similar fashion, the document style Heading 3 denotes a CUE, used to introduce someone speaking next. CUEs are show in inverted color, black text on a white background.
Like the Title Style, CUEs can also automatically trigger operations. For example, if a Switcher input name matches a name in the CUE, that source is placed on output, and a title identifying the newly introduced talent is shown (after a few moments, the title is automatically removed).
-
Text meant to be read aloud is shown in a large white typeface.
-
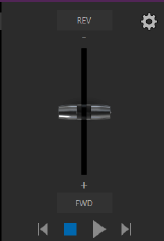
Live Story’s operating controls are located in a small panel just right of the script pane.
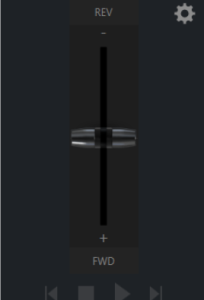
This Control Panel is dominated by a vertical Speed control. You can modify the scroll rate during playback or traverse the script backward or forward by dragging the Speed bar up or down. Transport controls below the Speed bar include Stop and Play, as well as Previous and Next Segment buttons.
Tip: Divide your show into different segments identified by applying the Heading 2 style to lines in your .docx file.
-
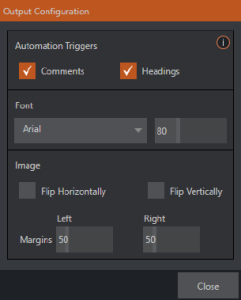
Click the familiar gear gadget in the upper-right corner of the Control Panel to open Live Story’s configuration panel.
-
The two switches in the Automation Triggers toggle automation in response to Comments or Headings (styles) applied in the .docx document.
-
When both switches are off, Live Story does not process automation commands, and is operates as a simple teleprompter.
-
Font controls let you adjust text display for legibility when you are using an external teleprompter device.
-
The Flip switches in the Image group likewise allow you to conform the teleprompter output to match your local devices, while the margin sliders let you move text confine teleprompter output to best suit your preference.
Style-based Operations
Various styles applied in the .docx document serve different purposes in the Live Story Creator context, and some styles can even trigger automatic operation.
|
Document |
Applies to |
Displayed |
Description |
Sets value for |
Description |
|
Title |
Show Title |
No |
e.g., “State of the Union Address” |
%SCRIPT_ShowTitle% |
Main show title |
|
Heading 1 |
Show Descriptor |
No |
Sets value for a DataLink key |
%SCRIPT_ShowDescription% |
Main show descriptor |
|
Heading 2 |
Segment |
No |
e.g., “Intro Package”, "Welcome Monologue" |
%SCRIPT_ShowSegment% |
Current show segment |
|
Heading 3 |
Cue |
Yes (inverse) |
e.g., talent name: “Billy Bob” |
%SCRIPT_CueName% |
Name of speaker |
|
Subtitle |
Information text |
Yes (yellow, italics) |
Displayed but not meant to be read (e.g., “walk behind desk”) |
%SCRIPT_Info% |
Current/Last information text |
|
Normal |
Body text |
Yes (white) |
Text to be read by On Air talent. |
N/A |
N/A |
The following styles automatically trigger Viz Vectar Plus operations when the Headings switch is enabled:
-
Title: Triggers automatic display of a LiveGraphics show opening title animation. This title uses the text from the Title-style line to populate the first line of the animated title, and takes (hidden) text from a line entered using the Heading 1 style for its second line (when used).
-
Heading 3: Identifies a CUE. When the Headings switch is enabled, a lower-third title is automatically displayed for a short duration when the eyeline reaches a CUE for the first time in a segment. The first line of the title shows the full Switcher input name set in Input Configuration for that source. The second line of the title is drawn from the (Input Configuration) Comment entry for the source.
Note: Titles as discussed above default to a pre-selected LiveGraphics title, and transition in and out automatically. To display a different title page, preload the desired title into Buffer 1 beforehand. This can be done using a command entered as a Comment in the .docx file. You can also use Comments to change the title’s transition effect, display duration, and so on.)
Comment-based Commands
While heading styles provide some useful automation possibilities, the use of Comments in the .docx file provide much more powerful and detailed options.
Note: The Comment inserted into the text has two lines. The first is simply “Black”, which tells Viz Vectar Plus to select the input named “Black” on its Program row.
Fuzzy Logic
The very same thing would occur if the command entered in the Comment had instead said “Show black”, “Put black on program”, “Send Black to Program”, or “Output black”. Live Story uses “fuzzy logic” to try to find the best match to your entry.
Note: Extraneous text is typically ignored so, for example, you could instead write “Put black on program while I have lunch” and still be successful (assuming your lunch was satisfactory).
We mentioned earlier that you can move the mouse pointer over blue text in the script pane to see a tooltip showing how Live Story interprets your comment. It is helpful to know that Live Story determines the probability that the interpretation is correct. If the wording of a Comment entry is ambiguous, and could be interpreted differently, the text color in the script pane is red rather than blue.
Note: If a comment has multiple lines in it, Live Story adds an asterisk to any ambiguous lines in the tooltip. The entry “Output black” would trigger this behavior, even though it is correctly interpreted, with the result that black is shown on output.
Live Story Creator VS. Macros
Like Live Story commands, a macro shortcut is entered on a single line, and may support arguments, or parameters. Macro shortcuts, however, require you to use very specific syntax. By contrast, though, Live Story commands are entered using ‘natural language’, the way you might normally speak or write. A macro shortcut generally fails with an error if your syntax isn’t perfect, while Live Story uses fuzzy logic to try to find the best match for your command, and only fails ‘reluctantly’.
Note: Live Story documents are evaluated on loading. When Live Story determines its evaluation of a specific command in a Comment could be incorrect, it posts a message to Viz Vectar Plus' Notification panel to note the ambiguity, in addition to marking the commented text in red in the script pane.
Additionally, a single Comment command can do things that would otherwise require multiple commands entered on separate lines in a macro. Consider for example, when Live Story encounters the simple Comment entry “fade tom slow”, it results in the following steps:
-
Select an input named “Tom” (or “tom”, or with a similar string, such as “Tommy” in the input Comment box) on the Switcher’s Preview row.
-
Set the Switcher’s Background transition effect to Fade
-
Set the effect speed to Slow
-
Perform an Auto
To do something similar using a macro, you’d need to enter four separate lines, getting the syntax correct for each macro shortcut, and since macro commands require an input index parameter rather than a name, you’d need to know in advance which camera would be pointing. If a person was moved to a different chair on your set at the last minute, the macro would need to be modified. Using Live Story Creator, you could simply rename the camera.
Rather than naming an input “Tom”, you prepared a PTZ preset (or Pan and Scan preset, for a non-PTZ source) and named it “Tom”, Viz Vectar Plus would automatically select that preset at step 1 above.
Tip: If you are using a few PTZ cameras to cover a city council meeting, with PTZ presets prepared for different participants. If two people change seats at the last minute, all you need to do is update the PTZ presets and Live Story Creator takes care of everything else.
So, not only are Live Story Comment commands easier to write, often performing multiple operations with a single entry, but they are "smarter", and easier to maintain and update.
Live Updates
As mentioned, you don’t need to press Play to test modifications, you can reload the .docx file and hover the mouse over commented text to see the way the embedded commands have been evaluated.

Live Story Creator has a built-in Update feature, and monitors changes to the script file you loaded. If you use a laptop to edit your script in Microsoft Word, you might opt to save the file across a network connection (for example, the shared Public\Documents folder on your Viz Vectar Plus).
Then, when you modify the document and save it (which typically requires just a quick keyboard operation to perform - CTRL + S), Live Story immediately shows an Update icon at the top of the script pane. Click this to reload the .docx file with the changes you made.
Note: This resets Live Story’s eyeline indicator to the top of the script, so don’t do update when your talent is reading from the teleprompter you are quite confident that they will miss you with whatever they throw!
Default Behaviors
Live Story’s Comment commands can perform compound operations, and are simpler to use than macros. They are designed to provide a useful result even when you don’t supply complete information.
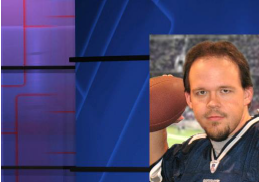

The first picture illustrates the result of the Comment command “Fade Football Star on in PiP” (the simpler entry “PiP football star” would have produced the same result). Live Story produced a ‘default’ picture in picture effect, as shown.
In the next image, the Comment command was edited to read “PiP Football Star large top right”, achieving a better result.
The Comment command “title” provides another example of default operation. Add the simple entry “title brackets lower third” to a comment. Live Story evaluates the comment when the eyeline indicator reaches it, and the predetermined defaults are used so you may not even need to add any more detail. The designated title page (Brackets Lower Third) is automatically:
-
Loaded into a Buffer
-
Assigned to a DSK
-
Faded on
-
Held briefly, and then
-
Faded off.
In this example, you can change the effect used to introduce the title page. The Comment command “Show Title brackets lower third Edge LtoR(H)” works quite nicely for this purpose.
Tip: You might want a title to remain in view longer than the default time. To do this, add the word “hold” to the command you use to display the title. Then insert a new comment into your script at the point where you want to remove the title from view and enter the command “title off”.
You can also change effect speed (Fast, Medium, Slow), specify the DSK to use, and so on.
Additional Comment Commands
Identified below, are the main Viz Vectar Plus features Live Story currently supports, with some examples and a few alternatives that work just as well.
Audio Mixer
-
“Set input 2 Volume to -5”; “volume input 2 5dB”; “input 2 9dB”; “ Set volume for input 2 to -20”
-
“volume master 5dB”; “Set Saster Volume to 5”; “set volume to 5”
-
“mute”; “mute on” – mute master output
-
“unmute”; “mute off” – unmute master output
-
“mute out 2”; “mute out 2”; “mute aux 2”; “mute aux 2 on”; “aux 2 mute on” – mute named output
-
“aux 2 mute on”; (etc.)
-
“mute input 3”; “mute input 3 on” – mute the named input
-
“mute input 3 off”
-
“solo input 6”; “solo input 6 on” – solo the named input
-
“solo input 6 off”
-
“unsolo input 6”; “solo input 6 off” – disable solo for the named input
-
“follow input 6”; “follow input 6 on” – solo the named input
-
“follow input 6 off”
-
“input 4 eq”; “input 4 eq on”; "input 4 enable equalizer”
-
“input 4 eq off”; "input 4 disable equalizer”; (etc.)
-
“input 5 compressor on”; "input 5 enable compressor”
-
“input 5 compressor off”; " input 5 disable compressor”; (etc.)
-
"AudioMemName”; "select AudioMemName"; "recall AudioMemName”; “mixer AudioMemName”; “audio AudioMemName”; audio select AudioMemName”; “audio recall AudioMemName”
-
“audio select MEM 3”; “audio select 3”; “audio recall 3”; “audio recall mem 3”; “mixer select 3”; “mixer select mem 3”; “mixer recall 3”; “mixer recall mem 3”
Comps
-
“load MyComp”; “select MyComp”; “myComp” – loads the named main Switcher Comp.
-
“comp 3”; “load Comp 3”; “select comp 3”; “go to comp 3”
-
"m/e 1 comp 2"; "me1 comp 2"; "select comp 2"; "load main comp 2"; "go to myMEname myCompName"; (etc.) – loads the designated Comp into the main Switcher (default) or named M/E.
-
“myComp medium”; ““myComp normal”; “myComp 1.0”; “go to myComp slow”; (etc.) – loads a Comp using the designated speed.
Media Players
-
“play lion”; “play lion on main”; “="take lion on me1"; "cut to lion on m/e 1"; (etc.) – locates, loads and plays a clip named “lion” on the main Switcher (default) or named M/E; performs an auto or take when playback ends. The scrolling of the script pauses until playback is complete.
-
“circle(h) lion” works as above but uses a Circle wipe to display and remove the clip.
-
“play lion ddr2” forces the operation to use DDR 2 (rather than selecting a default DDR)
-
“add lion to ddr 2; “load lion ddr 2” – adds the clip without displaying it
-
“play lion at 9 db";
-
“play lion voiceover”; play lion vo” – the script continues to scroll during playback
-
"play lion at 5 db”; "play lion 5db"; "lion 5 db”
-
“DDR 1 stop”
-
"DDR 1 Next"; "DDR 1 Previous"
DSKs
-
“Toggle DSK 1”
-
“toggle DSK 1 slow”
-
“auto on dsk 2 slow”; “auto on M/E 2 key 2 slow”; “Fade M/E 2 keyer 1 slow”;
-
"fast auto off dsk3" ▪ “Set main dsk 1 as input 1”; “Set input 1 on main dsk 1”; “set DSK 1 to GFX 1"; “set M/E 1 Keyer 1 to GFX 1"; "assign GFX 1 to Me2 key 2"; (etc.) ▪ “Play lion in dsk2”; “Play lion on dsk2”; “Show lion in dsk2” – plays a clip named lion in DSK2, fading on and holding the last frame. ▪ “Play lion on key 2 in M/E 1 with slow circle(h)” – as above but uses a slow Circle wipe in M/E 1.
-
“Show lion on dsk 3 with fast auto"; “Show lion on dsk 3 with take" ▪ “set main DSK 3 transition to circle(h)”; set circle(h) Me2 key 1"; "change transition on me4 for key 2 to circle(h)"; (etc.) ▪ (etc.) See also dedicated PiP (Picture in Picture) commands)
Buffers
-
“Add globe to buffer 6”; “buffer 6 load globe” – loads the Globe Frame Buffer Animation effect to the target buffer ▪ “Add Hexagon lower third to buffer 6” – loads the named static title page into the target buffer ▪ “buffer 3 load Hexagon Broadcast” - loads the named LiveGraphic into the target buffer ▪ “Buffer 1 set speed medium” ▪ “Buffer 1 speed 2”; “Buffer 1 set speed 2x”; “Buffer 6 globe 200%” – set speed to 2x the default (Medium).
-
“set buffer 1 to layer preset 2"; “set buffer 1 to index 2"; “set buffer 1 to preset 2"; "buffer 1 select preset 2"; “buffer 1 preset 2"; select buffer 1 index 2 (etc.) – select the designated Layer Preset for a LiveGraphics title page loaded in the buffer slot specified.
-
“set buffer 1 to data preset 2"; etc.– select the designated Data Preset for a LiveGraphics title page loaded in the buffer slot specified.
Macros
To run a more complex macro from within a script, you can use the commands below:
-
“macro_name”; “macro macro_name”; “run macro_name”; “play macro macro_name“; etc.
-
“stop macro_name”; “stop macro macro_name”; macro macro_name halt”; macro_name end”; etc.
-
“stop all macros”; “stop macros”; “halt macros”; etc.
-
"Continue Paused Macro"
PiP (Picture in Picture)
-
“Input 5 pip”; “pip input 5”; “ots input 5” – assign input 5 to a default DSK and display it using default options
-
"pip globe" – show the matching file (in the example, a Framebuffer Animation) using default PiP settings
-
"pip globe center large"; "pip globe middle large"
-
"pip me1 key 2 globe small bottom right”
-
“pip input 5 large center” – assign input 5 to an unused DSK and display it large size at center screen
-
“pip main dsk 3 input 5” – assign input 5 to DSK3 and display it using default options
-
“pip me1 dsk 1 input 2” – assign input 2 to DSK1 in M/E 1, and display it using default options
-
“pip input 5 fly in L” - – assign input 5 to an unused DSK and fly it in from left
-
“fade pip off”; “ots off” – remove the default PiP from output using a fade effect
-
“pip main dsk 2 off”– remove the PiP in DSK 2 from output
-
"pip myPtzPreset” – recall the named PTZ preset and show that source in a PiP
-
"pip dsk1 myPtzPreset “; "pip me1 key1 myPtzPreset"; "take pip myPtzPreset "; (etc.)
PTZ
-
"myPtzPreset "; " myPtzPreset on program”; "put myPtzPreset on program"; "take myPtzPreset on program"; "select myPtzPreset on program”; "take to myPtzPreset “; (etc.) – locate a PTZ preset named “myPtzPreset” and display it on Program output.
-
"put myPtzPreset on preview"; "select myPtzPreset on preview"; etc.
-
" myPtzPreset on M/E 1 b row"; "me1 put myPtzPreset on b row"; "me1 select myPtzPreset on b row"; "set me1 b row to myPtzPreset"
-
See also PiP-related PTZ preset commands.
Record, Grab
-
"record"; "record on”; "recording on"; "start record"; "begin record"; "start recording"; etc.
-
"record off"; "recording off"; "stop recording"; "end recording"; etc.
-
“Grab still”
Stream
-
"stream"; "stream on"; "streaming on"; "start stream"; "begin streaming"; etc.
-
"stream off"; "streaming off"; "stop streaming"; "end stream"; etc.
Switcher
-
“auto"; "transition" – perform a Background transition on the main Switcher
-
“take”; “cut”
-
“fade”; "crossfade"; fade slow; etc.
-
"input 4”; "input 4 on program"; "put input 4 on program"
-
“bob”; “take to Bob”; "take Bob on program"; “fade to Bob”– perform a Background (Take or Fade, respectively) transition to show a source (or PTZ preset) named “Bob” on the main Switcher.
-
"input 4 on preview"; "put input 4 on preview"; "set preview to input4"; "input 4 on b row”; "set layer b to input 4"; etc.
-
"me1 put input 4 on preview”; "set M/E 1 preview to input 4"; etc.
-
"set M/E 1 b row to input 6"; "set me1 layer b to input 6"; "input 6 on me1 b row"; etc.
-
“auto to input 4”; "transition to input 4" etc.
-
“fast auto to input 4”; etc.
-
“auto to input 4”; "transition to input 4" etc.
-
“M/E 3 bob“; me3 auto to input 4”; "transition me3 to input 4"; etc.
-
“ftb”; “fade to black”; “ftb off”; etc.
DSK
-
"DSK1 Auto"; "dsk 1 perform auto"; etc.
-
"dsk2 take"; etc.
DataLink
-
“set datalink key myVar to I’m a Yankee Doodle Dandy”
-
"datalink key myVar equals 12";” set datalink key myVar to value 12”; "set datalink myVar to 12"; “set myVar to 12”; “myVar equals 12”
Titles
-
"Aero Broadcast"; "Title Aero Broadcast" – for a LiveGraphic title, sets the default layer preset (10), then transitions the designated title in a default buffer assigned to a default DSK, removing it after 8 seconds;
-
"Aero Broadcast hold”; "title Aero Broadcast hold” – as above but does not automatically removed the title
-
"title Aero Broadcast Fly In L medium"; etc. – as above using the designated transition and speed
-
See also title-related commands listed in the Buffers subheading.
Aliases and Comments
-
You can use these comment commands to eliminate the need to pre-configure Switcher source names. Instead, you can set them right in the .docx script. This also allows you to change the metadata associated with a Switcher inputs at various points in your show as you wish.
-
"Sam Smith is on input 4"; “assign input 4 to Sam Smith”; “set input 4 to Sam Smith” - set an alias for the designated input’s name value Hint: You’ll likely want to use the full name here, for use in connection with titling.
-
"input 4's description is CEO of Megadyne Inc."; "Input 4 memo is CEO of Megadyne Inc."; etc. – sets the descriptor for the input, which is used as the value for the second line of default lower third titles
Teleprompter Output
Live Story Creator can be useful as a native teleprompter. Coupled with file watcher functionality to easily update your script right up to air-time, this feature saves a setup time, expense, and provides exceptional output flexibility.
Control
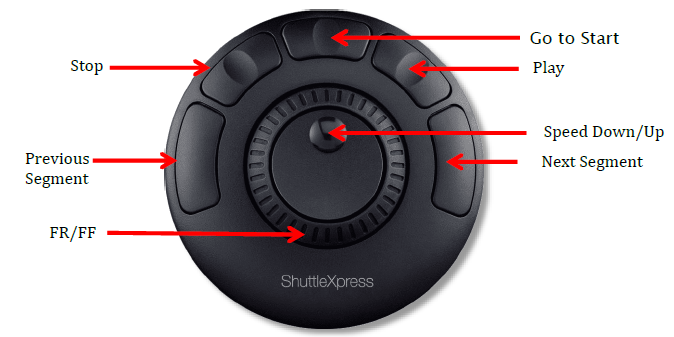
For live use, most prefer a dedicated physical controller device, whether for use by the talent or another teleprompter operator in the studio. Live Story natively supports the ShuttleXpress USB controller by Contour Design Inc..
You will find this device provides common teleprompter controls in an easy to use and affordable manner.
Output
In order to support a wide array of external teleprompter hardware, Live Story assigns the scrolling text output to the highest numbered Switcher output by default. You can then assign this signal to a video Mix output supplying a physical video output connector to feed an external device.
In an NDI® environment, you have other powerful options. Viz Vectar Plus automatically supplies the teleprompter output to your network as an NDI stream, offering many display options (for example, the Studio Monitor application included with the free NDI Tools bundle (found at ndi.tv/tools/) can be used to display your teleprompter output on Windows® and OS X® platforms).