Viz Vectar Plus User Guide
Version 1.3 | Published November 18, 2022 ©
Primary Command Group
The second column of buttons in each stripe provides access to important control operations and options.
Command Group
The Command group in the first stripe (nearest the operator) has some unique features that actually govern other sections of the overall control surface. The primary Command group.
Among these special controls are several that we can describe as delegate buttons.
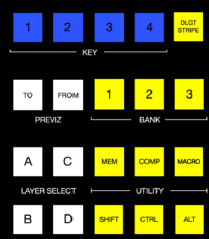
For example, consider the four buttons labeled KEY in the top row of this group.
KEY
Pressing one of these buttons, labeled 1-4, delegates or assigns the buttons in the 24-button KEY selection row at left in the same stripe to govern the active source assigned to one or more KEY (or DSK) layers.
Tip: Delegate buttons usually, though not always, support multi-selection.

DLGT STRIPE
The remaining button on the topmost row of the primary Command group is labeled DLGT STRIPE, which is an abbreviation of delegate stripe.

When you press and hold DLGT STRIPE, the LCD displays in each stripe update to show the names of the available switcher busses (MAIN, M/E 1, 2, etc.) and MIX 1-4. In this state, press one or more buttons in the PGM/A row beneath and release the DLGT STRIPE button to assign the stripe to the designated bus or busses.
Hint: The QuickSelect button (marked with an 'eye' icon to associate it with visibility) is located in between BKGD and FTB. Clicking it updates the Switcher's T-Bar delegate and transition states so that the next TAKE or AUTO operation will remove all visible DSK or KEY layers from output. (On supporting control surfaces, press ALT & BKGD to trigger the QuickSelect feature.)
BANK
Another set of delegate buttons sits in the second row (counting from the top) of the primary Command group. This group is labeled BANK. As you know by now, the Switcher crosspoints of Viz Vectar Plus systems are organized in banks comprising 24 columns.
Similarly, Switcher sources are presented in banks on Viz Vectar Plus control surfaces.
Press the desired BANK button – 1, 2 or 3 – to determine which group of sources is currently delegated to the Switcher rows in all stripes. The displays above the selection rows update accordingly.
Note: BANK buttons do not support multi-selection.
Split Banks
Ordinarily, the Switcher and M/E row bank assignments for all stripes on the surface match. So, for example, if the Main Switcher is showing Bank 1, all other stripes likewise display Bank 1. It possible, however, to lock individual stripes to specified Banks.
To do so, hold down the ALT and CTRL buttons on the surface together, which causes the LCD displays to list Banks 1, 2, and 3 in the first three Switcher columns. Press the KEY row button above the display for the desired stripe to select the Bank it presents thereafter.
Stripes delegated to a particular Bank in this manner do not update when you press the Bank (1-3) buttons in the Primary Command Group. To restore normal behavior, hold down ALT and CTRL again, and notice that the KEY row button for the currently assigned bank lights. Press this button again to extinguish it, and the stripe once again follows the primary Bank button assignment.
PREVIZ
The control PREVIZ group which is reserved for possible future implementation.
UTILITY
MEM
When the MEM button is held down, the first nine columns in the displays of all stripes update to list the names of MEMs for the busses delegated to the individual stripes. Punching a button in the selection row below a MEM name recalls the corresponding preset for the bus assigned to the stripe.
Note: For multi-delegated stripes, only the first delegate is affected.
Holding CTRL+MEM then pressing and releasing a button in the PGM/A row beneath stores it into the corresponding MEM for the bus assigned to the stripe.
COMP
When the COMP button is held down, the first 16 columns in the displays of all stripes update to list the names of COMPs for the busses delegated to the individual stripes. Punching a button in the selection row below a COMP name applies the corresponding preset to the bus assigned to the stripe.
Note: In the case of multi-delegated stripes the COMP names displayed represent the first delegate only.
To store or update a COMP, hold down CTRL + COMP, then press a button in the selection row below the display for the desired stripe. To clear a COMP, hold down ALT + COMP, then press a button in the same selection row.
MACRO
To assign a macro to any button, first select the desired macro in the Macro Configuration pane in the user interface. Click a box in the Triggers control group at the bottom of the panel, to enable Listen mode, then hold down the MACRO button, punch the control surface button you want to use for the macro, and release the MACRO button.
When the MACRO button is held down, the names for any macros assigned to buttons in the (PGM/A/C) row immediately beneath the selection area displays are shown. Punching the button below a macro name triggers the corresponding macro.
Tip: To clear an assigned macro from a button, hold down CTRL with the Macro button, the press the (lit) button you wish to clear.
SHIFT, CTRL, ALT
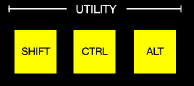
These buttons provide support for extended features and future expansion.
Note: Among other things, CTRL and SHIFT are used in connection with instant replays.
See section Replay in Secondary Command Group and Buffers in section Buffers and Titles.
LAYER SELECT (A/C, B/D)
SomeViz Vectar Plus models let you configure M/Es with effects supporting up to four primary sources (along with KEY layers). The control surfaces, however, offers just two primary source selection rows, PGM A/C and PREV B/D.
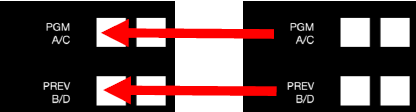
In cases where more than two selection rows are required for a given M/E, use the LAYER SELECT buttons to delegate the upper or lower selection rows to the layers you wish to control.
Tip: If you reduce the number of layers required by an M/E (by loading a different effect) the control surface automatically revises the LAYER SELECT delegate state to match.