Viz Vectar Plus User Guide
Version 1.3 | Published November 18, 2022 ©
Configuring Genlock
Viz Vectar Plus includes synchronization utilities using a genlock function.
When genlocking is active and properly configured, the timecode in the title bar will display in green.

Working with Genlock
NDI Genlock
NDI Genlock synchronization allows video sync to reference a network-supplied external clock signal over NDI. This type of synchronization is key to future 'cloud-based' (and hybrid) production environments.
The Genlock feature enables Viz Vectar Plus to 'lock' its video output or NDI signal, to timing derived from an external reference signal (house sync, such as 'black burst') supplied to its genlock input connector.
Genlocking is not an absolute requirement in most cases, but it is recommended whenever you have the capability.
To configure NDI genlock
Viz Vectar Plus output can then be synchronized to other external equipment locked to the same reference.Viz Vectar Plus comes with additional options for synchronization, the pull down menu conveniently centralizes all sync options and allows them to be changed on the fly.
Ideally both the cameras and your Vizrt system’s output should be genlocked. If they are not genlocked to the same reference signal, by default the Switcher will automatically apply a Time Base Correction (TBC) operation. Time base correction may drop or insert frames as necessary to maintain sync, making it is a less accurate approach.
-
If the Live Desktop isn't already open, launch a live production session from the Viz Vectar Plus Home page.
-
Open the Output Configuration panel by double-clicking in the PROGRAM viewport.
-
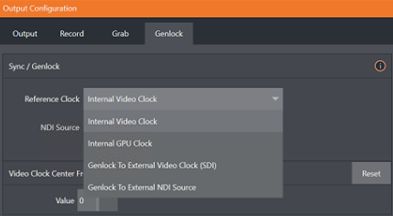
Click the Genlock tab.
-
From the Reference Clock drop-down menu, select the synch source.
Note:
-
Internal GPU Clock means following the graphics card output (best quality when connecting a projector to a Multiview output.
-
Internal Video Clock means clocking to the SDI output (best quality when connecting a projector to an SDI output).
-
-
When selecting Genlock to External NDI Source, the NDI Source field becomes active, offering a selection of network sources.
-
With the aid of downstream Waveform and Vector Scopes, adjust Horizontal and Vertical Position and Phase settings.
To Configure Genlock for non-NDI sources
-
If the Live Desktop isn't already open, launch a live production session from the Viz Vectar Plus Home page.
-
Open the Output Configuration panel by double-clicking in the PROGRAM viewport.
-
Click the Genlock tab.
Note:
-
Internal GPU Clock means following the graphics card output (best quality when connecting a projector to a Multiview output.
-
Internal Video Clock means clocking to the SDI output (best quality when connecting a projector to an SDI output).
-
-
When connected to SDI, the default Reference Type in the Genlock settings group is SD (Bi-level), as this is currently the most common reference signal type.
If you supply an HD reference signal to the Genlock input, you may want to change the setting to HD (Tri-level). -
With the aid of downstream Waveform and Vector Scopes, adjust Horizontal and Vertical Position and Phase settings.