Viz Vectar Plus User Guide
Version 1.3 | Published November 18, 2022 ©
LiveMatte
Although its controls are deceptively simple, the LiveMatte™ feature employs powerful chromakeying technology capable of extremely high-quality results. Used alone or in conjunction with DSKs and M/E Overlays, you will find LiveMatte can play a key role in your live productions.
Terminology
Chromakeying
Chromakeying (or keying) is used to combine images by eliminating a portion of a foreground image (effectively cutting a digital keyhole in it) to reveal another background.
It is an essential tool in video and film production. Typically, foreground footage is shot in front of a blue or green screen, and then that background color (the key color) is treated as transparent, allowing another image to be inserted.
For example, when you see a TV meteorologist in front of a weather map, that person is almost certainly posed in front of a green screen. The background is keyed out, to be replaced by computer generated imagery.

If you choose poor settings, foreground areas may inadvertently be cut away as well. Or, some areas that should be transparent may be only partially keyed. Good keying often requires judicious balance between too little and too much.
Matte

The term Matte refers to a black and white representation defining the transparent (background) and opaque (foreground) parts of an image during compositing. Portions of the matte that are grey are treated as semi-transparent, which is very useful in progressively smoothing edges between foreground source material and inserted background imagery.
Working with LiveMatte
Let’s consider the tools provided to help you achieve a great result.
The method by which part of the image is defined as transparent is generically referred to as chromakeying, for its dependence on the color values (chrominance) of the video stream (LiveMatte’s mature algorithms far exceed typical chromakeying techniques to provide real-time results).
LiveMatte supplies a digital version of this traditional tool. Controls in this group allow you to define and adjust the matte for the corresponding video input.
The controls are located in an expandable group in the Image tab of the Input Configuration panel for each Switcher source.
-
To access them, click the Configure button (gear) that appears above an onscreen monitor in the All Monitors tab.
Tip: Crop controls in the Input Settings tab can serve as a garbage matte tool for chromakey sources.
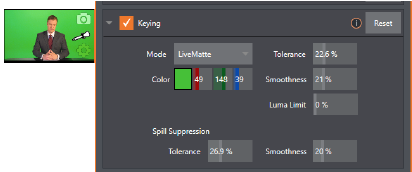
Color
Initially, LiveMatte removes a specific color from the foreground image. This color is chosen using the Color button. To choose this key color, click on the Color sample box and keep the mouse button depressed. Drag the eyedropper tool over one of the video monitors to choose the color you wish to remove and then release it. The neighboring color well is updated to show the color selected.
Tip: Enable the Lumakey switch to disregard hue and base the effect solely on luminance.
Tolerance
No physical green screen is perfectly comprised of one color. Wrinkles, folds and shadows along with the seemingly inevitable uneven lighting result in difference. For this reason, LiveMatte supplies a numeric slider Tolerance.
The Tolerance setting allows you to broaden the range considered as the key color, including more near-neighbor colors to be included in the matte. A low tolerance removes only color values close to the primary or key color. As you raise the tolerance, you extend the range of values on either side of the primary color that will be treated as transparent. This allows you to deal with those imperfections we mentioned.
On the other hand, it may be that there is (usually unplanned for) detail in the foreground that is somewhat similar to the key color. Reducing Tolerance may allow you to prevent unwanted holes appearing when the subject opts to wear his St. Patrick’s Day tie.
Smoothness
Smoothness defines a further tolerance factor, and a very useful one. We want our keyed foreground to blend smoothly into the background – rather than to stand out in hard relief like a postage stamp or decal. Smoothness serves this purpose, by defining a falloff zone of partial transparency. Don’t overdo it though, as aggressive settings can cause the foreground to become unnecessarily muddy.
Luma Limit
When working with poorly-lit backgrounds (or poor-quality footage), the color tolerance range separating the foreground (talent) from the background can be extremely narrow.
This problem can be aggravated by the subject’s choice of clothing, or when there are harsh shadows. There is often a strong chroma component (and associated chroma noise) in dark foreground areas. The noise may be partially or completely transparent when tolerances are critical. Because the noise varies over time, holes in the foreground can result, and even worse these may flicker on and off from one frame to another.
LiveMatte’s Luma Limit control makes it possible to overcome this issue. In essence, it restricts the chromakey operation based on luminance (brightness) values. Dark foreground areas which typically cause the problems just described normally have quite different luminance values from the background color, which is usually brightly illuminated. In simplest terms, problem areas of this type can be decisively pulled back into the foreground by pre-filtering the chromakey effect around a luminance threshold.
Generally, try to set up the best key you can before raising the Luma Limit from its default value of zero (no effect). Then gradually raise the limit until you are pleased with the result.
Spill Suppression
The term spill refers to key color unintentionally reflected or spilled onto the foreground subject. For example, a little green spill often appears on the shoulders of someone in a greenscreen shot.

The Spill Suppression controls let you remove key color spill in your scene by reducing the amount of that color in the foreground, where it doesn’t belong. The net result is that the impression of spill color is eliminated, or at least reduced to the point where it is not objectionable.
Use the Tolerance and Smoothness in similar fashion to the controls by the same name discussed earlier. Endeavor to subdue spill without overdoing it, which could result in an unsightly gray fringe around offending edges of your foreground.
Compositing
When you enable (and configure) LiveMatte for an input, the onscreen monitor for that input shows the source keyed over a checkerboard pattern (when the Checkerboard option is selected in Overlays for the monitor).
If you select the (LiveMatte-enabled) input as Input A in an M/E tab in LiveMatte mode, the keyed source is overlaid on sources in lower input rows. The composite result shows when the output is assigned to either the PGM or Preview row.
Cropping the Source
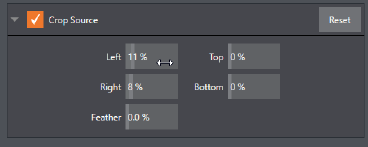
Unwanted items often remain after chromakeying.
Common examples include microphones or lighting fixtures dangling from above, harsh creases, blemishes or tears in the background screen.
-
Crop Source, located in the Image tab just below LiveMatte, can serve as a garbage matte to remove this sort of intrusion.
Recommendations for Your Settings
Fine Tuning
LiveMatte is straightforward to configure.
Some workflow tips:
Initially turn Smoothness off or nearly so. Likewise begin with a low value for Tolerance – perhaps just 5-10, or so. Put the video source on Preview or Program Output before you do so, to provide a larger view to help you assess your settings.
Pick your primary Color, but – before releasing the mouse button – slide the eyedropper around to different parts the background. Watch the monitor as you do so to see how the area of transparency is affected by different Color choices.
Release the mouse when you find the color that produces maximum results. It’s often preferable to pick an average color from a location fairly close to the boundary between the background and foreground regions.
Now you can start to ramp up Tolerance. Bring it up slowly until most of the background color has been eliminated, cutting away most of the background to within a few pixels of the foreground/background boundary. Now raise Smoothness to fine tune that edge region, and you’re nearly done.
Before considering your settings final, make sure to test the result using a moving source. This sometimes reveals that overly aggressive settings cause small blocks of pixels in the edge region to appear to snap on and off during motion - as they either qualify or disqualify for inclusion in the resulting matte
(A little reduction in Tolerance and increase in Smoothness usually resolves this problem).
Tip: It can be useful to zoom in using Position controls when fine tuning LiveMatte.
Lighting for LiveMatte
When preparing your set, the single most important aspect of pulling a clean key is lighting. The lighting should be even and diffuse. Bright hotspots and shadows create different shades on the wall, and overexposed areas lack sufficient color for clean keying (it is not how much light you have on the key wall, but how evenly lit that wall is). Naturally, you want to keep your green (or blue) screen clean and free of wrinkles, ripples, folds, tears, or other blemishes, as well.
Second, the distance from your talent to the screen behind can make a profound difference in key quality. When the subject stands too close to the key colored background, the key color reflects back onto the subject, creating a green or blue fringe that is difficult to remove. If you have available space, move your subject farther away from the wall.
When good distance is out of the question, you can improve things somewhat by placing lights above and behind the talent, lighting them from behind with a complimentary color filter over the light to cancel out unwanted reflection (for green use a magenta filter; for blue, orange or amber.
Don’t overdo back (or top) lighting, however. The limited dynamic range of the camera means there is little useful color data in badly over-exposed highlights. This can make it next to impossible to separate fringe zones (such as hair detail) from the background (especially when this is also overexposed).