Viz Vectar Plus User Guide
Version 1.3 | Published November 18, 2022 ©
Live Call Connect
Conduct live video calls from virtually anywhere using the Viz Vectar Plus Live Call Connect functionality. This capability enhances your productions with high-quality video and audio, allowing you to flexibly present remote conversations, interviews, reports, and more—regardless of the caller’s device.
Supported Applications
Microsoft® Edge Chromium is pre-installed on your Viz Vectar Plus system. However, if you prefer a different web browser, Google Chrome (or another Chromium™ based browser) can be installed. A number of popular video conferencing applications are also supported, for example:
-
Microsoft® Teams
-
Facebook Messenger
-
WhatsApp, FaceTime
-
VooV™ Meeting
-
Slack®
-
Discord
-
Zoom.
Note:
-
Exit the Viz Vectar Plus software to download and install the supported applications you wish to use.
-
To use FaceTime and Messenger please click the link below and install the WebView2 runtime using the x64 Evergreen StandAlone Installer.
https://developer.microsoft.com/en-us/microsoft-edge/webview2/#download-section
Working with Live Call Connect
Deployment Platforms
Viz Vectar Plus is designed to take advantage of the hardware accelerated capabilities of the latest versions of Windows. Because of this, the Live Call Connect feature requires Windows Build 19041 or later. There are some cloud platforms like AWS on which this might not currently be available in the current default configurations although this is of course very likely to change over time. In most cases you can work around this by bringing your own Windows 10 version and deploying that manually in the cloud platform. This may have implications on cost, technical complexity and licensing agreements with Microsoft. To do this manual process is not something Vizrt can support installing, however, we do support our software.
Application Desktop Widget
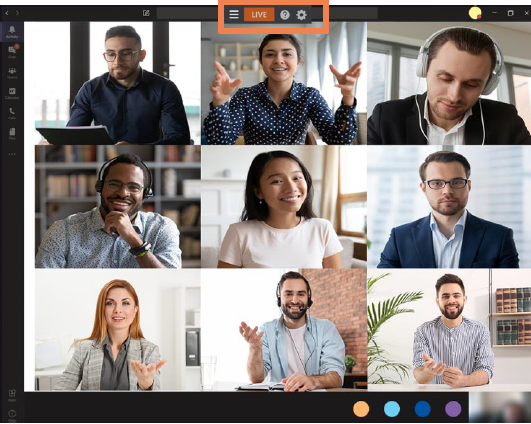
A special Live Call Connect widget pins itself to the title bar of your browser or conferencing app window when it has focus. The widget has the following components:
-
The hamburger icon at left side collapses the widget to a tiny size, reducing the possibility of its obscuring any of the application’s video sources.
-
The LIVE button performs several tasks, including detecting the caller’s video viewports, beginning video capture, auto maximizes the application screen, and locking the mouse out of the application to prevent it intruding (the LIVE button is highlighted in orange when active).

-
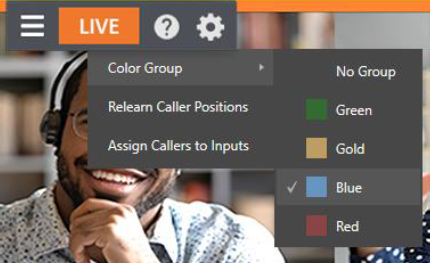
The gear on the right side of the widget opens a menu listing with the following options:
-
Color Group: After choosing a color corresponding to a color group in Viz Vectar Plus Switcher, you can click a caller’s video viewport in the conferencing application to assign that caller to the color-linked Switcher channel.
-
Relearn caller positions: This selection triggers the relearn algorithm, including re-detecting the caller’s screens (useful if things change unexpectedly in ways that can’t be automatically detected).
-
Assign callers to inputs: Automatically assigns caller video output from an application to Switcher inputs 9-17.
-
Help: Opens a convenient Help applet to walk through the use of the feature.
-
Setting Up A Call
You need at least one secondary monitor to access the Application Desktop you assign to it using the Workspaces menu (as discussed in the earlier section on Workspaces). Once you have selected the App Desktop from the Workspaces menu, the Live Desktop will appear on your secondary monitor.
Your video conferencing application(s) and the system default browser will appear in your task bar. Click on your preferred app’s icon, and join a meeting or display a web page in the usual manner for that application.
Note: Viz Vectar Plus does not support "High Contrast" mode within any video application.
In our example we are using Microsoft® Teams Application for a Live Call Connect walk-through. Notice the widget in the application’s titlebar (highlighted in orange). You can either host or join a meeting.
Note: When using the Teams application, we suggest using Fit to Frame (Microsoft Teams 1.4.00.4167 or higher) by right clicking the individual caller feeds.
Once all callers have joined, you can use the Assign Callers to Inputs menu item to automatically assign the number of inputs starting from input 9. Or you can manually assign the callers to Switcher inputs using Viz Vectar Plus standard Input Configuration dialog. After that is complete, it’s time to take it live (by pressing the LIVE button).
Live Call Connect attempts to maintain callers at the Switcher input you assign them to, but should the need arise you can turn off LIVE and apply the Relearn Caller Layout menu option. Live Call Connect crops out static application tools and borders, and supplies the callers’ video to Viz Vectar Plus Switcher as potential sources.
Note: Recording Switcher Inputs assigned to output from Live Call Connect is not supported.
Input Configuration
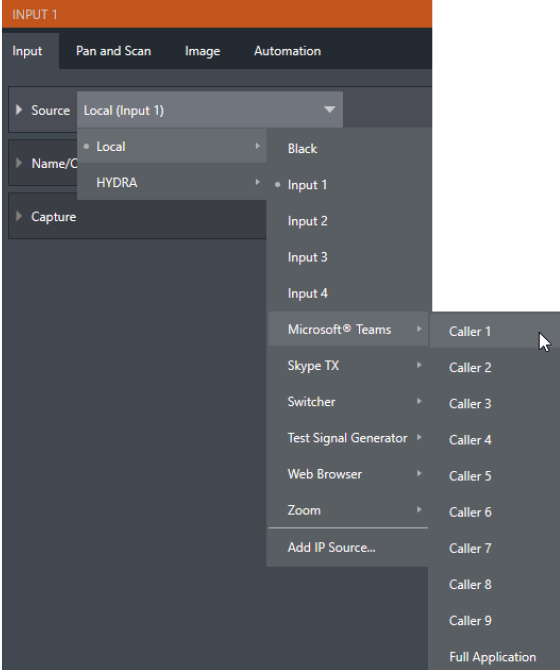
In the input configuration panel, the conferencing or browser applications appear along with other local sources. Each application supports up to a nine user configuration in each applications layout. Should you wish to capture the entire application interface, select Full Application. Web browsers offer just two options, Full Application and Page Area (which crops the browser’s toolbar at the top.
Audio Configuration

Viz Vectar Plus takes the system audio output for the supported applications and makes it available as an input in Viz Vectar Plus' Audio Mixer (labeled APPS, by default). You find System Audio listed as an optional selection in the Mixer’s Input Configuration Panel’s Connection options.
A/V Return to Caller
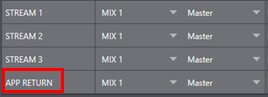
Viz Vectar Plus main video Mix 1 output is returned to the conferencing application, and passed to remote callers so those calling into the meeting can see it.
The audio return is configurable in the Output Configuration panel and corresponds to a mix minus of the Master and AUX busses, or any input.
Green Room Method
Zoom permits the meeting host to create “Breakout Rooms” to split your Zoom meeting into separate sessions. This feature, supported by Live Call Connect, provides a path to “Green Room” functionality. Examples where this feature is useful are helping to prepare callers before a live show or splitting-up the participants of a large class or meetings.
Steps to use Zoom’s “Breakout Rooms” as a “Green Room” with your Viz Vectar Plus are below, but first be sure to enable the Breakout Room setting, in the account, group or user settings.
Setup
-
External meeting host system (for example, laptop):
-
Launch NDI Webcam Input.
-
Select Viz Vectar Plus Mix 1 as the NDI source.
-
Set Webcam Input’s Audio Level to +20dB.
-
-
Zoom Preparations:
-
Set Zoom’s camera and microphone to NewTek NDI Video and Line (NewTek NDI Audio).
-
Start your meeting.
-
Name the local Host connection Program, and Spotlight the connection (this is your show).
-
Open a breakout room and name it Green Room.
-
-
-
Viz Vectar Plus:
-
Launch Zoom on the App Desktop.
-
Connect to the meeting.
-
-
Zoom configuration (meeting host laptop):
-
Give the Viz Vectar Plus connection a suitable Zoom name (for example, Operator).
-
Make Operator a co-host (provides the ability to mute/unmute callers in the Green Room).
-
Assign program participants and “Operator” to the “Green Room” (using the Breakout Room option that moves them automatically).
-
Different Rooms for Different Purposes
-
Callers in the main meeting see Viz Vectar Plus program (Mix 1) from Webcam Input.
-
Callers in the Green Room see and hear each other and Program output.
-
As a co-host, the Operator can selectively mute/unmute any caller in the Green Room.
Note: Zoom has a “pre-approved consent to be unmuted” feature (Meeting Options > Request permission to unmute participants). When enabled, callers are prompted to let the host mute/unmute them. Permission persists for any future meeting with the same ID, and is particularly useful for callers in the Green Room.
Displaying a Caller in Your Show
-
Either the Host or Viz Vectar Plus Operator can assign program participants to the Green Room.
-
The Operator can selectively mute/unmute callers in the “Green Room”, and use TalkBack to address them without disrupting program audio.
-
The Operator assigns callers in the Green Room to Viz Vectar Plus Switcher inputs and can display them in the program, and mix Green Room caller sound into the show.
Note: Adding or removing a caller to/from the Green Room may require a relearn operation, so changes to Green Room assignments should not be performed when a caller is On Air.