Viz Vectar Plus User Guide
Version 1.3 | Published November 18, 2022 ©
Monitoring Video
Your Viz Vectar Plus system provides extensive and versatile monitoring for controlling your live productions. Monitoring features also warn you of conditions that might affect output quality, as well as providing access to adjustments providing quality control and creative alternatives.
Features include Proc Amp, LiveMatte, Hotspot, Tracking and Edge controls (see section Input Configuration).
This section covers the following topics and procedures:
Live Desktop and Multiview
The Live Desktop provides a number of multiview monitor displays:
One on the Live Desktop (the Interface), normally comprising its upper third,
the others consisting of fully independent displays presented on secondary monitor outputs on the rear connector panel.
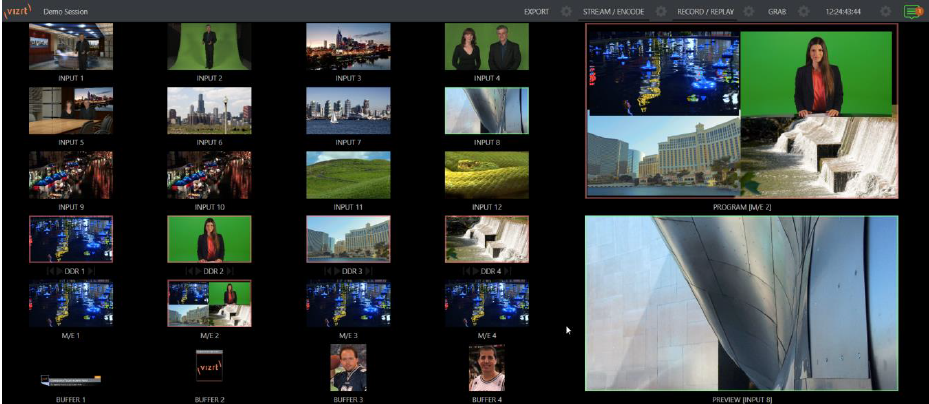
Live Desktop Monitors
Because the Live Desktop provides various control features along with a multiview pane, and controls can consume a greater or lesser amount of the screen, the multiview on the Live Desktop is adaptive.
To put this another way, the viewport layout of the Live Desktop’s multiview pane re-arranges itself as required to make optimal use of the space available.
For example, when tabbed modules (such as the DDRs) at the bottom of the Live Desktop are fully expanded, the Program and Preview viewports above are stacked one above the other. On the other hand, if the tabbed modules are minimized, these viewports are side by side.
Workspace Presets
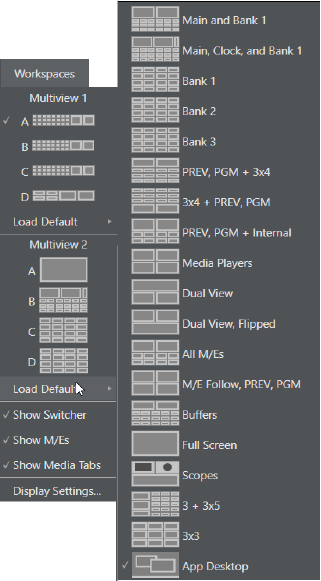
The basic layout of all multiview monitoring areas is established by assigning a Workspace preset to the screen. To access these presets, move the mouse pointer over the left-hand end of the Dashboard at the top of the Live Desktop to reveal the Workspaces menu.
Four presets, labeled A-D, are provided for each connected Multiview screen. Select a preset and assign a layout to it using the Load Default menu point. Continue to customize the display options for the viewports, and recall the entire setup at a moment’s notice by reselecting it (to reset a preset, select it again and reload the default layout). Each viewport in any layout offers diverse input or output source options. The settings you select for individual monitors are retained in the current Workspace preset.
Note: The Display Settings option in the Workspaces menu lets you choose the Resolution of connected monitors, and apply Proc Amp settings to them. Select the native resolution of external display devices for best results. Changing Resolution can cause frames to be dropped, so modifications during live production are discouraged.
Scopes

Scopes represent a very useful monitoring option, providing Waveform and Vectorscope displays. Among other things, these help you to judge Proc Amp and LiveMatte settings (see Video Calibration).
To display the Scopes view, select that entry from the Load Default options for a Workspace. By default, scopes and the associated monitor refer to the Look Ahead Preview composition (including delegated DSK channels, or FTB), shown at left for reference. Right-click a scope to change the monitored source to the source you wish to view. Adjust the Brightness controls in the scope footers, and the trace overlay in full or solid colors using the context menu.
Tip: To use Scopes to calibrate a DSK source independently, first select it as the Preview row source.
Double-click a monitor in this Workspace to access Proc Amp and LiveMatte™ controls for the current source.
Viewport Options
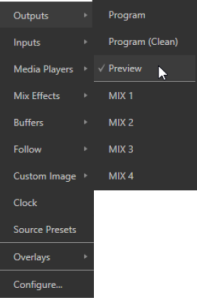
Right-clicking an individual monitor viewport also opens a context menu. The first option group governs the monitor’s source.
In addition to external video inputs and network sources, you can assign the output of
-
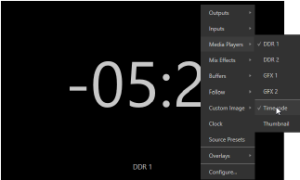
Media Players
-
M/Es
-
Main Program output (including DSK channels and effects)
-
Program (Clean)
-
The main Switcher’s look ahead Preview
-
Another Preview showing M/E source B output (Mix mode only)
-
Any Output.
Several special displays are also available.
-
Selecting the Clock item replaces the video display with Event Clocks showing current time along with countdown style Start and End clocks.
-
The Custom Image feature lets you display a network logo.
-
A Timecode Only option that appears at the bottom of the Media Players sub-menu.
This displays a time counter showing the current position of the playhead in the Media Player (respecting the specified player’s Warning Colors option, too).
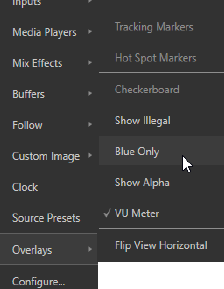
Below the basic source selection options in the menu, you’ll find another group that provides access to optional Overlays for the monitor port.
Available overlays include:
-
Checkerboard (shows a checked pattern wherever transparency exists in the source).
-
Title Safe (note this is a 4:3 format safe margin).
-
4:3 Safe (a true 4:3 frame edge boundary).
-
Center Cross to help with alignment.
-
Show Illegal.
-
Show Alpha.
In addition, you may choose to display:
-
VU Meters with the source
-
Tracking Markers
-
Hot Spot Markers.
Long-standing practice when using color bars to calibrate video signal color attributes requires special video monitors with ‘blue only’ (or ‘blue-gun’) displays.
-
The Blue Only viewport option means you can now use any color monitor for this purpose.
Flip View flips the images horizontally, useful for a variety of studio requirements such as talent orientation in greenscreen applications (including Hotspot operations).
Viewport Presets
From corporate video to reality TV, PTZ cameras are playing an expanded role in modern production. Viz Vectar Plus gives top billing to your PTZ presets right in its Live Desktop or any connected Multiview. The viewport context menu option Source Presets lets you assign preset controls to any viewport. Large, colorful thumbnail icons represent PTZ presets for robotic cameras, Pan and Scan presets (virtual PTZ), and M/E Comps (or zoom presets on systems lacking Comp support).
With a click, or tap on a touchscreen, your source moves to its new position (Pan and Scan sources can also be set to Cut).
Using Viz Vectar Plus' Multiview workspace options you can create custom layouts providing one-click access to presets for multiple sources of different types.
Configure
-
Configure: Opens the Input Configuration panel for the corresponding source.
Tip: Double-click a viewport to quickly open Input Configuration without using the gear or menu.
Viewport Tools
Viewports provide additional features when you move your mouse pointer over them.
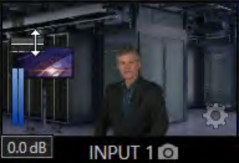
When the VU meter overlay option is enabled, a volume knob (similar to those in the Audio Mixer) is shown.
-
Drag this knob up or down to modify the audio source associated with this input.
Tip: When using a touchscreen with the Click Viewports to Show on PGM option enabled, swiping the monitor horizontally (rather than tapping it) will temporarily display viewport overlays.
Clicking the Configuration (gear) icon for a Switcher input, a Preview monitor, or Program, opens the corresponding Configuration panel. Notice, too, that a snapshot icon appears in the label below most viewports. Click this to quickly grab a still image (images grabbed in this manner obey the Add grabs to option in the Grab Configuration panel).
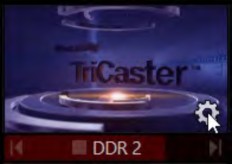
The viewports for Media Players show handy transport control in the label area: From left to right, Previous, Play/Stop, and Next. In addition, a progress gauge is shown in the background to show the playhead position and warning colors as playback nears its end.
Tip: When LiveMatte, Proc Amp, or Crop settings are active for a source, the configuration gear gadget for a viewport is color coded and shown full-time.
Program Monitor
The Program Output monitor could hardly be more important, hence it’s prominent default location at upper-right on the Live Desktop.
Normally, this viewport shows what the Switcher is sending to Program output at any moment. The display includes the BKGD video layer as well as any other video layers (such as one or more DSKs, or FTB) displayed above it.
Note: By default, Program output is sent to the MIX 1 output, subject to assignments made in the Output Configuration pane. When you move your mouse pointer over the Program monitor, a Configure button (gear) appears at lower right. Clicking this button opens the Configuration panel (see Output Configuration).
Look Ahead Preview
By default, the Live Desktop also prominently displays the Look Ahead Preview monitor (labeled Preview). The Look Ahead Preview is versatile and powerful. Instead of showing just one video source (the Preview row selection), it displays what the outcome of a Take operation applied to all currently delegated video layers would be.
-
Delegating the BKGD layer indicates you intend the next transition to swap the Program and Preview layers. The Preview monitor shows the Preview row selection as its background.
-
When the BKGD is not delegated, that layer does not change during a transition. In this case the Preview and Program monitors share identical backgrounds.
-
Delegated DSK layers are shown above the background on Preview according to their current state. If a delegated DSK layer is currently displayed on Program output it does not appear on Preview (since the next transition would remove it).
In other words, what you see is what you get: After performing the next Take or Auto operation as currently configured. This lets you set up the next shot, check its composition (including titles and overlay positioning), and switch to it with sublime confidence.
M/E Preview and Program
Your live production system also provides a Look Ahead Preview monitoring capability for M/Es.
-
Monitor viewports can be assigned to display the output of M/Es.
-
You can freely assign a monitor as a secondary program output monitor in cases where you are using an M/E to supply an auxiliary program mix for independent display.
-
Viewports can be assigned to specific M/Es, or follow the delegate status (Outputs > Follow > M/E Program).
To work with the M/E Preview option
-
The Viewport Options menu group Follow, lists a special M/E Preview option for this purpose.
Tip: All viewports assigned as M/E Previews show output from the same M/E. Making an M/E delegate selection updates all viewports when Tabs Follow all Delegates is enabled.
Just like the main Look Ahead Preview, the M/E Preview respects Delegate selections made in the Transition section of the assigned M/E.
This shows what results from the currently configured (M/E) Take/Auto operation.