Viz Mosart Administrator Guide
Version 3.9 | Published November 04, 2019 ©
Building Viz Mosart Templates
This section contains the following topics:
Working with Template Sets
A Viz Mosart template and its variants are arranged in a set. From the AV Automation utility, you have several operations:
To Add a Template Set
-
Select File > New template set.
-
Enter the name of the new set in the text box.
-
Click OK.
To Open a Template Set
-
Select an existing template set with File > Open template set.
-
The name of the currently opened set is shown at the top of the Template Editor.
To Rename a Template Set
-
Select File > Rename template set.
-
Enter the new name in the text box.
-
Click OK.
To Delete a Template Set
-
Select Edit > Remove template set.
-
Confirm delete in the dialog box.
To Copy a Template Set
-
Select Edit > Copy template set.
-
Enter the name of the new set in the text box.
-
Click OK.
This copies the template set including all containing templates.
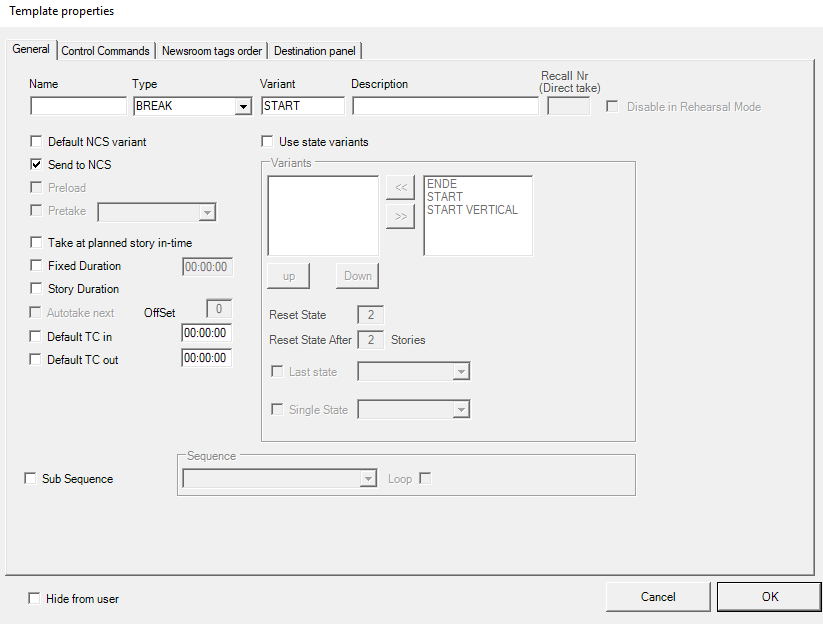
Template Properties
|
Item |
Description |
|
Name |
The name of the template. This value will only show in log files. English language is preferred, for making it easier to understand log-files. |
|
Type |
The different primary and secondary templates types are described in the Viz Mosart User Guide, section Viz Mosart User Interface under Rundown Window. |
|
Variant |
The variant is a unique name for the selected type, and should match the value entered in the newsroom system. |
|
Description |
Description of the template (optional). English language is recommended, for future maintenance purposes. |
|
Recall Nr (Direct take) |
(Applies only for templates in the Direct takes template set). Values from 0-999 apply, and are the value recalled from the numeric keypad in the Viz Mosart client application. Note: Avoid starting numbers with zero (0). For example, use 56 instead of 056. |
|
Disable in Rehearsal mode |
(Applies only for templates in the Direct takes template set). The DirectTake will not be executed when in Rehearsal Mode |
|
Default TC in |
(Applies only for templates in the Direct takes template set). |
|
Default TC out |
(Applies only for templates in the Direct takes template set). |
|
Default NCS variant |
This sets the template as the default variant for the selected type. |
|
Send to NCS |
When selected, allow this template to show in the NRCS ActiveX. |
|
Preload |
When selected, enable the preview functionality for the Accessory template. The Accessory template must have time code 00:00 for this to function. |
|
Take at planned story in-time |
If you want a story to start at a specific time of day, you can add a template with this option checked, to a story that has a set "hit time" in the NRCS. The "hit time" must be included in the story data sent to Viz Mosart, and the field-name must be mapped to back_time in Newsroomsettings. See Story External Metadata. |
|
Fixed Duration |
Make the template always have the same length (overriding the time from the NCS) in the Viz Mosart rundown. Select this option and enter the time in mm:ss:ff (minutes:seconds:frames). This can also be combined with Autotake to make a frame accurate continue to the next story. Remember to write the whole number each time, you cannot edit a single character at a time. |
|
Story duration |
When selected, the duration of the template will be set equal to "story editorial duration", coming from the NRCS. The "story editorial duration" must be included in the story data sent to Viz Mosart, and the field-name must be mapped to story_duration in Newsroomsettings. See Story External Metadata. |
|
Autotake next |
When selected, automatically perform a Take Next (F12) at the end of the template's duration, with an offset as described in Offset below |
|
Offset |
Set the offset when Autotake is enabled to adjust the Viz Mosart continue action at the end of the event. The value is in frames. Negative values are allowed. |
|
Sub Sequence |
A call to a bundle comprising a story with all its sub-elements. Please refer to the section Creating sequences of the Viz Mosart User Guide for details. |
|
Hide from user |
When selected, this template is removed from the template list in the Quick Editor. |
|
Use state variants |
Please refer to Additional Template Functionality for explanation of state variants. |
|
Control Commands (tab) |
If the template should have control commands attached, configure here. Please refer to Control Commands in Templates for further instructions. |
Working with Templates
To Add a Template
You can add a new template to the currently selected template set.
-
Select File > New template.
-
Enter the new Template Properties.
To Edit a Template
-
Select Edit > Template properties.
Template properties can also be accessed by right-clicking in the device's Function area. See the table Template Properties.
To Remove a Template
-
Select File > Remove template.
-
Confirm delete in the dialog box.
To Copy a Template
You can copy a template from one template set to another template set.
-
Open the template you want to copy.
-
Select Edit > Copy template.
-
Switch to the other template set, and then apply Edit > Paste template.
-
Select Edit > Paste to all to copy the template to all template sets.
Accessory Templates
In this example you create an accessory template for driving content to a video wall driven by the Template Router feature in Viz Mosart. this feature merges new template-based instructions onto an existing one, enabling, as in this example, an asset to be diverted to the video wall. You need a separate accessory template for each wall that will be controlled. The accessory template can contain settings for cross points, video server port, graphics engine and aux.
Creating the Wall Accessory Template
The wall accessory template is created as a standard template.
-
You can create a new accessory template with a variant name of for instance "wall2".
Switcher Cross Point
-
To change switcher crosspoints enable Switcher crosspoint in the Template Editor.
The Switcher XPoints appear.
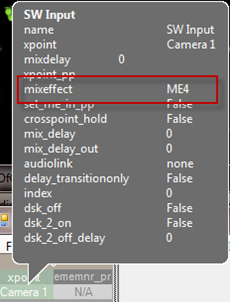
Here you can set the ME-step you want for the wall taken template. -
When the template is set to the wall item it will use this ME step instead of the one specified in the template.
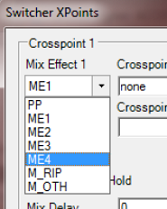
The ME-step will show as a mix effect in the Template Editor.
Video Server Port
If a video clip is wall taken; another video server should be used.
-
This can be changed in the accessory.
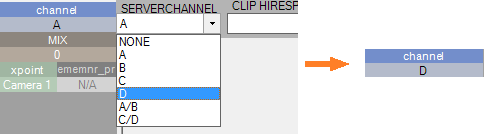
Make sure the video clips are available through this port.
AUX
-
The AUX is controlled by the template but should be added to the accessory template.
The setting will be replaced by the wall taken template.
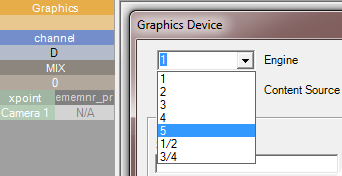
Graphics
-
To avoid conflict with other graphic elements, you may want the wall to run on its own engine. This can be changed in the accessory.
A wall taken graphic element will then use this engine.
Working with Device Functions
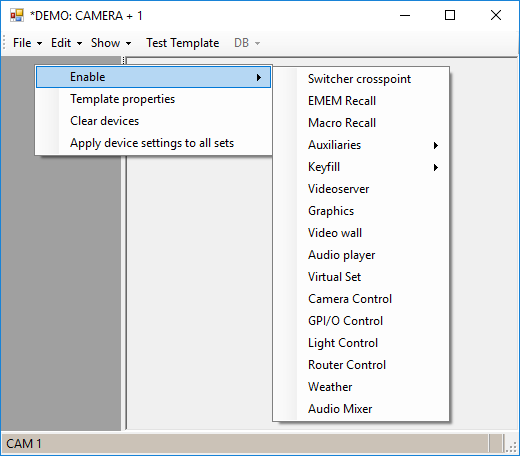
To Enable Device Functions
-
Right-click in the device Function area.
-
Select the device to configure from the Enable menu.
This opens the edit box for the selected device. -
Please refer to section Template Device Functions for a list of properties for each device.
-
Right-click over the top half of a device Function area.
-
Select Device properties. Please refer to the Template Device Functions for a list of properties for each device.
Depending on the Protocol chosen, the caption EMEM Recall may alternatively be:
-
Emem Recall
-
Dmem Recall
-
Snapshot Recall
-
MemoryRecall
(Macro Recall may alternatively be named Custom Control).
To Remove Device Functions
-
Right click in the Device function area
-
De-select it from the Enable menu.
Linking Device Properties and Newsroom Tags
To Make a Device Property Editable from the NCS
-
Right-click over Property and select Add newsroom tag.
The property is then reassigned to the value supplied from the newsroom system.
If several device properties are given to a newsroom tag with the same name in a template, all devices use the value given in the NCS.
See also: Newsroom Tags.