Viz Mosart User Guide
Version 3.9 | Published November 04, 2019 ©
Wall Manager
The Wall Manager control helps you control any wall elements or any other AUX devices using the Viz Mosart GUI. The wall manager is optimized to be used with a touch screen.
This section contains the following topics:
Creating a Wall Shortcut Item in AV Automation
When creating a wall shortcut item you have to create a new shortcut. But before you can do that you need to create a wall accessory in AV Automation. The accessory will merge with the taken template causing the signal to go to the wall. The accessory can contain settings for cross points, video server port, graphics engine and aux.
Creating the Wall Accessory Template
The wall accessory template is created as a normal template in AV Automation.
-
You can create a new accessory template with a variant name of for instance "wall2".
Switcher Cross Point
-
To change switcher crosspoints enable Switcher crosspoint in the Template Editor.
The Switcher XPoints appear.
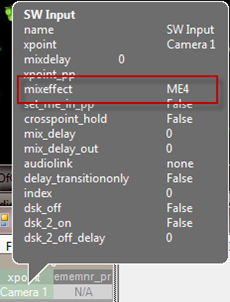
Here you can set the ME-step you want for the wall taken template. -
When the template is set to the wall item it will use this ME step instead of the one specified in the template.
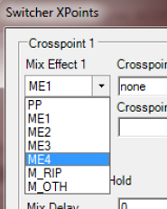
The ME-step will show as a mix effect in the Template Editor.
Video Server Port
If a video clip is wall taken; another video server should be used.
-
This can be changed in the accessory.

Make sure the video clips are available through this port.
AUX
-
The AUX is controlled by the template but should be added to the accessory template.
The setting will be replaced by the wall taken template.
Graphics
-
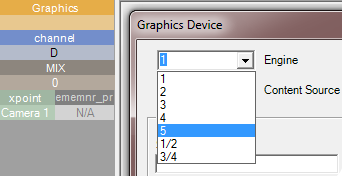
To avoid conflict with other graphic elements, you may want the wall to run on its own engine. This can be changed in the accessory.
A wall taken graphic element will then use this engine.
Creating a Wall Shortcut
When we have one accessory for each wall we want to control we are ready to create some wall elements in the Viz Mosart GUI. Create the wall shortcut using the Keyboard Editor on the Viz Mosart menu bar.
(Tools > Keyboard Shortcuts > Keyboard shortcuts editor)
-
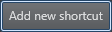
Click Add new shortcut.
-
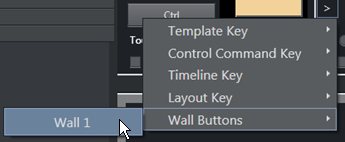
Select Wall Buttons > Wall 1 (see The Wall1 Shortcut)
-
Select the accessory for the wall you want to control.
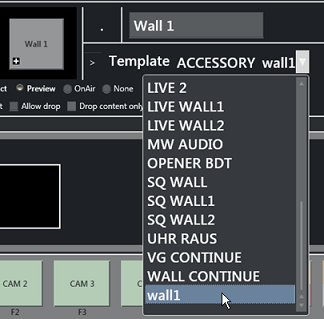
-
Type in a name for the wall. It is recommended that you call the wall shortcut the same as the accessory, but this is not mandatory.
-
If you are using several wall elements you have to drag and drop them in the wall canvas in the keyboard editor.
Here you can arrange the wall items and make it easier to recognize the different elements during production.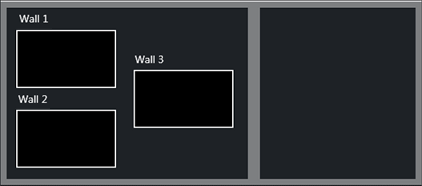
-
When you have added all the wall items you want to use
click Save and close the editor.
Wall Manager User Interface

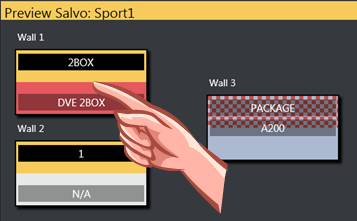
The wall manager provides enables sending content (clips or graphics) to specific destinations in the studio, typically video monitors (walls).
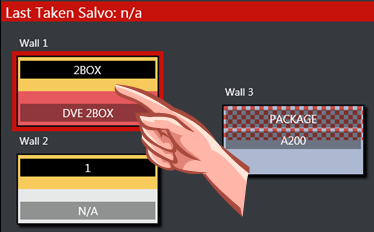
Areas of the Wall Manager
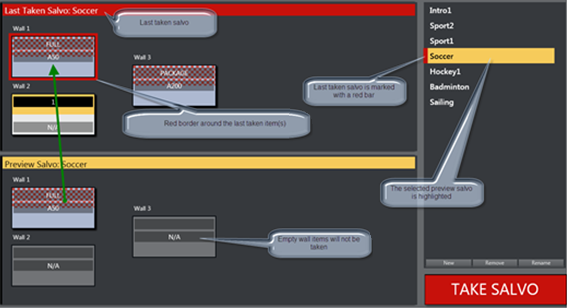
-
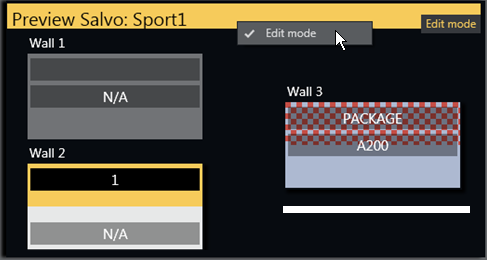
In the top area (red) the on-air wall templates are shown. In the bottom preview area (yellow) the selected salvo is shown.
-
The TAKE SALVO button takes the wall items in the preview area on air. It is also possible to take templates directly on air without using the salvos.
-
During a show you can change templates on preset video wall salvos by selecting a salvo and then pressing Take Salvo.
Compact View or Salvo View
The wall manager can be viewed in the GUI in either Compact view or Salvo view.
To Change the View Setting
-
Go to Tools > General settings
-
In the Settings window select User interface > General
-
Select the Use compact wall manager view option.
In Compact mode, the wall manager only shows the on air salvo section. This view works well when placed above the Quick Access Panel and/or Media Pool, so you can drag elements from the Media Pool or select an item in the Quick Access panel and tap a wall item to execute the template.
The Wall1 Shortcut
A wall item in Viz Mosart GUI is defined as a shortcut of type Wall1. This item can be modified very quickly and taken on air using a Direct Take Wall Shortcut or a Wall Salvo.
Layout of Wall Items
The layout of the wall items can be set in the keyboard editor.
-
You can also possible to change the layout in the UI control by opening the Context menu of the Preview Salvo header.
-
The canvas then changes background color and enters Edit mode.
-
While in this mode it is possible to drag the wall items around.
-
When you are finished you must again click Edit mode in the upper right corner to exit this mode.
The canvas will then be ready again.
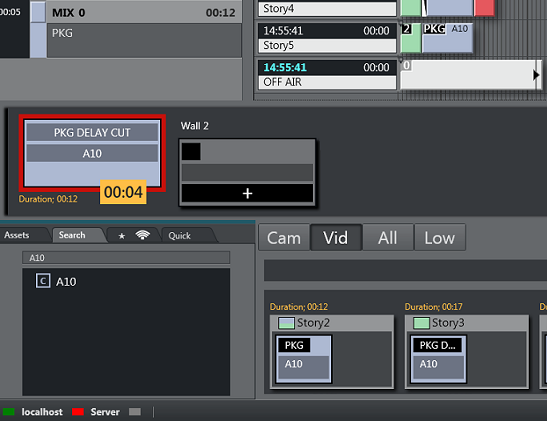
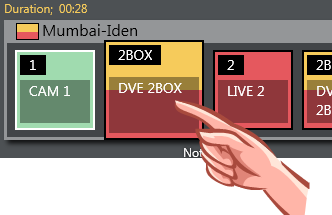
Countdown of Video Wall Elements
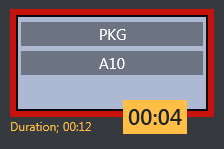
If a video clip is played on a wall using the methods described above, the Wall Manager will display a countdown of the clip in the element in the on air canvas.
When the video clip is stopped, the countdown square is not shown.
For example, the image below shows a clip with a duration of 12 seconds, and 4 seconds remaining.
The clip can be controlled by sending control commands from the GUI with some parameters. When the clip is taken on a wall item it will be cued and played, meaning that the countdown will start immediately. By using the Video Port Control Commands the clip can be paused, stopped, re-cued and other additional operations.
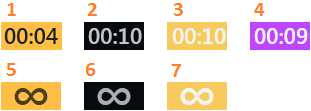
The Video Wall countdown states are:
-
Playing
-
Cued
-
Paused
-
Playing but time remaining is low (the value is specified in Settings > User Interface - Preview/Program Window > Clip visual countdown)
-
Playing and Looping
-
Cued and ready to begin looping
-
Paused while looping
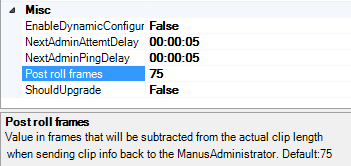
Post Roll Frames
The media administrator has Post roll frames, which will not be used when counting down. For example, if a post roll of 75 frames is used, then there will still be 3 seconds left of the clip.
Set the Post roll frames to 0 if you want to see the actual countdown.
Direct Take Wall Shortcut
A Direct take wall shortcut allows you to take a template directly on air on a wall very quickly and easily.
To Direct Take Wall using a Keyboard Shortcut
-
Choose a selectable keyboard shortcut. (It will be highlighted in the keyboard buttons panel)
-
Select the wall element to take on air
To Direct Take Wall using Quick Access Panel Shortcut
-
Make sure the Quick Access Panel Command Mode is Sel - Select Mode.
-
Select a Story Item
-
Select the wall element to take on air
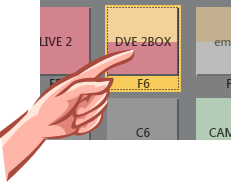
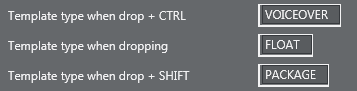
To Direct Take Wall by dragging from Media Pool
Any item from the Media Pool can be dragged and dropped directly on a Wall item. This also applies for video clips located with the Search Tab. These clips will then use the template as defined in Tools > General settings > User interface > Search pool.
Wall Salvo
A Wall salvo is a set of templates that will be sent to some wall elements. When taking a wall salvo all the wall items in the salvo will be taken on air. The Wall Manager UI encourages the use of wall salvos when working with wall elements.
To Add a Wall Salvo

-
To add a new wall salvo click the New button, type in a name of the salvo and press OK.
-
You also have the option to Remove or Rename the selected/previewing salvo.
To Fill a Wall Salvo
To fill a wall salvo with templated items, you use a procedure similar to that for Direct Take Wall Shortcut.
The only difference is that you click the wall items in the Preview canvas instead of the items in the On air canvas, as follows:
To Fill a Wall Salvo Shortcut Using a Keyboard shortcut
-
Choose a selectable keyboard shortcut. (It will be highlighted in the keyboard buttons panel)
-
Select the wall element to fill in the preview canvas
To Fill Wall Salvo Shortcut using Quick Access Panel
-
Make sure the Quick Access Panel control is in Sel - Select Mode
-
Select a Story Item
-
Select the wall element to be filled in the preview canvas
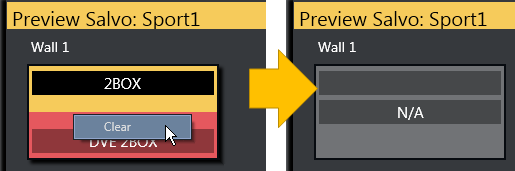
To Clear Existing Wall Salvo Items
-
To remove a wall item from the preview canvas you can select another item from the keyboard buttons or Quick Access panel and click the wall item you wish to replace.
-
To clear a wall item, open the context menu and select Clear.
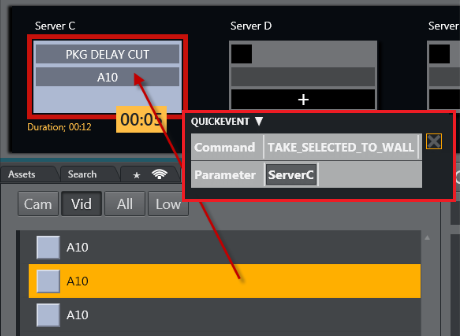
To Send Items to Wall using Quick Access Tab
-
Select the item you want to send to wall using the QUICKEVENT commands.
The Quick Access Tab (QAT) can be used with the QUICKEVENT Control Command TAKE_SELECTED_TO_WALL. If you want to use the selected preview wall salvo then use the PREVIEW_SELECTED_TO_WALL control command. -
Click the keyboard button with the defined shortcut with the QUICKEVENT variant TAKE_SELECTED_TO_WALL and the name of the accessory used by the wall item as the parameter.
You can also drag and drop items from the Media Pool to any wall.
Video Clip Playout Use Cases
Independent Video Port Control
-
To play cover pictures from independent video ports, so that the director can choose to air these clips across live events, studio discussions or as-live clips, use the Wall manager, as well as Quick Access Panel.
Combining Quick Access Panel and Wall Manager for Video Clip Playout
In combination, these elements become a “clip router” – enabling the operator to select any clip from the Quick Access panel and send it to cue and play in the port of their choice.
If available, the Quick Access panel and Wall Manager can be set up on a touch screen – making it even more user friendly.
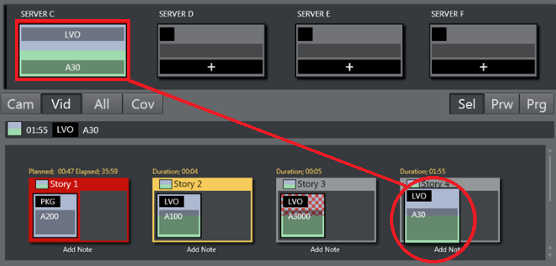
With this configured it is now possible to manually assign clips to play in these four ports simultaneously - outside the timeline of Viz Mosart. As long as the selected mode in Quick Access panel is Sel - Select Mode. These routings are entirely independent of the A/B roll. Ensuring that the primary clips will not be interrupted by the playout of cover pictures.
In the example below, the LVO clip “A30” has been sent to play in Server Port C.