Viz Engine
Version 3.10 | Published April 03, 2018 ©
Video Wall Setup Instructions
This section has information on the following topics:
Make sure that the monitor cables are the same for all cards. For example, a video wall configuration with six monitors on two cards, should use three outputs on each card with the same connectors on each card. If required, adapters can be used to connect the displays to the machine.
Make sure the NVIDIA G-SYNC card receives the same reference signal as the video board:
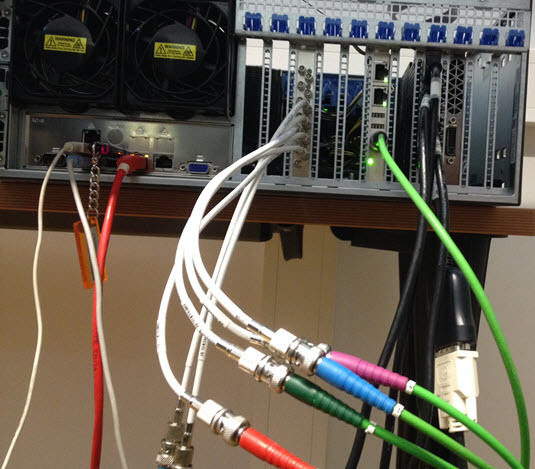
If a Matrox X.mio2 video board is in use, the loop through of the reference signal can be used, as illustrated below:
Pre-Requirements for all Setups
-
Shut down the machine.
-
Install the graphics device, NVIDIA G-Sync board and Matrox X.Mio3. Please refer to the related documentation included with the hardware. For multiple CPU setups with two graphics devices, make sure that both devices are on the same CPU.
IMPORTANT! The NVIDIA M6000 and P6000 card must be installed using the 8-pin power adapter which is included with the card. Installing the card using a 6-pin power connector will have a negative impact on performance and can lead to unexpected system behavior with reports of a PCI error.
-
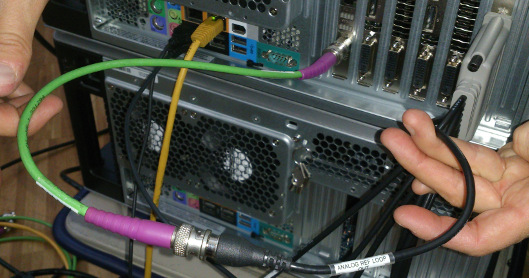
Connect the NVIDIA G-Sync and Matrox X.Mio3/DSX.LE4 to the Genlock source.
When attaching the connector cables between the graphics card and the G-SYNC card, make sure that the red line on all of the connector cables are facing the card’s mounting bracket, towards the back of the case. Failure to do so can result in synchronization issues. -
Connect the Matrox video input and output jacks.
-
Connect one monitor only to the graphics card, for the initial setup.
-
Boot the machine.
-
Install NVIDIA drivers and Matrox DSX.Utils. Reboot the machine as required.
-
Shut down the computer and connect all remaining video wall displays to the graphics card. For configurations with more than one graphics card, make sure to use the same outputs on all cards. Boot the machine and proceed with the Order of Steps to Set Up NVIDIA Mosaic.
Configure the NVIDIA driver for Video Wall
-
Using the standard NVIDIA settings for Viz Engine, change the following parameter:
-
Vertical Sync:On.
-
-
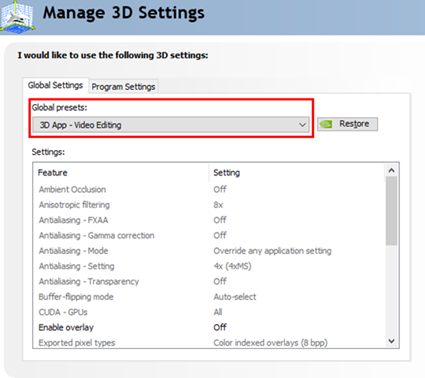
Apply the changes, then select 3D App - Video Editing from the profile drop-down menu, and apply changes again:
Order of Steps to Set Up NVIDIA Mosaic
Please take a look at the Troubleshooting section prior to setting up NVIDIA Mosaic for the first time, as it provides solutions for common issues that may arise during Mosaic setup.
IMPORTANT! For 50 Hz setups, make sure that there is no EDID-file loaded. Then start the Mosaic configuration, there is no need to perform more steps. For 59.94 Hz, load the EDID-file and make sure it is applied properly by verifying every single monitor in the View System Topology panel.
If running with two or more cards, make sure the same outputs are used on each card. For example, if using two DisplayPort outputs and one DVI output on the first card, the same outputs must be used on the second card, etc. Failure to do so may result in Mosaic setup failure, with an error message stating that the configuration is not supported.
-
Enter Mosaic configuration in the NVIDIA control panel and setup Mosaic for the required refresh rate:
-
Synchronize the GPU to the internal house-sync, by configuring the NVIDIA G-Sync device in the Synchronize displays panel of the NVIDIA Control Panel:
-
NVIDIA Quadro Sync
Proceed with adjusting the Viz Engine Video Wall Configuration Settings to finalize the video wall configuration.
-
NVIDIA Quadro Sync
The NVIDIA Quadro sync card is used to synchronize the graphics cards with the house clock, and is required for video wall configurations.
V-sync must still be set in the NVIDIA driver to ensure that the OpenGL SwapBuffer operation takes place at the vertical retrace, to avoid tearing between two frames. The Quadro Sync board synchronizes the vertical retrace of all the displays, it does not lock the OpenGL SwapBuffer operation to the vertical retrace.
To Check the Status LEDs of the G-Sync Device
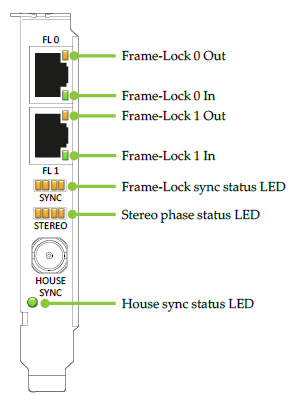
-
Ensure the House sync status LED indicates that a proper sync signal is connected.
-
Ensure that the Frame-Lock sync status LED is shining green. It must not blink or shine orange. When sync is stable, the Stereo phase status LED should also be lit green.