Viz Engine
Version 3.10 | Published April 03, 2018 ©
Scene Default Values
This section configures the default values for new scenes.
-
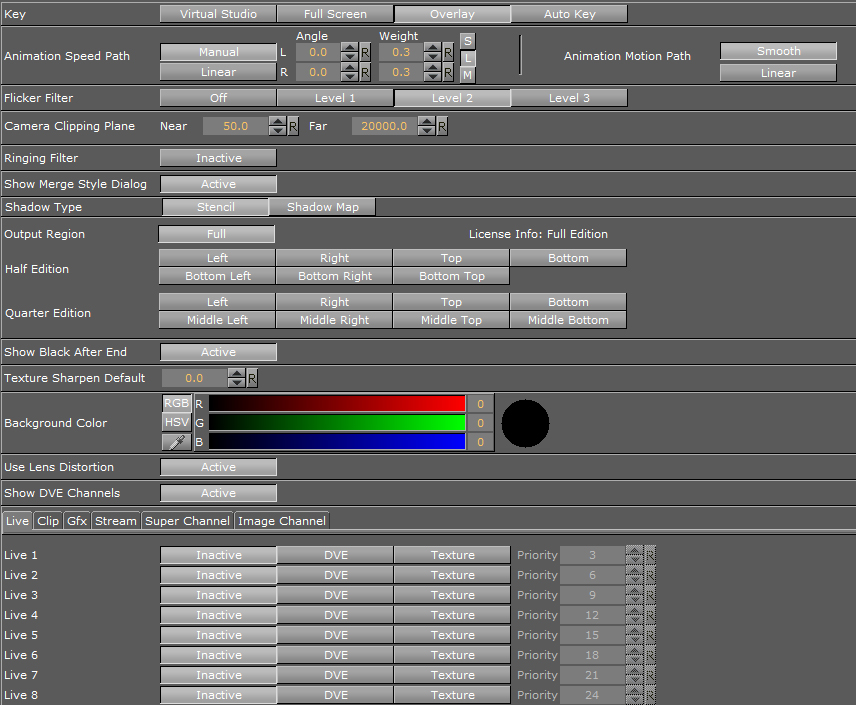
Key: Sets the key mode. Alternatives are; Virtual Studio, Full Screen, Overlay, and Auto Key.
-
Animation Speed Path: Set the default animation speed either to Manual or Linear, and define the default Angle and Weight.
-
Animation Motion Path: Defines the default motion path between position key frames. When set to Smooth the motion path will be calculated as a Bezier curve between position key frames. Handles will be added to the key frame positions in the preview window to allow for path editing. When set to Linear the animated object will follow a straight line between position key frames. This setting can be changed individually under Path, in the Viz Artist Channel Editor.
-
Flicker Filter: When enabled it will reduce interlaced flicker on high contrast objects. For example small lines and hard objects. Alternatives are; Off, and Level 1-3.
-
Camera Clipping Plane: Sets the range of the virtual camera. Near sets the close range while far defines the far range. Only objects within this range will be rendered.
-
Near: Sets the Near value to clip unwanted objects from the foreground. Default value is 50.
-
Far: Sets the Far value to clip unwanted objects from the background. Default value is 20000.
Note: The camera range is where the Z-buffer is within. So if Z-buffer problems arise, they may be solved by editing the camera clipping plane settings.
-
-
Ringing Filter: Sets the default value for the Ringing Filter. A ringing filter reduces high frequency values in the video signal created by high contrast and color changes in horizontal directions.
-
Show Merge Style Dialog: Enables the user, when opening a scene in Viz Artist, to open old-style merged objects and expose containers within it.
-
This feature relates to scenes using old-style ordering of containers within merged objects, and solves the problem with auto-follow. When loading such scenes the dialog lets the user decide how to deal with them.
-
Users that are aware of this and decide to keep the old style can deactivate this dialog.
-
-
Shadow Type: Choose between Stencil and Shadow Map.
-
Output Region: Shows which region of the screen Viz Artist/Engine is licensed to render.
-
Half Edition: Allows Viz Artist/Engine to render half screen. Available options are; left, right, top, bottom, bottom left, bottom right and bottom top.
-
Quarter Edition: Allows Viz Artist/Engine to render quarter screen. Available options are; left, right, top, bottom, middle left, middle right, middle top and middle bottom.
-
Show Black After End: Shows black after a clip has finished playing.
-
Texture Sharpen Default: Sets the default sharpen value for textures.
-
Background Color: Set default scene background color.
-
Video Input Layer Targets and Priority: Set the defaults for how the specific input channel should be used and its priority. Available options are, Inactive, Texture, DVE and Priority.
-
Use Lens Distortion: Activates the Lens Distortion. For detailed settings, see Advanced Lens Distortion.
-
Show DVE Channels: If activated, the DVE Channels will be visible in the Scene Editor.
Media Asset Configuration
Here you can pre-configure all available media assets to the different modes of DVE or Texture. This works for Media Assets such as Live Video, Clip Channels, and Stream Channels. Super Channels and Image Channels can only be pre-configured as Inactive or DVE.
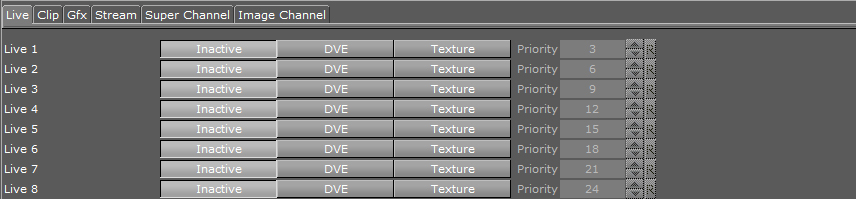
By setting the individual number and type of Media Asset to Inactive, DVE or Texture, the desired channel is automatically set up when dragged into the Scene Tree of new scenes. The priority option works only in DVE mode, and influences the drawing order of the defined channels.