
Viz Engine
Version 3.10 | Published April 03, 2018 ©
User Interface
This section describes the user interface settings. Some of these settings are also available in Viz Artist.
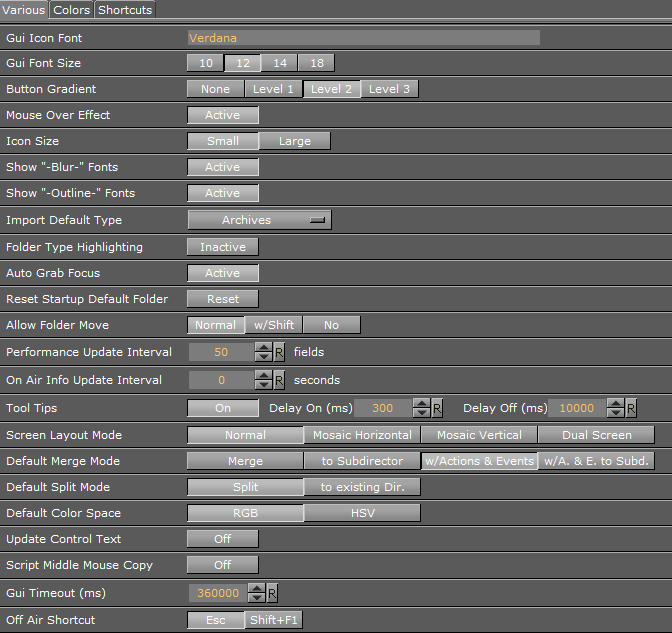
Various
-
GUI Icon Font: Sets the Font type for all icons of items such as scenes, objects, materials, images, fonts, and audio clips. Complex character sets such as Arabic, Hebrew and Chinese must change the default font type to show the correct names for the icons.
-
GUI Font Size: Sets a global font size for the Viz Artist user interface. Alternatives are; 10, 12, 14, 18 pixels.
-
Button Gradient: Sets the gradient level of the buttons in the Viz Artist user interface.
-
Mouse Over Effect: Mouse over effect for buttons in the Viz Artist user interface. Set to Active or Inactive.
-
Icon Size: Sets a size preference for scene, font and audio icons. Icon size can also be switched using the context menu in the server view in Viz Artist; however, changing this setting in Viz Artist will not be saved as a preference for later sessions.
-
Show “Blur” fonts: Set the default show or hide blur fonts in the Server area. The option can then be toggled with the Item Context Menu (see the Viz Artist User Guide).
-
Show “Outline” fonts: Set the default for showing or hiding the outline fonts in the Server area. The option can then be toggled with the Item Context Menu (see the Viz Artist User Guide).
-
Import Default Type: Selects the default item type for imports, which will be pre-selected in the GUI Import Menu. Options are:
-
Fonts
-
Images
-
Geometries
-
Scenes
-
Audio
-
Archives
-
-
Folder Type Highlighting: When enabled this will highlight the folders that contain content matching the current Viz Artist’s Server view (for example Scene, Geometry, Material, Image, Font, Audio, etc.).
Note: This can cause some performance overhead, when switching to different types and/or with opening sub folders (but only first time, as the information is cached).
-
Auto Grab Focus: When Inactive, a middle mouse click grabs the focus, as a left and right-click do. When auto grab focus is Active, the focus is grabbed as soon as you move the mouse over a widget.
-
Reset Startup Default Folder: Resets the startup folder. If Viz Artist is unable to start due to problems with the last saved server view, clicking the Reset button will reset the Server view to its top node.
-
Allow Folder Move: Allow or restrict the user’s ability to move/organize projects and folders in a Graphic Hub. Options:
-
Normal: Drag folders freely, as required to move (Default setting)
-
w/Shift: Press <Shift> and drag to move folder or folders
-
No: No folder movement allowed
-
-
Performance Update Interval: Sets how often Viz Engine should update the Performance Bar when it is opened.
-
On Air Info Update Interval: Update interval for the On Air Information Panel window. Note that a shorter interval decreases render performance. Setting to 0 means that no update occurs.
-
Tooltips: Enables or disables the tooltip information in the Viz Artist user interface.
-
Delay On (ms): Sets the amount of time in milliseconds before the tool tip shows. Default is 1500 ms.
-
Delay Off (ms): Sets the amount of time before the tool tip disappears. Default is 4000 ms.
-
-
Screen Layout Mode: Set to either:
-
Normal: Default screen (single monitor):
-
Mosaic Horizontal: Viz Artist shows on the left monitor and the Scene Editor shows on the right monitor (two monitors):
-
Mosaic Vertical: Viz Artist shows on the top monitor and the Scene Editor shows on the bottom monitor (two monitors):
Note: Mosaic Horizontal and Mosaic Vertical are only available with NIVIDA graphics cards, on systems running at least Windows 7. Open the NVIDIA properties to setup Mosaic before changing the Viz Config file.
-
Dual: The Scene Editor opens in a new window (two monitors):
-
-
Default Merge Mode: Sets the default merge behavior available in the Viz Artist user interface. Options are:
-
Merge
-
[Merge] to sub director
-
[Merge] w/actions & events
-
[Merge] w/actions and events to sub director (w/A. & E. to Subd.)
-
-
Default Split Mode: Sets the default split behavior available in the Viz Artist user interface. Options are:
-
Split
-
[Split] to existing director
-
-
Default Color Space: Select RGB or HSV as the default color space for the Material editor
-
Update Control Text: Click to make Update Control Text active or inactive:
-
Active: The Control text, in Control Objects, is updated with every key stroke
-
Inactive: The Control text, in Control Objects, is not updated with every key stroke
-
-
Script Middle Mouse Copy: Click to enable or disable the middle mouse button copy and paste function in the Script Editor.
-
Gui Timeout (ms): Defines the timeout threshold in milliseconds when awaiting command replies from the Engine. After the specified time, a timeout dialog is displayed. The minimum and default value 180000, or 180 seconds.
-
Off Air Shortcut: Choose the shortcut that takes the render On Air window to Off Air.
Tip: Adjust the timeout value if timeouts occur when loading very large scenes in Viz Artist.
Colors
The Colors tab gives the ability to change the User Interface color theme.
Global Settings
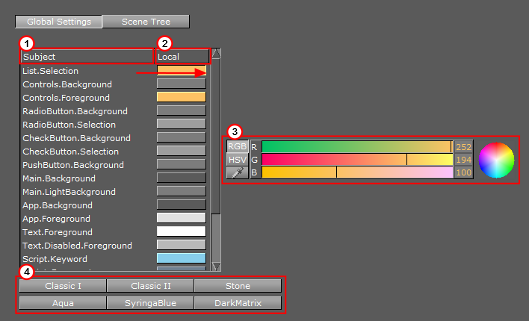
Use Global Settings to change the color theme of the User Interface. All the changes made to the User Interface are local. Click Save then restart Viz Artist for the changes to take effect.
There are six pre-set color themes (4):
-
Classic I
-
Classic II
-
Stone (default)
-
Aqua
-
SyringaBlue
-
DarkMatrix
To Change a Preset Color Theme
-
Click on a preset color theme (4).
Individual parts of the User Interface can be assigned a new color, if the part is listed in the Subject panel (1).
To Change a Subjects Color
-
Click on a Subjects color bar in the Local panel (2).
-
In the color selection area (3) select RGB or HSV.
-
In the color selection area, click a color bar, or the color circle, and drag to change the color.
or
-
Drag one of the current Subjects color (in the Local field).
-
Drop it onto another Subjects Local field.
or
-
Click on the eye dropper icon in the color bar.
-
Move the cursor to an area, color on-screen.
-
Click to accept the new color.
Scene Tree
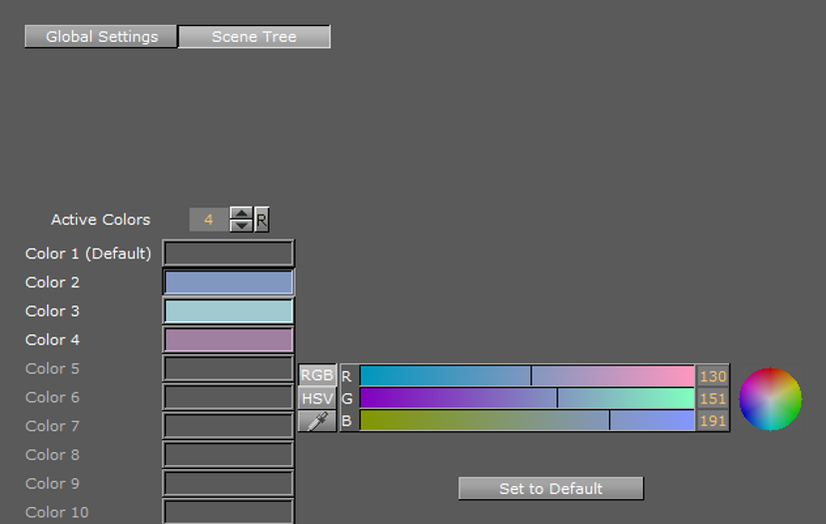
Use the Scene Tree panel to set the color codes for Containers in the Scene Tree. A Container with a color code can be searched for in the Scene Tree, and the Scene Tree can be restricted to Containers with certain colors (see Scene Tree Menu in the Viz Artist User Guide).
A text tag can also be added to the color. The text is Scene specific and saved with the Scene on the Graphic Hub. Note that the colors might change if the Scene is opened on a different machine with a different color setting.
Example: All text Containers can be colored gray and tagged Text, while all Containers that hold images can be colored green and tagged Image, and so on.
Four colors are configured and active by default with no text descriptions. Click Set to Default to set all color bars to their default setting.
The color options are available in the GUI Scene Settings panel in the Tree Color Text setting, and available for use in the Scene Tree panel.
To Change the Amount of Active Colors
-
In the Active Colors field enter the amount of colors to be active. Up to 16 colors can be configured and made active.
To Create a Color
-
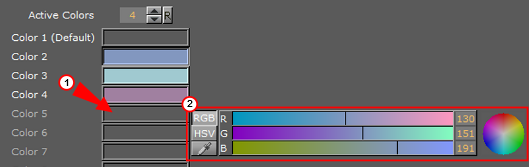
Click on a unused color bar (1). It is also possible to change the color of the first four colors. Click in their color bar.
-
In the color selection area (2) select RGB or HSV.
-
In the color selection area, click a color bar, or the color circle, and drag to change the color.
-
If required: Click the color bar (1) and enter a name for it.
or
-
Click on the eye dropper icon in the color field.
-
Move the cursor to an area, color on-screen.
-
Click to accept the new color.
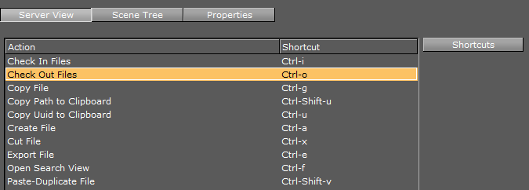
Shortcuts
The shortcuts view shows all available server, scene tree and property actions and the currently assigned shortcuts. All shortcut configurations are saved to the database into the user table for personalization.
-
Server, Scene Tree and Properties: Shows all server actions and their currently assigned shortcuts.
-
Shortcuts: When clicked, shows a list of available shortcut key-combinations that can be assigned to the selected action.
-
Reset All: Resets all shortcuts to the default setup.