
Viz Engine
Version 3.10 | Published April 03, 2018 ©
NVIDIA Driver Configuration
This section contains information on the following procedures:
-
To Configure NVIDIA Driver Settings for Viz Engine, Video mode
-
To Configure NVIDIA Driver Settings for Viz Engine, VGA mode
To Configure NVIDIA Driver Settings for Viz Engine, Video mode
IMPORTANT! For maximum performance when running the Viz Engine in VGA mode, please refer to the procedure To Configure NVIDIA Driver Settings for Viz Engine, VGA mode below.
-
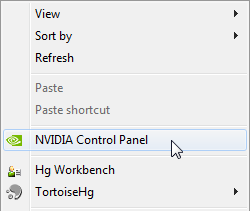
Right-click the desktop and select the NVIDIA Control Panel.
-
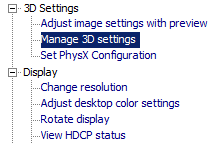
Click Manage 3D settings.
-
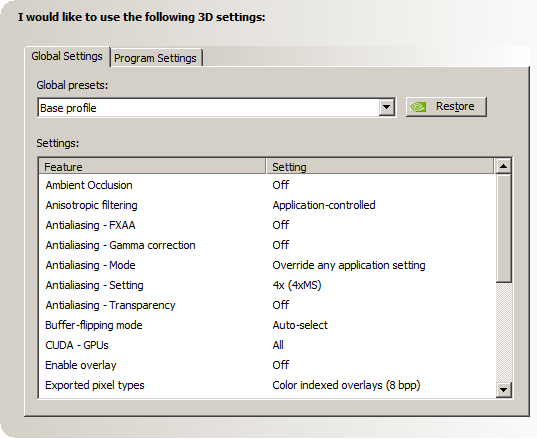
In Global Settings select the Global presets option Base Profile
-
Set the following parameters:
-
Ambient Occlusion: Off
-
Anisotropic filtering: Application controlled
-
Antialiasing-Gamma correction: Off
-
Antialiasing-FXAA: Off
-
Antialiasing-Mode: Override any application settings
-
Antialiasing-Setting: 4x (4xMS)
-
Antialiasing-Transparency: Off
-
Power management mode: Prefer maximum performance
-
Vertical Sync: Off (see Vertical Sync below)
-
-
In the Global presets drop down box select Workstation App - Dynamic Streaming.
-
Click on Apply.
Please refer to the Release Notes on information about which nVidia driver to use.
To Configure NVIDIA Driver Settings for Viz Engine, VGA mode
For maximum performance when running the Viz Engine in VGA mode, follow the procedure To Configure NVIDIA Driver Settings for Viz Engine, Video mode outlined above, and observe the following changes:
-
In Global Settings, change the Global presets option to 3D App - Video Editing
-
The parameter for Vertical Sync must be set to On
Vertical Sync
Notes for Vertical Sync:
-
Use the 3D application setting: Use for Viz installations (running in Standard PC (VGA) mode) and for Video Wall setups where video is in use.
-
Off: Used for Viz installations where video is in use (unless used for video walls).
To Configure Mosaic
If setting up a Video Wall, please refer to the Video Wall Configuration chapter.
-
Right-click the desktop and select the NVIDIA Control Panel.
-
Click Set up Mosaic.
-
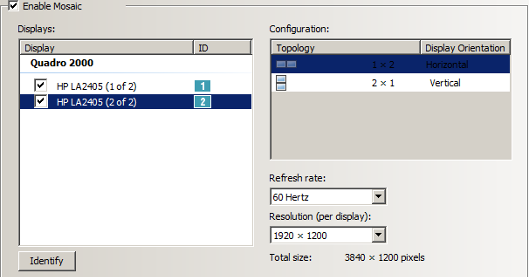
Tick the Enable Mosaic box.
-
Tick all required displays.
-
Set the Refresh rate.
-
Set the Resolution (per display).
-
Click Apply.
-
Open Viz Config.
-
Click on User Interface.
-
Set Screen Layout Mode to Mosaic Horizontal or Mosaic Vertical.
NVIDIA G-SYNC Card
The G-SYNC card makes sure that all screens, which make up a Video Wall, are synchronized. When there are several Viz Engines in use, one is defined as the master and all the others as slaves.
Make sure that the G-Sync card firmware is version 4.0 (0x54 in the NVIDIA Control Panel (System information)). To check the current version download these files from ftp.vizrt.com:
-
start_update.bat
-
NVGSyncUpdate.exe
This section contains the following procedures:
To Check the Firmware Version
-
Double click the start_update.bat file:
-
If the output says 4.0 same version, no action is required
-
If it shows an older version install the latest version
-
To Install the Latest Firmware Version
-
Close all applications, including the NVIDIA Control Panel.
-
Run NVGSyncUpdate.exe -u.
-
Restart the machine.
-
Check that the version is 4.0 (0x54 in the NVIDIA Control Panel (System information)).
To Configure G-SYNC on one Viz Engine
-
On Viz Engine, go to the NVIDIA control panel.
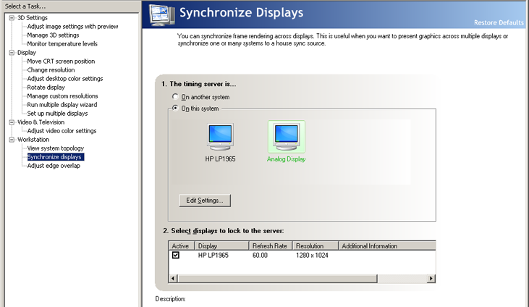
-
In Workstation, click Synchronize displays.
-
In The timing server is..., click On this system.
-
In Select displays to lock to the server, click each available display, in the field below, to make them active.
To Configure the G-SYNC Card on Viz Engine Slaves
Do this procedure on each Viz Engine slave.
-
On the Viz Engine slave, open the NVIDIA control panel.
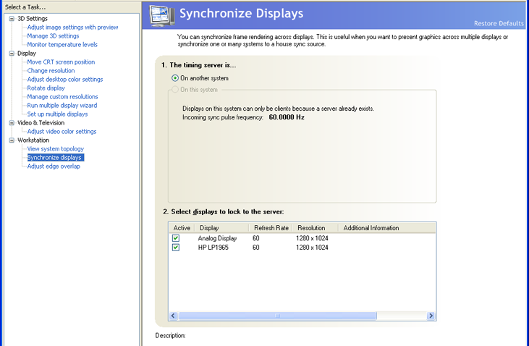
-
In Workstation, click Synchronize displays.
-
In The timing server is..., click On another system.
-
In Select displays to lock to the server, click each available display, in the field below, to make them active.
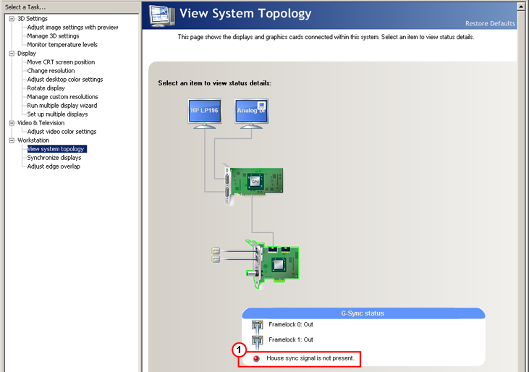
To Check the G-SYNC Status
-
On each machine, in turn, open the NVIDIA control panel.
-
In Workstation, click View system topology.
-
On the slave system, make sure that Frame lock sync pulse is present shows in the G-SYNC status portion on the lower part of the screen.
Genlock (House Sync)
There also the option to use a genlock (house sync) signal from the studio as an input to the G-SYNC card. In this case, once connected, check the signal in the View system topology screen, in Workstation.
House sync signal is not present (1) means that no external genlock is connected and that the pulse is generated internally. If the external genlock is not used, this message can be ignored.
Legacy configurations
This section contains information about how to configure FX 4500 SDI and FX 5500 SDI boards, which are not supported anymore by vizrt.
-
Start Viz Config, or open the configuration from Viz Artist (Config button in the upper right corner)
-
Select Video Output.
-
When using an NVIDIA SDI output option and synchronize on blackburst, use the following v-phase settings:
-
PAL: 606
-
NTSC: 509
-
720p50: 743
-
720p60: not supported
-
720p60M: 736
-
1080i50: 1113
-
1080i60M: 1113
-
-
When synchronizing with SDI, leave the v-phase to 0
-
For Quadro FX 4500 SDI, and FX 5500 SDI boards the parameter use_old_nvsdk may need to be set to 1 in the Viz Config file, if stability issues encounter, on unsupported systems.