
Viz Engine
Version 3.10 | Published April 03, 2018 ©
Database
The Database section has three tabs for setting connections to, e.g. a Graphic Hub, Failover servers and Deploy servers.
See Also
Global Properties
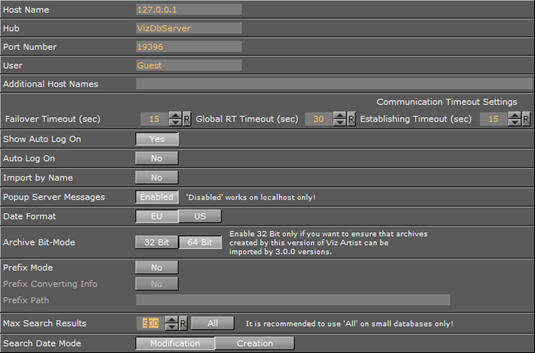
Use this section to configure the Graphic Hub database connection settings.
-
Host Name: Enter the name of the Graphic Hub naming service. The naming service will always be a one to one map to the Host Name of the machine running a Graphic Hub.
-
Hub: Enter the Graphic Hub server name.
-
Port Number: Enter the listener port number for a Graphic Hub. The default port number is 19396, and should normally not be changed.
-
User: Set the default user.
-
Additional Host Names: Enter the host name or IP address of a Graphic Hub database located on a different subnet, to make it selectable in the log on screen database drop-down list.Multiple entries can be added, and must be separated by a semicolon. Hosts located on different subnets will be highlighted in turquoise in the drop-down list.
-
Communication Timeout Settings:
-
Failover Timeout (sec): Set the maximum time to wait before a fail over is initiated from the main to the replication Graphic Hub.
-
Global RT Timeout (sec): Set the maximum response time for any request to a Graphic Hub.
-
Establishing Timeout (sec): Set the maximum waiting time to establish a connection to a Graphic Hub.
-
-
Show Auto Log On:
-
Yes: Show the Auto log on check box in the Graphic Hub log on window.
-
No: The auto log on check box is hidden.
-
-
Auto Log On: Enable or disable automatic log on to a Graphic Hub. This will disable the log on screen for Viz Artist/Engine.
-
Import by Name: Set to Yes to check for objects by name rather than by UUID. Set to No to check by UUID.
-
Popup Server Messages: Enable or disable popup server messages. Disabled only works on local host.
-
Date Format: Set the date format to EU (DD.MM.YYYY 13:54) or US (MM/DD/YY 01:54).
-
Archive Bit-Mode: Set the bit-mode in which the archive will be saved.
Note: For compatibility, 32-bit should be enabled if scenes will be imported to Viz Artist versions prior to build 2310.
-
The following prefix settings are needed if an external control application is used that sends commands containing certain path locations, but where the path of the files is a different one on the Graphic Hub (e.g. because they were deployed to a specific location).
-
Prefix Mode: Activate the prefix mode.
-
Prefix Converting Info: Show the prefixed (final) paths in the console (this behaves like the Viz Artist 2.x debug mode).
-
Prefix Path: Contains the prefix path string that is used for incoming commands containing path parameters.
-
-
Transfer Buffer Size: The entered value is a multiplier for the standard buffer size of 51200 bytes and is only for the transfer buffer size to the Graphic Hub (Graphic Hub 2.4 and above only).
-
Max Search Results: Set the maximum amount of search results which should show in the search result panel (see Item Search and SmartViewSearch in the Viz Artist User Guide).
-
All: Show all results. To set a maximum amount deactivate All
IMPORTANT! If All is selected this could produce a large number of search results, which may affect the performance of Viz Artist. Vizrt recommend that All should be used on small databases only.
-
-
Search Date Mode: Select the results date order for Item Search and SmartView Search:
-
Modification: Sort search results by their modification date
-
Creation: Sort search results by their creation date
-
Failover Properties
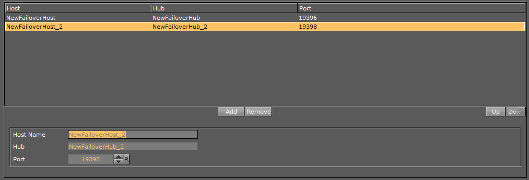
To Add Redundant Servers to the Failover List
-
Enter the Host Name of a Failover server.
-
Enter the Graphic Hub instance for Failover.
-
Enter the Port number of the Graphic Hub for Failover.
-
Click Add.
-
Use the Up and Down buttons in the database Failover list to raise and/or lower a database’s priority in the event of Failover.
-
Click Save.
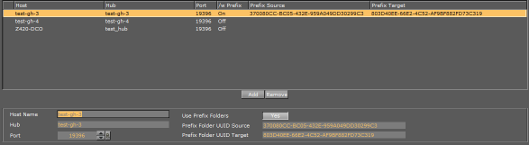
Deploy Properties
-
Added Deploy Servers Box: View all available Deploy Servers
-
Add: Add Deploy Servers (see To Add Deploy Servers)
-
Remove: Click to remove a selected Deploy Server
-
Host Name: Enter the host name of the Graphic Hub machine to deploy files to
-
Hub: Enter the name of the Graphic Hub instance to deploy files to.
-
Port: Enter the Graphic Hub listener port number
-
Use Prefix Folders: Prefix folders provide a simple server copy functionality that is able to rebuild the underlying structure from a source folder on the source server to a destination folder on the destination server. All references outside the source folder are rebuilt according to the original structure, under /data/. Set to Yes to select a source and destination folder for the deployment. Set to No to keep the structure the same as on the source server. See To Add Deploy Servers below for an example setup.
-
Prefix Folder UUID Source: Enter the source folder UUID on the Graphic Hub to deploy from.
-
Prefix Folder UUID Target: Enter the target folder UUID on the Graphic Hub to deploy to.
-
To Add Deploy Servers
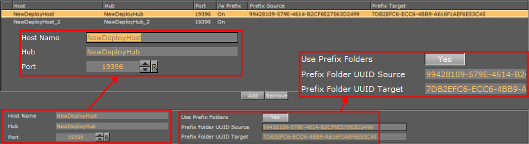
Note: To configure deploy servers, the user you are currently logged in with on the source server must exist on the destination server with the same credentials.
-
Enter the Host Name of a deploy server.
-
Enter the name of the deploy Graphic Hub.
-
Enter the Port number of the deploy Graphic Hub. The default port is 19396.
-
If specific source and destination folders are required, set Use Prefix Folders to Yes.
-
Enter the UUID of the Prefix Folder UUID Source.
-
Enter the UUID of the Prefix Folder UUID Target.
-
-
Click Add, and then Save.