
Viz Engine
Version 3.10 | Published April 03, 2018 ©
Integration with Viz One
Viz Engine can be integrated with Viz One so that video clips can be transferred, and monitored, to and from Viz One.
The following sections describe how to install the Transfer and Monitor services to the Viz Engine and how to enable clip playout.
A Viz One system, which is configured to communicate with the Viz Engine, must be running during the installation and configuration of the two services.
Administrator rights are required to complete the install (see Prerequisites).
This section contains information on the following topics:
See Also
-
Viz One Administrator’s Guide
Configure Viz Engine
Viz Engine must be configured for the transfer and playing-out of video clips from Viz One.
To Configure the Viz Engine
-
Open Viz Configuration.
-
Click on Output Format.
-
Select the correct output format as used in Viz One.
-
Click on Video Board.
-
Set the Viz Link option to On.
-
Click on Video Input.
-
Make sure that at least one Clip Channel is active.
-
Click Save.
-
Restart Viz Engine.
Install Transfer and Monitor Services on Viz Engine
The Mediaftp (file transfer) and the Fsmon (file system monitor) Services are required for Viz One a Viz Engine to exchange data.
Both services are part of the Viz Artist installation, but must be installed (activated) or removed (deactivated) through the Viz Configuration.
Note: If these Services are not required, make them unavailable when Viz Artist is installed. The Mediaftp Service will print some feedback to the Viz Engine Console. The Fsmon Service will not.
The files for Mediaftp and the Fsmon are installed into the folders:
-
<viz install folder>\Fsmon
-
<viz install folder>\Mediaftp
Log-files are written to the folders:
-
<viz data folder>\Fsmon
-
<viz data folder>\Mediaftp
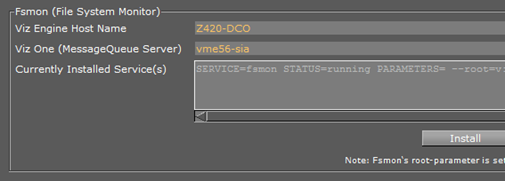
To Install the Transfer and Monitor Services
IMPORTANT! Make sure that the Clip Data Directory is set correctly before the services are installed (see Video Board).
-
Open Viz Config.
-
Click on Viz One.
-
In the Days to keep log files field, set the number of days log files are to be kept (default is 7 days).

-
Fsmon Service Only:
-
Enter the host name of the local host.
-
Enter the host name of the Viz One Message Queue Server.
IMPORTANT! The local host name must be exactly the same string that was entered in the Viz One as host name for the Viz Engine (it must be the exact same string as seen beside Host on the Servers page).
-
-
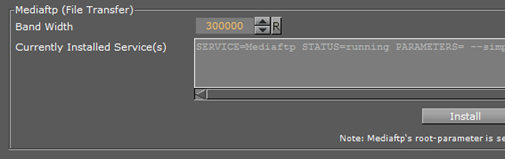
MediaFTP Service Only: Set the transfer band width (Kbits per second), as required.
Note: Mediaftp is installed with the -a flag. This assumes that the default Viz One user/password combination is: vtrsync/vtrsync. Mediaftp will install, but not work, if the user/password combination is different (see Adding a Viz Engine in the Viz One Administrators Guide).
-
Click on Install for each required Service.
Note: Any currently installed Services must be removed before a new Service can be installed.
To Remove the Transfer and Monitor Services
Note: When a Service is removed, the Service is made inactive. The Service is still available, and if required again, click Install to make active.
-
Open Viz Config.
-
Click on Viz One.
-
Click on Uninstall for each required Service.
Configure Local Preview of Video Files
If a Viz Engine is used for local preview (for example, Viz Engine installed on a control client machine) the FFDShow codec package and a Matroska splitter, must be installed.
Note: The procedures, detailed below, are only relevant for low resolution versions of video clips to be previewed on Viz One. In most cases this happens when control applications, such as Viz Trio, are used to, for example, preview a full screen clip. High resolution video clip versions do not need this codec installation.
The following procedures will guide you through the necessary installation steps:
To Install Codecs for Local Preview
After the FFDShow codec package has been installed:
-
Make sure that Viz Engine or generally no applications are excluded (there is an inclusion and exclusion list in FFDShow)
-
Make sure that there are no other codec packages installed on the machine that will interfere with FFDShow or the Matroska splitter.
Note: A license is required for clip playback as FFDShow does not come with a decoding license.
-
Start the browser.
-
Search for and download:
-
The FFDShow M PEG-4 Video Decoder
IMPORTANT! Make sure a license is available to use the codec and that the 32-bit version of the codec is downloaded
-
The Matroska Splitter
-
The Windows 7 DirectShow Filter Tweaker
-
-
Remove older 64-bit versions of the MPEG-4 codec
-
Extract:
-
The Matroska Splitter, and
-
The Windows 7 DirectShow Filter Tweaker.
-
-
Install the MPEG-4 codec.
-
Set your MPEG-4 32bit decoder to FFDShow.
-
Register the Matroska Splitter.
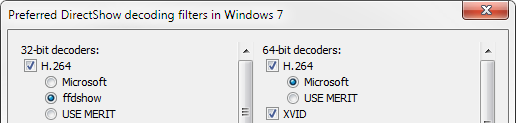
To Set a Preferred Decoder
-
Run the Windows 7 DirectShow Filter Tweaker
-
In the appearing dialog box click Preferred decoders
-
Set your MPEG-4/H.264 32-bit decoder to FFDShow.
-
Click Apply & Close.
-
Click Exit.
To Register the Matroska Splitter
-
Extract the Matroska Splitter
-
Copy the ax file to your C:\Windows\System32 folder
Note: There are two files available, one in the root folder that is used for 32-bit systems, and one in the x64 folder used for 64-bit systems.
-
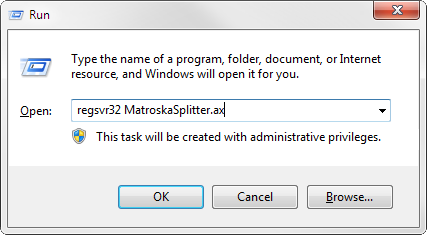
Click on Start > Run
-
Enter regsvr32 MatroskaSplitter.ax.
-
Click OK. A message box appears confirming your registration.
-
Click OK.
To Unregister the Matroska Splitter
-
Click on Start > Run
-
Enter regsvr32 -u MatroskaSplitter.ax.
-
Click OK. A message box appears confirming that it is unregistered
To Configure Preview of Clips Stored on Viz One
If the VGA version is installed, do these steps:
-
Open Windows Explorer
-
Open the Viz Config file
-
Locate SECTION VIDEO
-
Set vizlink_mode = 1
-
Save the file
If the Video version is installed, do these steps:
-
Start Viz Config
-
Select the Video Board section and enable (On) the Viz Link option
-
Click Save.