
Viz Engine
Version 3.10 | Published April 03, 2018 ©
Video Board
This section is used to configure video input, output and clip playback related settings.
Note: Not available on VGA versions of Viz Engine.
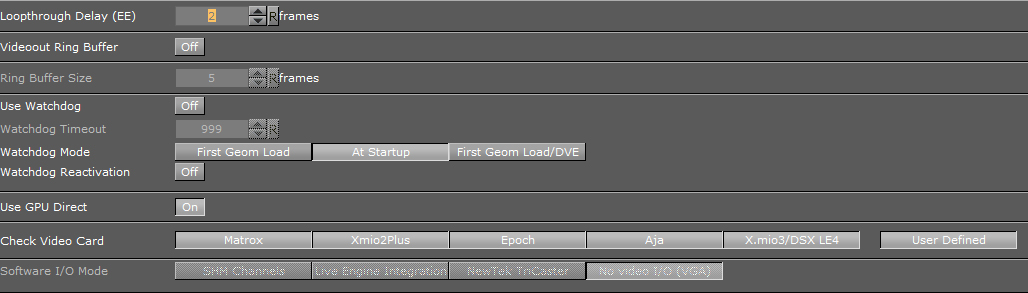
Video Board Properties
-
Loopthrough Delay (EE): Set the delay for live video input (DVS, Bluefish and NVIDIA SDI boards only). This setting applies for all input channels. For Matrox, see Video Delay DVE in Video Properties.
-
Videoout Ring Buffer: Sets the render buffer for video output. Helps to prevent frame drops on the video output during execution of commands or loading of objects. When enabled the engine will render a number of graphics frames in advance and provide it to the video hardware. The number of frames rendered forwardly is defined by the Ringbuffer Size. Large buffer sizes will delay the output and increase the input to output delay for video textures.
-
Ring Buffer size: Sets the size of the Ringbuffer in frames.
-
Use Watchdog: Set Watchdog On or Off:
-
Matrox: See Watchdog.
-
Bluefish: See Special Configuration Options for Bluefish444 in the BlueFish444 chapter.
-
-
Watchdog Timeout: Set the time, in milliseconds, until the watchdog takes over control. This value should not be smaller than the time of two fields/frames. Default value is 999 milliseconds
-
Watchdog Mode: Set the Watchdog mode:
-
First Geom Load: Video Out is activated when the first geometry is loaded.
-
At Startup: Video Out is activated at startup.
-
First Geom Load/DVE: Video Out is activated when the first geometry is loaded or an input or clip channel is set to DVE.
-
-
Watchdog Reactivation: Set to On to activate the watchdog again if scenes are unloaded from renderer.
-
Use GPU Direct: Set to On to enable a fast, low latency method to copy frames from the video IO device to the GPU and back (gives more time for the renderer to process complex and GPU intense visual effects).
-
Check Video Card: Select which video cards to search for and use when Viz Artist/Engine is started. If a video card is not selected it is not used, even if it is installed in the system. All cards are enabled by default.

-
Select Individual Cards: If User Defined is selected, click on each listed card to select or un-select, as required.
Note: If a Matrox X.mio3 card is installed in the system and X.mio3/DSX LE4 is disabled, the card will be treated like a Matrox X.mio2 Plus card.
-
User Defined: To select and use individual cards, select User Defined.
-
None: If None is selected, all connected video cards will be unavailable for Viz Engine and Viz Artist. This can be used to run a Viz Artist video version as a VGA version, even if video cards are installed. Possible use-cases for this are:
-
Dual channel Viz Trio One Boxes, which have three Viz Artist/Engine instances running and where only the first two should use the video board. The third Engine instance is exclusively for Trio preview.
-
With TriCaster implementation, where Viz Artist must run as a video version, running as VGA.
-
If utilizing the Stryme integration capabilities of Viz Engine, where Viz Engine hooks on to Stryme GenesiX to allow Stryme to show Vizrt graphics on its output. Please refer to the procedure below for further information on Stryme Integration.
-
-
Software I/O Mode: Set a specific Video I/O mode for setups without video hardware or configurations where Check Video Card is set to None. Not available in the VGA version.

-
SHM Channels: I/O mode for third party software utilizing the Viz SHMLib software library.
-
Live Engine Integration: Optimized I/O mode for Live Engine Integration with Viz Libero. Refer to the Viz Libero documentation for further details.
-
NewTek TriCaster: Uses the NewTek TriCaster input and outputs. Read more about using TriCaster with Viz Engine and Artist in the Third Party Applications and Files chapter of the Viz Artist user’s guide.
-
No video I/O (VGA): Disables all video version features, emulating the VGA version of Viz Engine.
-
To Enable Stryme Integration
To enable integration with Stryme, the Viz configuration file needs to be manually edited. Please make sure to create a backup copy of the configuration file before making any changes.
-
Locate and open the Viz configuration file.
-
Locate the section SECTION CHANNELS_CONFIG
-
Add the following lines:
StrymeOut.Enable =1StrymeOut.RingbufferSize =10StrymeOut.SHMname = Global\Genesix.MediaEngine.Matrox.SharedMem.0-
StrymeOut.Enable: Enables or disables the Stryme integration capabilities of Viz Engine. If the Stryme Integration is no longer needed at a later time, it can easily be disabled by changing the value of StrymeOut.Enable to 0.
-
StrymeOut.RingbufferSize: Defines the size of the ringbuffer, and can be omitted. If omitted, the default value will be 10. Valid values are in the range of 1-100.
-
StrymeOut.SHMname: Defines the name of the Shared Memory name as defined by Stryme GenesiX, and can be omitted. If omitted, it will default to Global\Genesix.MediaEngine.Matrox.SharedMem.0.
IMPORTANT! Stryme integration works only with Viz Engine in VGA mode or with Check Video Card set to None (see above).
-