
Viz Engine
Version 3.10 | Published April 03, 2018 ©
DVS Centaurus II
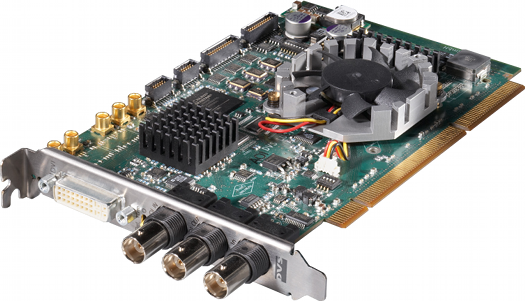
This section contains a description of the Digital Video Systems (DVS) Centaurus II video card.
The DVS was mainly sold with Viz Virtual Set and Viz Arena, and was Vizrt’s successor of the Digital Voodoo Red Devil V3 card. The DVS is able to output both HD and SD unlike the Red Devil which could only output SD. The DVS was typically mounted in HP wx8400, HP xw8600 or HP Z800 machines.
This section contains information on the following topics:
-
Connectors
-
Supported Codecs
-
Driver Installation
-
Licensing
See Also
-
Video, Audio, Server and Graphics Card Installation
-
DVS support
Connectors
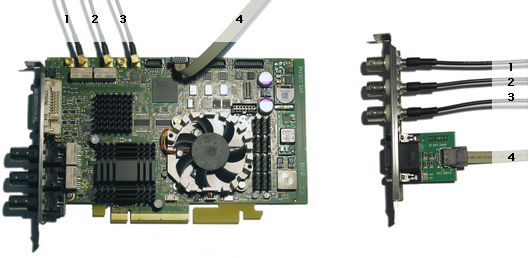
This section describes the main video card, the SDI/RS-422 extension card and how To Connect the DVS Centaurus II and SDI/RS-422 Extension Card.
This section contains information on the following topics:
-
Main Card Connectors
-
SDI and RS-422 Extension Card Connectors
-
To Connect the DVS Centaurus II and SDI/RS-422 Extension Card
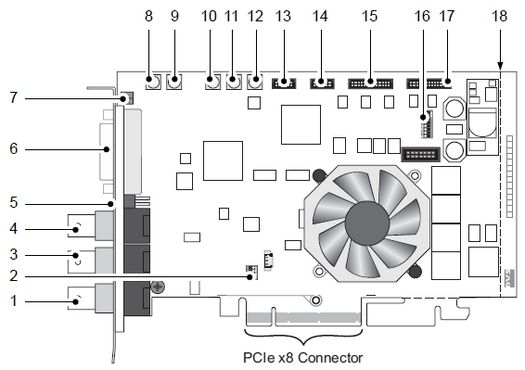
Main Card Connectors
-
Ref. In: BNC connector for the reference input. May be Bi-/Tri-Level sync.
-
DIP Switch for PCI: PCI-X variant only: DIP switch to set up the PCI video card interface, that is its clock frequency; This switch is not available on the PCIe version of the card used by Vizrt.
-
(HD) SDI OUT A: BNC connector for a video output at port A (serial digital interface); usually used for an output of the first video channel in single-link (YUV) or the first stream of YUVA or RGBA in dual-link mode.
-
(HD) SDI IN A: BNC connector for a video input at port A (serial digital interface); usually used for an input of the first video channel in single-link (YUV) or the first stream of YUVA or RGBA in dual-link mode.
-
Ref. Term: Termination switch for the reference input; switches off the termination of the GenLock signal manually, for example if the Centaurus II card is not the last link in a GenLock connection chain.
-
DVI OUT: DVI connector for an output of analogue and digital video signals.
-
LEDs: Two status LEDs (Red/Green) indicating the presence of correct video and sync signals (see also Description of the LEDs on the video card).
-
SD SDI IN1: MCX connector for an input of digital SD video signals (serial digital interface)
-
(HD) SDI IN B: MCX connector for a video input at port B (serial digital interface); usually used for an input of the second video channel in single-link (YUV) or the second stream of YUVA or RGBA in dual-link mode.
-
(HD) SDI OUT B: MCX connector for a video output at port B (serial digital interface); usually used for an output of the second video channel in single-link (YUV) or the second stream of YUVA or RGBA in dual-link mode.
-
SD SDI OUT1: MCX connector for an output of digital SD video signals (serial digital interface)-
-
CVBS OUT: MCX connector for a composite video burst signal, either analogue output of SD video or used for synchronization purposes.
-
GPI: Flat cable connector for the general purpose interface.
-
RS-422: Flat cable connector for an in- and output of RS-422 signals
-
AUDIO 1-8/LTC: Flat cable connector for the digital audio channels 1 to 8 and LTC.
-
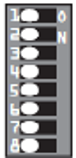
DIP Switch for Flash Controller: This switch controls the operation of the on-board Flash controller; it defines the version set of the map file that will be loaded at startup. The image above depicts the default setting of the DIP switch for the Flash controller; please observe the orientation of the switch on the card.
-
Audio 9-16: Flat cable connector for the digital audio channels 9 to 16.
-
Breaking line: The printed circuit board provides at its bottom (PCIe variant only) and right side extensions void of any electrical parts; these may serve to stabilize the installation of the card in a computer system; when not needed or interfering, you can break them off the circuit board at the breaking line(s); see also dotted lines in figure 1 on the previous page.
Description of the LEDs on the video card
|
LED |
Function |
Mode |
Description |
|
Green |
Signals the status of the sync input |
On |
A correct sync signal is detected, that is:- Sync mode internal is set- Sync mode external is set and a correct signal is connected- Sync mode analog is set and an analog GenLock signal is connected- Sync mode digital is set and a correct signal is connected |
|
|
|
Off |
A wrong input signal is detected, i.e.: - Sync mode external is set and no SDI input signal. – Sync mode analog is set and no GenLock signal connected. – Sync mode digital is set and no SDI input signal. |
|
Red |
Signals the status of the video raster detection feature |
Blinking slowly |
No input signal is available |
|
|
|
Blinking fast |
A wrong input signal is detected (for example DVS Centaurus II is set to NTSC video mode, but a PAL signal is connected to the active input) |
|
|
|
Off |
A correct input signal is detected |
SDI and RS-422 Extension Card Connectors
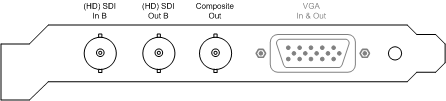
The SDI and RS-422 panel is included in the standard configuration of DVS Centaurus II. It provides the connectors for the second link of the dual-link connections. Additionally a CVBS output is installed on this panel that provides a composite video signal showing the fill signal generated by Viz Engine.
The RS-422 connector available on the panel is a DB-15 (HD) connector.
Note: This connector does not provide any additional functionality in regards to Viz Engine and should be ignored. The RS-422 port is not accessible to the operating system and can therefore not be used to transceive any kind of data by third-party applications.
-
(HD) SDI In B: BNC connector for a video input at port B (serial digital interface); usually used for an input of the second video channel in single-link (YUV) or the second stream of YUVA or RGBA in dual-link mode.
-
(HD) SDI Out B: BNC connector for a video output at port B (serial digital interface); usually used for an output of the second video channel in single-link (YUV) or the second stream of YUVA or RGBA in dual-link mode.
-
CVBS Out: BNC connector for a composite video burst signal, either analogue output of SD video or used for synchronization purposes. Provides the fill output of Viz engine as an analogue signal.
-
RS-422 In & Out: DB-15 (HD) connector (female), serial RS-422 interface for master/slave control, a breakout cable to two DB-9 connectors is included in the delivery.
Note: This RS-422 connector is inactive and not accessible to the OS and can therefore not be used to transceive data.
To Connect the DVS Centaurus II and SDI/RS-422 Extension Card
-
Connect the separate SDI/RS-422 panel with the DVS Centaurus II main card according to the enumeration shown in the illustration above.
Supported Codecs
Currently, the DVS implementation only supports the Microsoft DirectShow Filtergraph framework to render video clips. Therefore it is possible to play for example MPEG files or streams from a server. For more information on how to use video clips in Viz, see the Viz Artist manual and in particular the Mo Viz plug-in.
Basically, it can play everything that can be played out by the Windows Media Player, so it depends on what codecs/DirectShow filters that are installed on the machine.
Driver Installation
The following driver versions are supported:
|
Viz Artist/Engine Version |
Driver |
|
3.5.4 |
SDK 4.3.5.10 |
|
3.5.2 - 3.5.3 |
SDK 4.2.9.8 |
|
3.3.0 - 3.5.1 |
SDK 4.0.1.15 |
For information on how to install or update the driver, see the DVS SDK 2.7 User Guide.
Licensing
A few additional steps are required before Viz Engine is able to use the DVS Centaurus II card after a first time installation. First it is necessary To Install a DVS Centaurus II License, and then To validate the DVS Centaurus II license.
Note: Licensing should not be an issue if the DVS Centaurus II card came pre installed with the Viz Engine machine.
Note: License information is stored in a memory region on the device itself and will not be lost if the card is mounted on another computer.
The license key required during the installation process is shipped together with the device and comes as a single sheet of machine-written paper looking something like the illustration below:
lic<xxxxx>.txt-------------------------------------------------------------Date: <xxxxx> Licenser: <xxxxx> Serialnumber: <xxxxx> License does not expire rawkey 1 = <xxxxx> rawkey 2 = <xxxxx> rawkey 3 = <xxxxx> To check licenses 'svram license show' For DDR type: sv license key1 <yyyyy> For OEM type: svram license key1 <yyyyy>-------------------------------------------------------------------- # Product: Centaurus 2 PCIe # License Key Options: # # Not-Expire # # Centaurus 2-Dual-Link # Centaurus 2-Multi-Channel--------------------------------------------------------------------Page 1
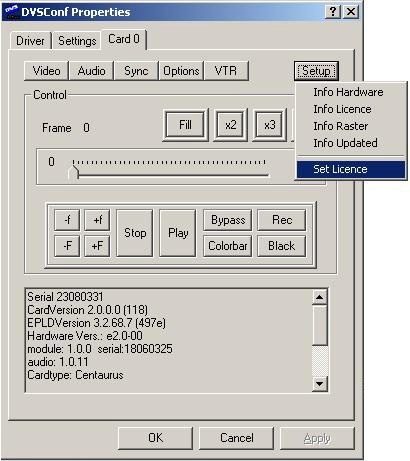
To Install a DVS Centaurus II License
-
Locate and double-click the dvsconfig.exe file located in the driver folder downloaded from Vizrt’s FTP.
-
Select the Card 0 tab.
-
When selecting the Card 0 tab for the first time the system will inform that a license needs to be installed for the product.
-
-
Click OK to close the DVSConf Warning dialog box.
-
Click the Setup button and select Set License from the appearing drop-down menu.
-
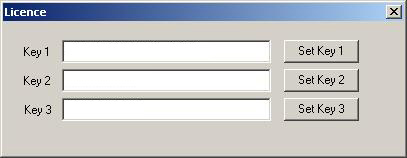
Enter the license key in field Key 1 and click the Set Key 1 button.
Note: It has been reported that the key might be ignored and that validation fails although it was correctly entered. Re-enter the license string and try again.
To validate the DVS Centaurus II license

-
Locate and double-click the dvsconfig.exe file located in the driver folder downloaded from Vizrt’s FTP.
-
Select the Card 0 tab.
-
Click the Setup button and select Info License from the appearing drop-down menu.
-
Check the following entries (bottom of the dialog box):
-
License : Opsys Windows
-
License : Opsys Linux
-
License : OEM
-
License : Multidevice
-
License : Audio
-
License : Hires
-
License : SDTV
-
License : HDTV
-
License : 12Bit
-
License : Processing
-
License : Mixer
-
License : ZoomAndPan
-
License : ColorCorrector
-
License : HDTVKeyChannel
-
License : HDTVDualLink
-
License : SDTVKeyChannel
-
License : SDTVDualLink
-
-
Once all licenses are verified, click OK to close the program.