
Graphic Hub Administrator Guide
Version 3.8 | Published February 06, 2023 ©
Schedule a Deploy Task
Deploy tasks can be scheduled to run on a regular basis. This is useful to replicate data for safekeeping on a regular basis.
To run scheduled Deploy Tasks the Viz Deploy Agent must be installed.
IMPORTANT! To configure a scheduled deploy task when the servers or the Deploy Agent are on different sub-nets, each server must be logged on to with its IP address, not its host name. Sign out of all servers and log back on using the servers IP address (see Graphic Hub Login and Log Out).
To Add a Deploy Agent for Use
IMPORTANT! Deploy Agents not reachable via UDP broadcast and / or for use in Login profiles need to be added manually.
-
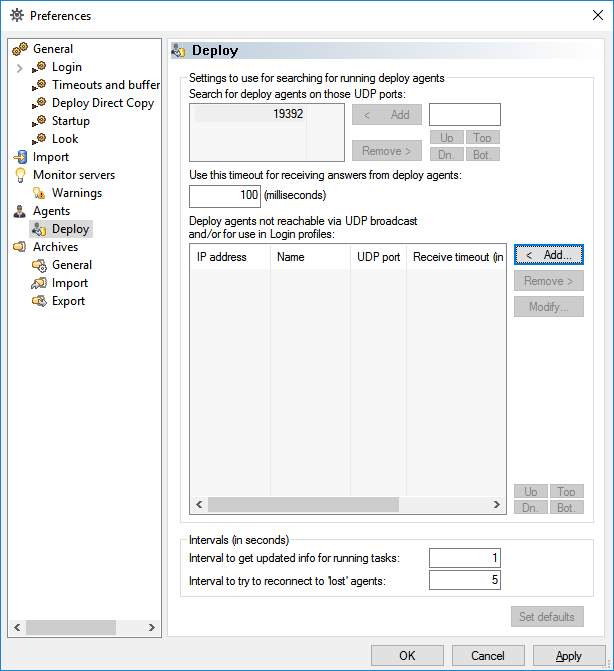
Open Tools > Edit preferences.
-
Navigate to Agents > Deploy.
-
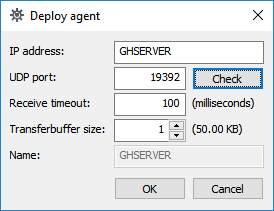
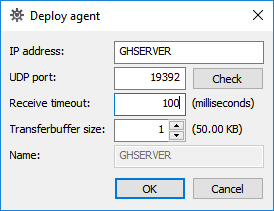
Press Add.
-
Insert hostname or IP address.
-
Provide UDP port (default: 19392).
-
Press OK.
-
Confirm all open windows.
The Deploy Agent has been added to current configuration and can be found although not reachable via UDP broadcast.
To Schedule a Deploy Task
-
In Graphic Hub Manager, log-in to two or more servers.
-
Right-click a folder/project/file in the Servers and Folders panel or Files panel, and then from the menu that appears, select Create Deploy Task...
-
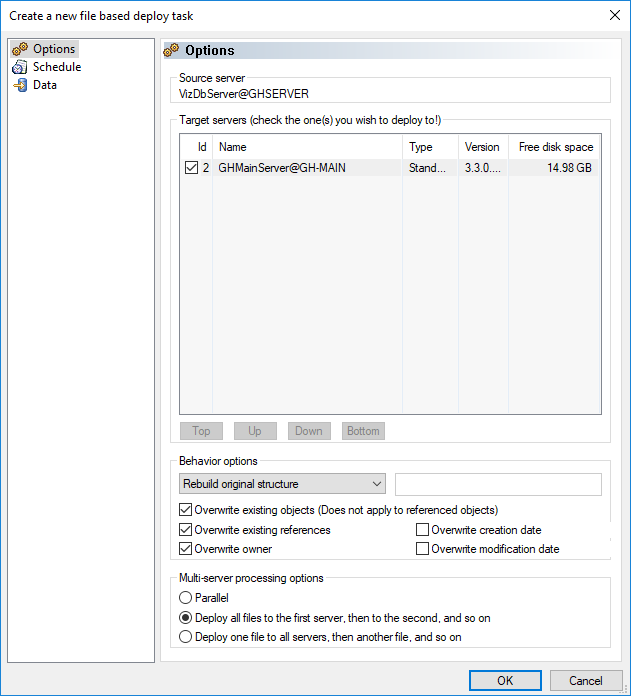
Select one or more target servers.
-
Select one of the Behavior options:
-
Rebuild original structure: Copies an exact replicate of all selected folders/projects/files and its references from source to destination server.
-
Rebuild structure under target folder: Copies an exact replicate of all selected folders/projects/files and its references from the source server to the destination folder on the destination server.
-
Copy to target folder only: Copies all selected folders/projects/files and its references from the source server to the destination folder on the destination server.
Tip: For Copy to target folder only and Rebuilt structure under target folder, you can also drag folders or projects into the field beside the Behavior options drop down menu.
-
-
Enable/disable the following Behavior options:
-
Overwrite existing objects (does not apply to referenced files)
-
Overwrite existing references
-
Keep original owner
-
-
Select one of the following Processing options:
-
Deploy all files to the first target server, then the next server in the queue, and so on.
-
Deploy one file to all target servers, then the next file in the queue, and so on.
-
-
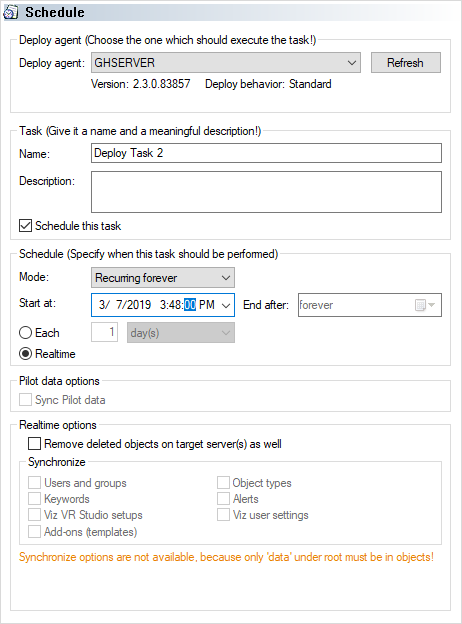
In the left panel, click Schedule.
-
From the Deploy agent drop down box, select a Deploy Agent.
Tip: If you have several Deploy Agents installed on various machines, and you intend to schedule many tasks, use a different Deploy Agent for each task for the purpose of load balancing.
-
Name and describe the task in the fields provided.
-
Check the Schedule this task check box.
Note: If you uncheck this box, the deploy task executes right away, rather than waiting for a scheduled time.
-
From the Mode drop down menu, select one of the following options:
-
Once.
-
Recurring.
-
Recurring forever.
-
-
In the Start at drop down menu, click to select a date from the calendar, and if necessary, adjust the time.
Note: You cannot schedule tasks to begin in the past.
-
If your mode is Recurring, in the End after drop down menu, click to select a date from the calendar, and if necessary, adjust the time.
-
Select one of the following radio button options:
-
Each: Select an interval.
-
Realtime: The deploy task occurs every time there is a change in the database. With this selection, you can optionally Remove deleted objects on the target server as well.
Note: Real-time tasks cannot be modified later.
-
-
In the left panel, click Data and drag any additional folders or files into the right panel, as necessary.
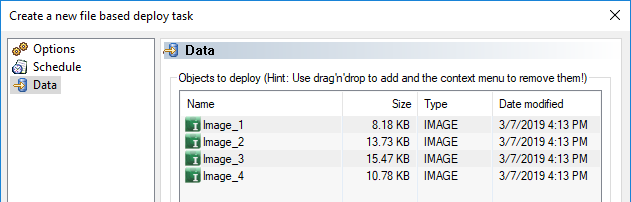
Caution: Do not drag sub-folders of any folders that are already in the right panel.
Note: You cannot drag files into the right panel for Real-time tasks.
-
Click OK to create the deploy task.
IMPORTANT! Scheduled tasks always trigger on the Server's UTC time, not the client time!
Two-way Real-time Deploy to a Remote Graphic Hub
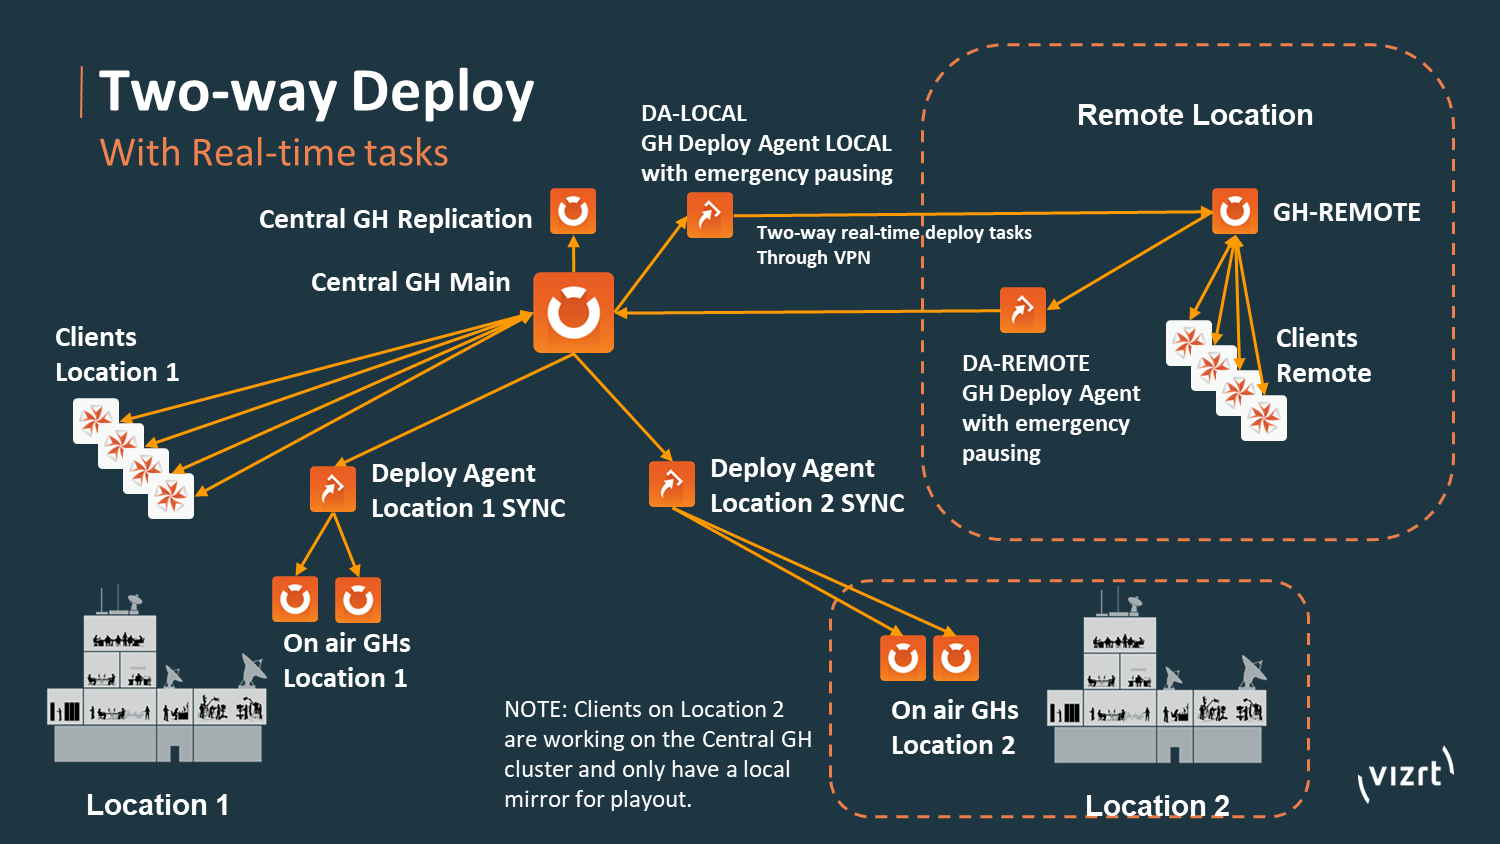
Below are recommendations and step by step instructions how to set up a two-way real-time deploy to a remote Graphic Hub (for example, on a remote location or cloud location).
Note: Usually real-time deploy is meant to be used for one-way deployments of changes. Clients on other locations are typically working on a central Graphic Hub cluster and only have a local, one-way synchronized mirror for playout. However, in some cases this is not possible and client are working on their local Graphic Hubs where changes need to be synchronized then in both directions. The subsequent documentation needs to be followed for a two-way real-time deployment to avoid unwanted side effects.
Basic Setup of a Two-way Real-time Deploy (Summary)
-
Install a Deploy Agent on each of the two Graphic Hub nodes.
-
Enable Deploy Agent emergency pausing to avoid accidental deletion due to deploy task or Graphic Hub downtimes (see details below).
-
-
Synchronize the two Graphic Hubs via Graphic Hub Manager (Server Diff).
-
The initial source server must have all content from the destination or both Graphic Hubs need to be equal in terms of file data when starting the sync. This is important as the task make the destination Graphic Hub equal to the source Graphic Hub, which can cause loss of data when it is only on the destination Graphic Hub.
-
-
Configure one real-time deploy job from one server to the other and vice versa.
-
After the initialization phase, the Deploy Agents start deploying the differences.
Note: Resuming operation when a Graphic Hub or Deploy Agent was down requires manual interaction (see below).
To Configure a Local Cluster with a Two-way Synchronized Remote Graphic Hub
-
Install the Graphic Hub on a remote location in multiuser mode or as main/replication cluster (referred to as GH-REMOTE). The remote host needs to be able to handle the number of expected clients.
-
Set up a local Deploy Agent (DA-LOCAL).
-
Set up a remote Deploy Agent (DA-REMOTE).
-
In Graphic Hub Manager in the Deploy Agent Properties, open the Configuration Panel and configure “Do emergency pausing of real-time tasks” to 1% of all objects or one object. This prevents the deploy task from accidentally deleting content created while the Graphic Hub has been unavailable and becomes available again, or the connection was interrupted and is reconnected.
-
This is a global setting for all tasks on the deploy agent and needs to be set on DA-LOCAL and DA-REMOTE.
Note: If the task pauses, it shows status Paused in the Scheduled Deploy Tasks panel (you need to be logged in to Central Graphic Hub and GH-REMOTE) and creates a message in the Finished Deploy Tasks panel with Paused because objects will be deleted. The task then needs to be resumed manually with Graphic Hub Manager by right clicking on the paused task and selecting continue deploy task.
Tip: You can configure e-mail alerts for these messages to get notified by mail when this happens (Application: Viz Graphic Hub Deploy, Level: 20).
-
In Graphic Hub Manager in the Deploy Agent Properties in the Configuration Panel it is possible to set the option “Do not overwrite if destination file is newer” too if desired. This is a global setting and applies to all tasks on the deploy agent.
Note: System time synchronization is required on Main/Replication Graphic Hub and the GH-REMOTE, otherwise this feature does not behave as expected.
-
Schedule a real-time deploy task (see sections above) from Central Graphic Hub "/data" to GH-REMOTE using DA-LOCAL with the following settings:
-
Options:
-
Behavior options: Rebuild original structure
-
When timestamps should be preserved check "Overwrite creation date" and "Overwrite modification date"
-
All other settings as is
-
Schedule:
-
Deploy agent: DA-LOCAL
-
Give it a proper name: For example, CENTRAL to REMOTE
Mode: Recurring forever -
Tick Schedule this task
-
Select Realtime
-
Tick Remove deleted objects on target server(s) as well
-
Select all Synchronize options
Caution: The task makes GH-REMOTE equal to the Central Graphic Hub. If there is content that needs to be preserved, copy all content to the Central Graphic Hub.
-
Wait for the task to start, synchronize and enter the IDLE state.
Note: The task might pause and requires a manual resume (continue) with Graphic Hub Manager, because of the emergency pausing on delete.
-
Schedule a real-time deploy task from GH-REMOTE "/data" to Central Graphic Hub using DA-REMOTE with the following settings:
-
Options:
-
Behavior options: Rebuild original structure
-
When timestamps should be preserved check "Overwrite creation date" and "Overwrite modification date".
-
All other settings as is
-
Schedule:
-
Deploy agent: DA-REMOTE
-
Give it a proper name: For example, REMOTE to CENTRAL
-
Mode: Recurring forever
-
Tick Schedule this task
-
Select Realtime
-
Tick Remove deleted objects on target server(s) as well
-
Select all Synchronize options
-
Wait for the task to start, synchronize and enter the IDLE state.
-
The synchronization is now up and running.
To Check Deploy Agent Connections
-
Log on to the Central Graphic Hub and GH-REMOTE with Graphic Hub Manager.
-
Open the Active sessions window. This provides an overview of all logged in users and active sessions, and to which host they are connected.
-
Look out for the Deploy Agent connection on both GHs and verify that they are stable and keep connected (Logged in since) for at ten minutes.
-
This is to ensure that the connection is stable.
To Check that Synchronization is Working Properly
-
Log on to the Central Graphic Hub and GH-REMOTE with Graphic Hub Manager.
-
Create a project/folder and copy a file on Central Graphic Hub and validate that it is synchronized to GH-REMOTE.
-
Create a project/folder and copy a file on GH-REMOTE and validate that it is synchronized to Central Graphic Hub.
To Check Deploy Agent emergency pausing is working properly
-
Create a dummy folder/project or file and wait until it is synchronized
-
Pause the deploy task or stop the deploy agent service
-
Delete the dummy item
-
Resume the task or start the deploy agent service
-
Validate that it pauses on startup with a warning: “Task paused because too many files would be deleted in real time”
-
Continue the task.
-
Validate that it resumes and processes the deletes to the destination.
To Resume a Paused Deploy Task or a Graphic Hub that was Down or a Connection was Lost
-
 Prior to starting a Graphic Hub that was down pause the deploy tasks or the deploy agent services before it is started
-
This makes sure nothing gets deleted or overwritten when the Graphic Hub is brought back up and running.
-
Log in to Central Graphic Hub and GH-REMOTE with Graphic Hub Manager.
-
From the main menu, select Server > Differences and click Diff All
-
To ensure that content that was changed on both servers does not get overwritten by the deploy task or files that were deleted don’t get restored a manual synchronization is required prior to resuming the deploy tasks.
-
Synchronize differences until one side is on the latest and desired state (for example, Central GH).
-
Resume deploy tasks one after the other starting from the one that was brought in sync.
-
For example, Central Graphic Hub was synchronized. Start CENTRAL to REMOTE first and wait until it is IDLE. Afterwards start REMOTE to CENTRAL and wait until it is IDLE.
-
The synchronization is now up and running again.