
Graphic Hub Administrator Guide
Version 3.8 | Published February 06, 2023 ©
Image Library Extension
This chapter describes the Graphic Hub Image Library Extension functionality.
In this section, you find the following information:
Introduction
The Image Library Extension offers the following functionality related to still images with browser based UIs:
-
Ingesting of images.
-
Metadata editing and assignment on/to images.
-
Searching for images including the assigned metadata.
-
Import of existing Viz Object Store image images and metadata.
It requires the following Graphic Hub components:
-
Graphic Hub ImEx Agent: Provides HTTP APIs and serves the browser based UI components. Imports images in the native Viz Engine format into Graphic Hub through Graphic Hub REST.
-
Graphic Hub REST: To import images in the Viz Engine format into a destination directory on the Graphic Hub.
-
Graphic Hub: For storage of metadata and images. The metadata and original image data is stored isolated form the existing file content. An image in the native Viz Engine format is created in a destination directory, as it is done with the Graphic Hub ImEx Agent distribution plans and watch folder workflow. The native Viz Engine images are read by Viz Engine during playout.
Important Pre-installation Information
Before setting up the Graphic Hub Image Library, observe the following:
-
The server must meet the minimum Graphic Hub hardware requirements.
-
It requires Graphic Hub REST and Graphic Hub ImEx Agent. The server running those must meet the Graphic Hub REST and Graphic Hub ImEx Agent Requirements.
-
The feature requires a license and is only available in modes multiuser, Main and Replication. See Licensing Graphic Hub.
-
Clients like Pilot Edge, Pilot Data Server and Media Sequencer need to be able to access Graphic Hub ImEx Agent across the network.
-
The Graphic Hub ImEx Agent open search endpoint needs to be configured in the Pilot Data Server Search Provider settings.
The Image Library functionality is bound to specific Graphic Hub component versions:
|
Functionality and Features |
Required Versions |
|
Image Library - Initial release |
Graphic Hub 3.8.0 |
-
All data is stored in the configured data directory. It is included in the Graphic Hub Terminal internal backup, and when the data directory is copied.
-
The internal file formats are automatically upgraded when the Graphic Hub is started on a data directory.
-
In general, old clients can work on newer versions, but newer clients cannot work on older versions.
Important: Always use the versions as listed above.
Key Features of the Image Library Extension
-
Centralized storage for both Viz Engine graphics and playout relevant images. Does not require a network share or mapped drive.
-
Easy setup of main and replication in terms of redundancy and fail-over.
-
Easy installation without any extensive database knowledge or upgrade procedures.
-
Easy import of data from Viz Object Store (metadata from Oracle, images from the network share).
-
Easy UI-driven import from a running Oracle database via a browser based UI hosted by Graphic Hub ImEx Agent. The import only has to be done one time in the transition phase. Note that re-import deletes all previously imported data and all changes.
-
Provide Core functionality with new standalone Web-UIs.
-
Ingest UI (basic UI to ingest single images).
-
Metadata editing/assignment UI (basic UI to edit/assign metadata on/to images).
-
Search UI and OpenSearch endpoints to cover basic search needs (image, person).
-
-
Shared browser based UI components served by Graphic Hub ImEx Agent.
-
Compatibility with existing Products (if possible).
-
Images support background loading in Viz Engine, as they are imported in the native Viz Engine image format.
-
Content is failsafe redundant on the Graphic Hub cluster.
-
Content is deployable with Graphic Hub Deploy Agent/Graphic Hub Manager.
Notable Limitations
-
Image Library content must be administered through the provided browser based UIs.
-
Searching in the image library metadata is only possible through the provided search UI or the search provider (opensearch) exposed by Graphic Hub ImEx Agent.
-
Deletion of images and metadata must be done through the Image Library UIs. When an image is deleted on the Graphic Hub with Viz Artist or Graphic Hub Manager is is staged again from the Image Library system.
-
-
Focus is on search/ingest and Pilot Edge workflows.
-
Image Library functionality requires specific Graphic Hub component versions (see above).
-
The provided API versions and UI components are bound to the Graphic Hub component versions.
-
Currently no support for synchronization on the metadata through Graphic Hub Deploy Agent in this initial version.
-
The imported image content stored on the Graphic Hub file part and are used by Viz Engine for playout are deployable and can be synchronized.
-
A manual backup solution is possible.
-
-
Metadata models are static in the initial release (the model can not be changed).
-
Static metadata also means searchable fields cannot be changed.
-
-
Ingesting only works with drag and drop and likely not with mobile devices
-
Ingesting has limited support for file types and might not work with some. Missing a list for supported file types.
-
Director search: Person search in Director has issues with displaying details and displays errors.
-
Image library Synchronization / Indices: No visual feedback about the current status when executing a differences / sync server / check indices/ fix indices.
Basic Setup
These are the steps to set up the Graphic Hub Image Library:
-
Install Graphic Hub (see To Install a Graphic Hub). You may configure a new and empty data directory or use an existing one.
-
Install Graphic Hub REST (see To Install the Graphic Hub REST).
-
When both installations are complete, the configuration windows for Graphic Hub Terminal and Graphic Hub REST open automatically in the browser.
-
Create a new configuration for mode Multiuser or Main/Replication and enable the allocation of the Image Library Extension license (see Graphic Hub Mode Configuration, Licensing Graphic Hub).
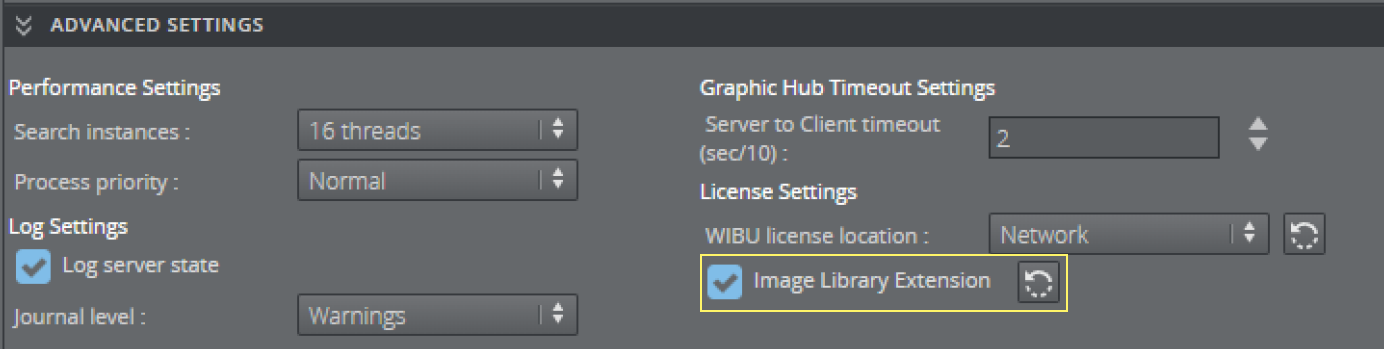
-
In the Graphic Hub Terminal window, click Start Server to start the Graphic Hub server.
-
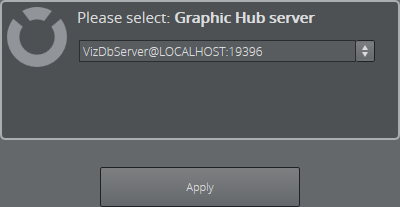
Switch to the Graphic Hub REST configuration window. Select the local Graphic Hub (if desired) as Graphic Hub server, and click Apply:
-
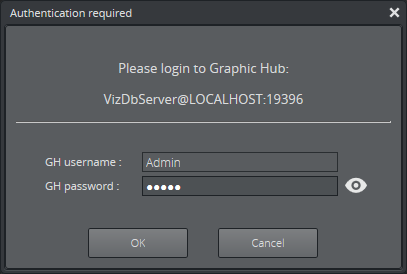
Log on to the Graphic Hub as Admin. The default password is VizDb:
-
Install Graphic Hub ImEx Agent (see To Install the Graphic Hub ImEx Agent).
-
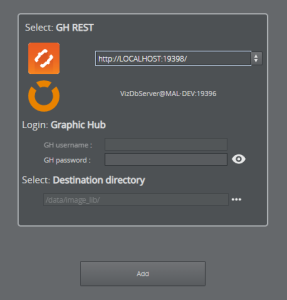
After the Graphic Hub ImEx Agent is configured, create a new destination directory (see Graphic Hub ImEx Agent Manage Imports).
-
Configure the used Graphic Hub REST by selecting the Endpoint in the dropdown menu or editing the input
-
Use the user Admin. The default password is VizDb
-
Select a destination directory by clicking on the "..." icon
-
-
An Image Library distribution plan is created to process imports for the Viz Engine native image format.
-
-
Configure the Image Library by navigating to "Import → Image Library"
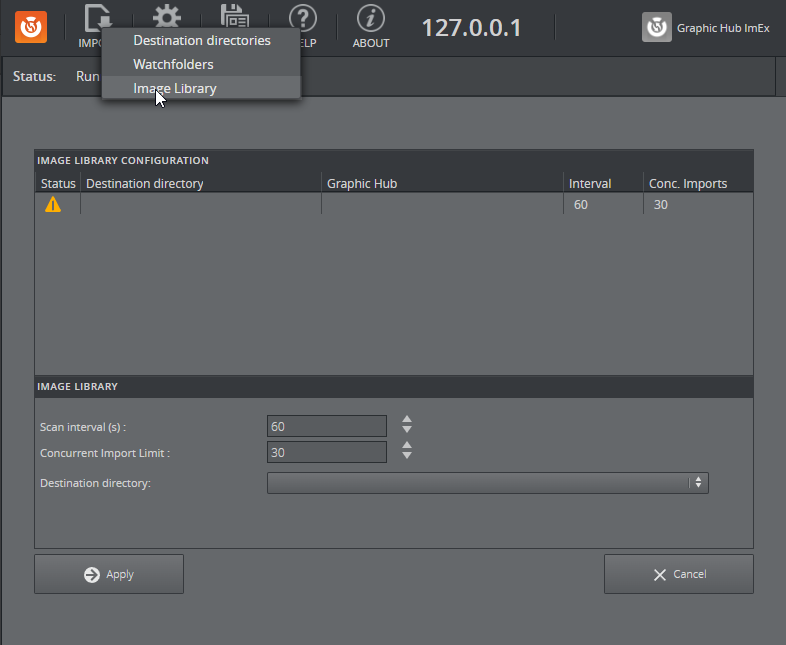
-
Select the previously created destination directory and save the changes with "Apply"
-
The Image Library Web-UIs can be accessed at http://127.0.0.1:19390/imagelibrary/index.html .
-
Install Viz Pilot Data Server.
-
Add the Graphic Hub Image Library as search provider in the Data server settings. This enables search of media in Pilot Edge.
-
Service Document URL: http://HOST:19390/restvos/service
-
Currently no username and password is required.
-
User Interface
General Concepts
-
One Web application to serve all Image Library topics.
-
Ingesting
-
Editing (images + metadata)
-
Importing (from external sources)
-
Searching
-
Administrative tasks
-
-
Image states: Images can have multiple states depending on the current progress in processing.
-
Image is stored on Graphic Hub Image Library storage, meaning only available for Image Library clients.
-
Image is processing, meaning it is currently converted to the native Viz Engine image format and imported to a destination directory.
-
Image is available, meaning Viz Engine can load the native format from Graphic Hub.
-
-
Metadata:
-
The metadata structure is represented as a model based on the Vizrt Data Format (VDF).
-
This is fixed in the initial version and not user editable.
-
-
The metadata content is represented as a payload which is validated against the model.
-
This can be edited by the user and assigned to images.
-
-
-
Reactive:
-
When tasks are executed in the background or by other clients the views are instantly updated.
-
Uploading an image with another client, makes the image immediately available in the main view, if image status changes, those changes are automatically reflected in the UI.
-
-
-
Snackbars:
-
Snackbars display updates from the back-end regarding current tasks or errors.
-
They are visible until the user closes them.
-
-
Tasks:
-
Tasks are asynchronously running background operations.
-
Currently there exist three tasks: import, delete and analyze.
-
These tasks can't run simultaneously.
-
They are shown by a progress bar.
-
For delete task and import task the progress bar is at the main menu at the top and shows the current item that is being imported or deleted.
-
For the analyze task the progress bar is displayed below the API configuration fields on the import view and shows which field is being analyzed.
-
-
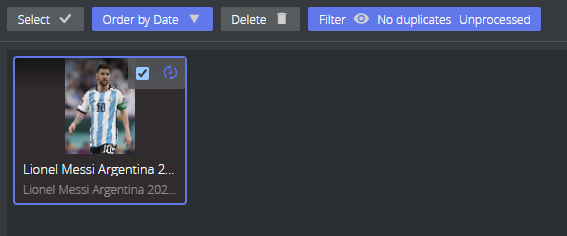
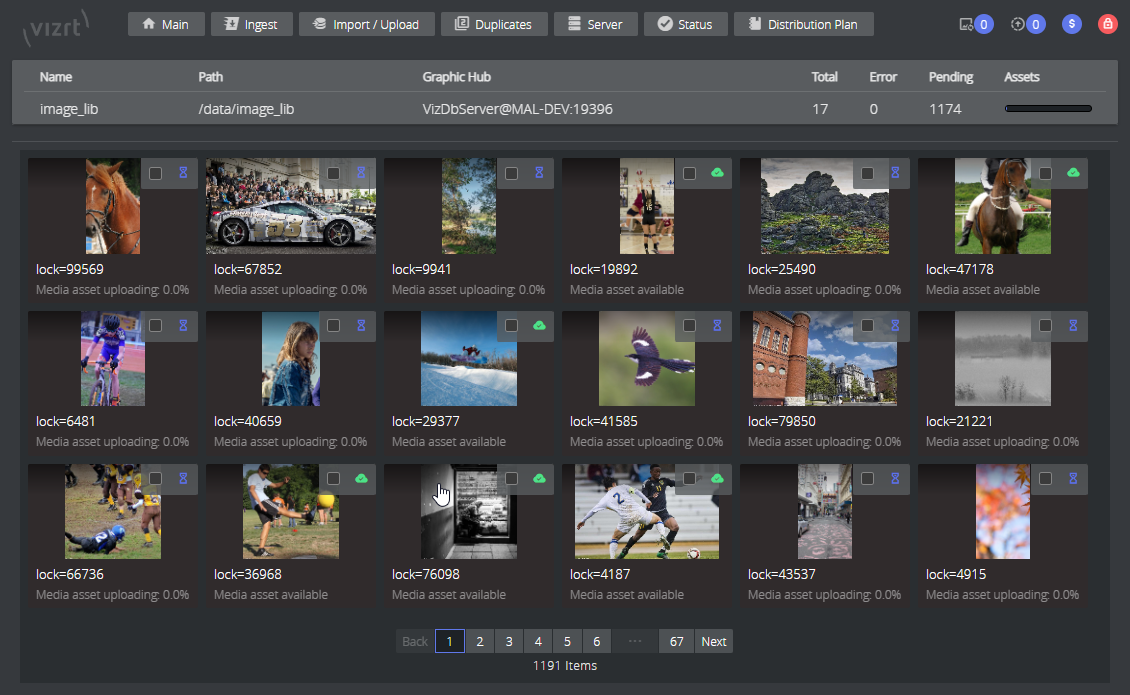
View: How to Browse Images and View Metadata
Viewing current Image Library content in the main view where all other views are visible. Most of the necessary tasks should be done here.
-
All available files are displayed in the main view.
-
You can execute all actions (searching, ingesting, editing).
-
Able to filter and order files on certain properties.
-
Refine your filters and ordering when browsing or serching
-
The filters are grouped and can be combined
-
Selected filters, ordering and active search are indicated with blue buttons
-
-
Has pagination and displays the total number of files and currently viewed page.
-
Amount of displayed files is defined by the screen space, and therefore dynamic.
-
Images can be selected, and have an overlay to display their status.
-
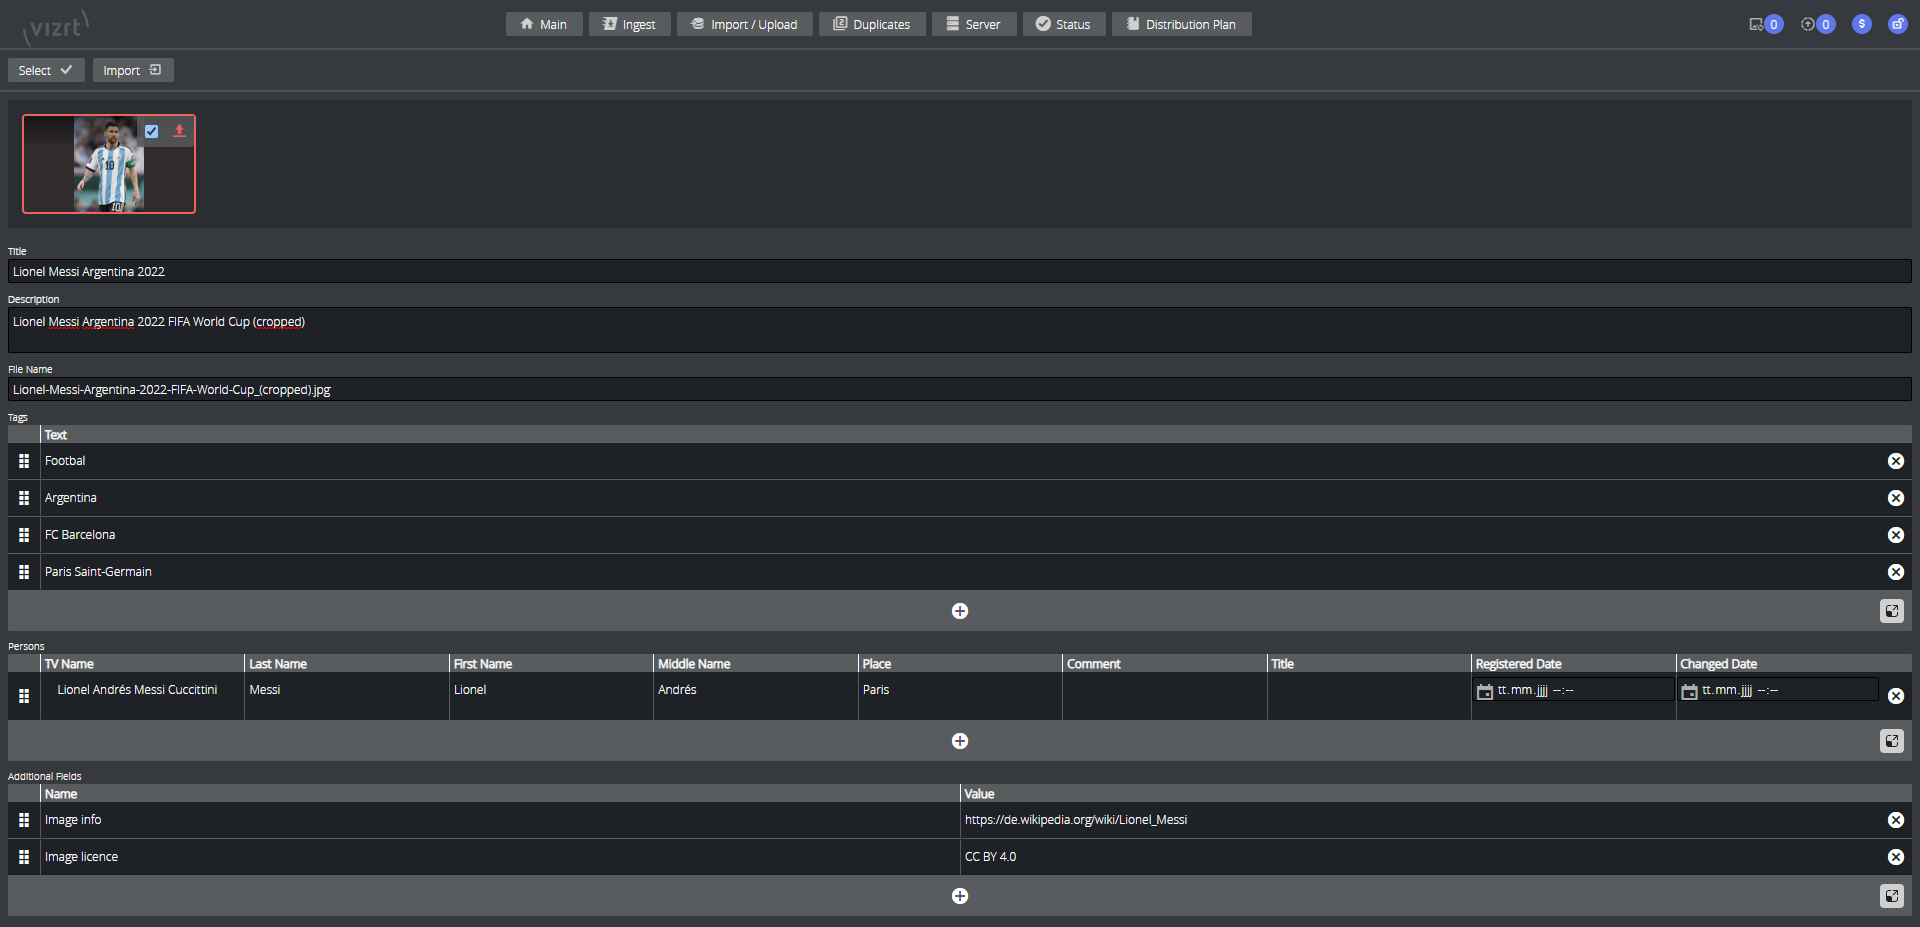
Images details can viewed by clicking on them:
-
Display the metadata.
-
Display the image properties
-
Display the image with an higher resolution.
-
Ingest: How to Add Images
Ingesting is the process in which a user uploads one or more an images to the Graphic Hub Image Library and assigns metadata.
This can be done by using the Upload/Import button on the main menu.
-
At the "Ingest" page the user can upload one or multiple images by dragging and dropping an image onto the upload pane

-
The ingest will automatically try to fill metadata by the file name, please revise!
-
Required metadata fields must be filled by the user, this can be done by clicking on the specific image
-
Confirm the upload of all selected image by pressing "Import"
-
The image is uploaded to Graphic Hub and is immediately available for usage in the Image Library and Asset search in Pilot Edge
-
Graphic Hub ImEx Agent automatically schedules an import and conversion to the Viz Engine native image format through Graphic Hub REST. This is indicated with the "processing" state.
-
When the image is converted and ready for playout by Viz Engine it is in the "available" state.
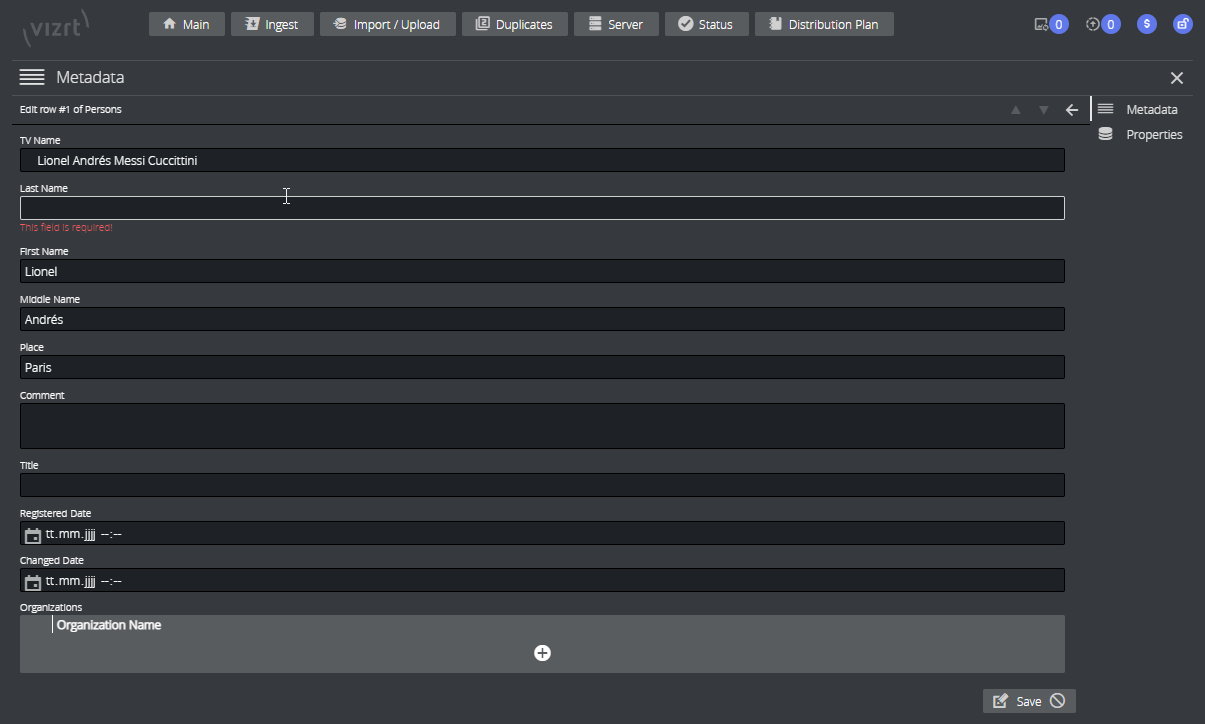
Editing: How to Edit Metadata
Editing metadata can be done in the main and search view by selecting an image.
Information: Required fields need to be filled, a red box indicates required fields when saving.
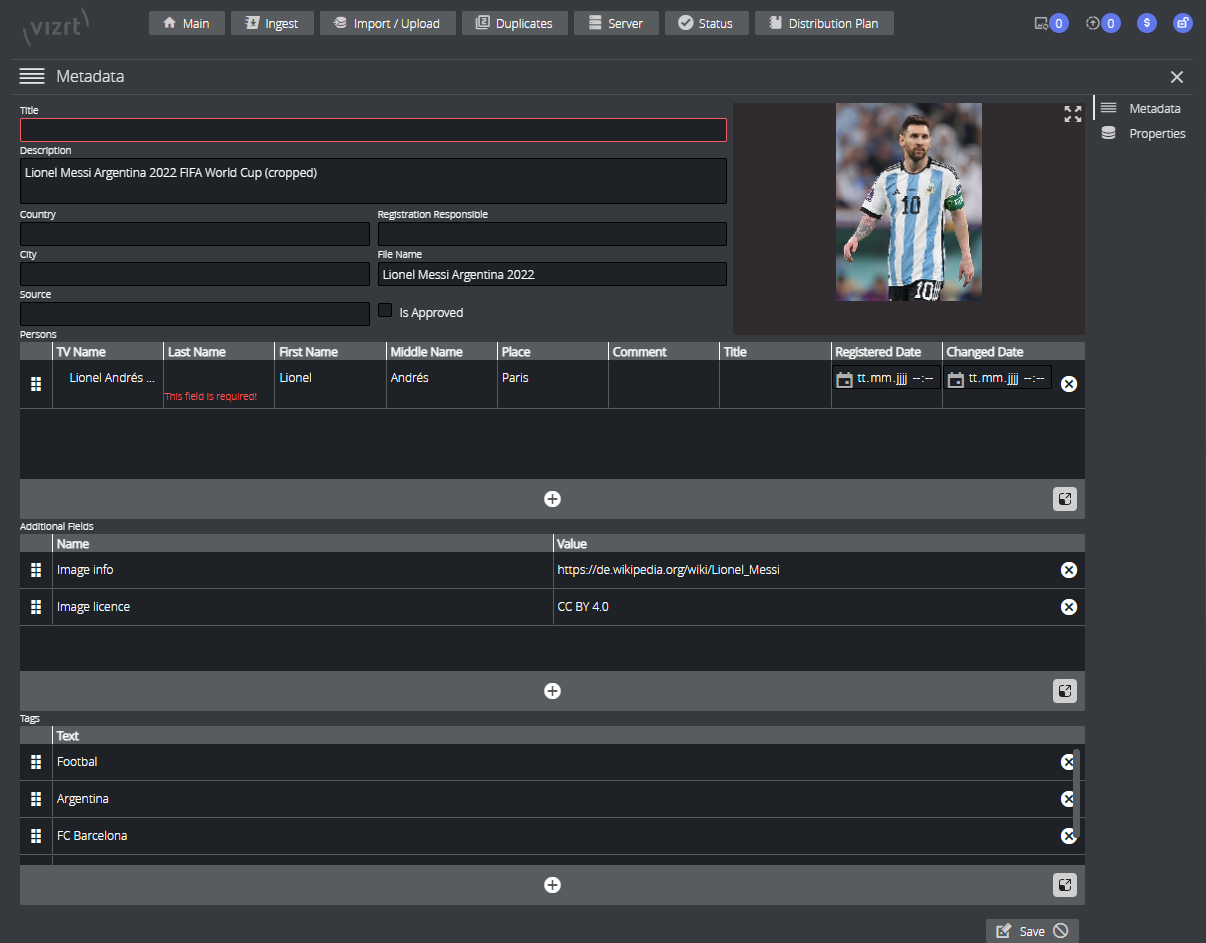
Information: You can edit Persons much better by selecting a field in the person editor and pressing ALT + ENTER. Now you can edit more fields and also add an organization.
Deleting: How to Delete an Image
This can be done in the main and search view by selecting one or multiple images and then clicking Delete.
Searching: How to Search for Images
The search bar is used to search for images.
-
Simple search based on all required metadata fields
-
Title
-
Description
-
Person:
-
TV Name
-
First Name
-
Last Name
-
-
Tags
-
-
The search is case insensitive and narrows by combining words. i.e.: "Lionel Messi" will find only images with the searchable fields "Lionel" and "Messi"
-
Total found results will be displayed under the page view
-
You can also order and Filter the search result
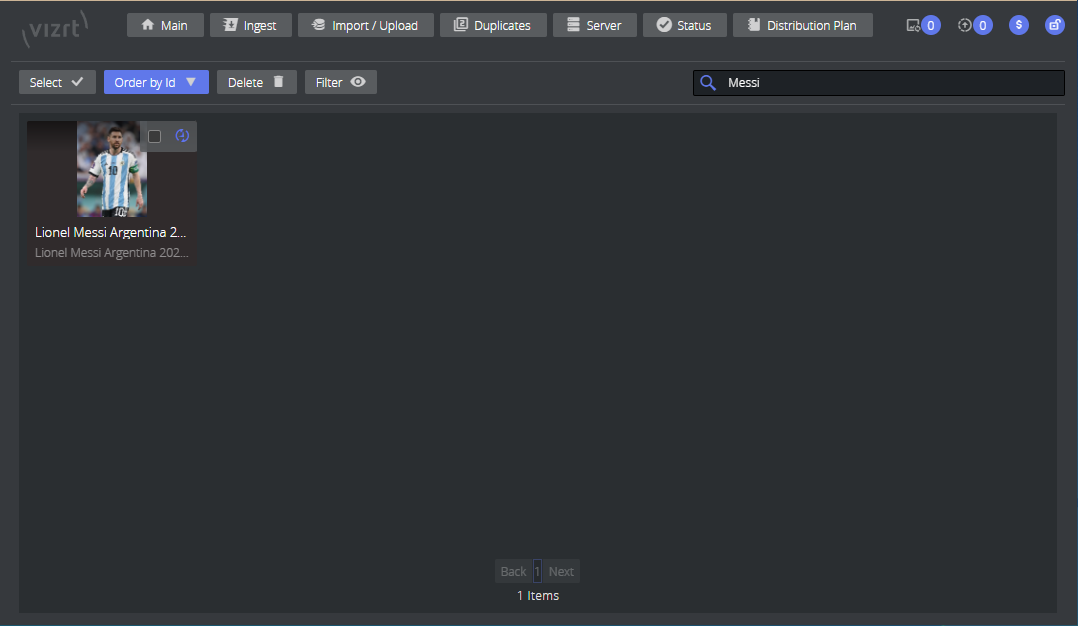
Information: An active search is indicated with blue search button. Clear the search result by deleting the search or hitting the "x"
Searching: How to Search for Images with Pilot Edge
The open search endpoint needs to be added as search provider in the Pilot Data Server configuration. Please consult the Pilot Manual for instructions.
Information: The default service document to add for the Image Libary is: http://HOSTNAME_IMEX:19390/restvos/service
Importing: How to Import an Existing Viz Object Store Database
Importing is a one stop process which allows to connect to an Viz Object Store Oracle database and import existing images (from the network share) and metadata once.
Information: Importing is only available in "Administrative View". The process should only be executed once for an initial import! Map your VOS image share network drive properly before starting this task: How to Map a Network Share into a Drive and Access it from Windows Services for Import!
-
It requires the Oracle access settings (hostname, username, password, database) and access to the network share used.
-
Steps:
-
Provide configuration and credentials for:
-
Hostname: Host where Oracle is running.
-
Username and Password: Oracle username and password.
-
Database service: The Oracle DB service instance (typically pilot or vizrtdb).
-
Server port: The Oracle service port (typically 1521).
-
-
Click Check connection. It should show Database Connection Successful
-
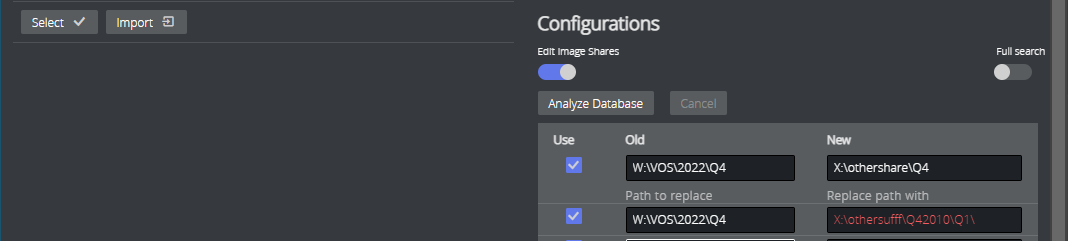
Edit the analyze options:
-
Edit Image Shares: Shows all image locations (network shares) found in the Oracle database.
-
From these paths the images are read and imported.
-
You are able to edit every individual path by editing the "Replace path with" part
-
You can replace all paths by adding applying a part of the path and its replacement in the first fields
-
-
-
-
Full search: use all database entries, even if the image is not available on the network share
-
By default this setting is disabled, meaning only content is analyzed where an image is available.
-
Enabling this will only analyze and display the image entries, they will be ignored during the import because no image is available.
-
-
-
Click Analyze Database: Starts to analyze the database content and the available images.
-
This can be done several times when the configuration is changed (for example, when editing the Image Shares mapping).
-
The Oracle database content and available images are analyzed, which can take some time.
-
If there are no results:
-
Please check that the network share is accessible for a service (Map it correctly)!
-
Refine your Image Share mapping by editing the image shares
-
-
-
Select a subset or all images to import by clicking Select (top left) > Select All.
-
Start the import by clicking Action (top left) > Import.
-
The import process starts and runs asynchronously on the Graphic Hub ImEx Agent.
-
The import process might take some time and the UI is locked and allows to view the progress and cancel the import.
-
Note that staging into the processing of the Viz Engine native format is done asynchronously and may lag behind.
-
It is recommended to have only one client active to avoid constant reloading of clients due to the massive amount of updates sent during the import.
-
Administrative Tasks
Information: Adminstrative tasks are only available in the "Adminstrative view", you are able to access this by adding ?admin=true to the URL. For example, http://localhost:19390/imagelibrary/index.html#/?admin=true.
-
Duplicates: View and find duplicates.
-
Import Progress/Status:
-
Currently uploading and processing images of the Graphic Hub ImEx Agent distribution plan.
-
Import status: Displays the status of the last import and analyze task.
-
-
Database Lock: Allows to exclusively lock the database for writes. Shows a red lock on the top right to all users when activated.
-
Distribution Plan: View the status of currently importing items to the Viz Engine native file format
-
Server: Displays multiple options to check
-
Analyzes and compares content between two Graphic Hubs (Main/Replication). Allows to synchronize two Graphic Hubs.
-
Shows the differences of "Models", "Images" & "Payloads"
-
The Differences can be "Missing" (on either Graphic Hub) or "Changed".
-
-
One can "Lock" + "Unlock" the database.
-
One can "Sync" it with another Graphic Hub, which can be used to bring Main and Replication in sync.
-
One can "Drop" the whole database on the right server in the view. Needed if sync errors happen. Meaning one drops the database first and then synchronizes it again.
-
Troubleshooting
Image Library Page has connection errors / Fresh installation / ImEx hangs
Image Library might not have been configured properly. Mostly those errors are because:
-
Missing / Misconfigured License.
-
ImEx Image Library is not configured to a destination directory.
-
ImEx destintion directory is not properly configured.
-
Graphic Hub REST is not properly configured.
Images are not found in search
-
Check if the image you are searching has the searched metadata.
-
The search index might be broken, you can fix that by following these steps:
-
Use the Image Library Administrative UI > Server page.
-
Database Indices > Select your server.
-
Check Indices: Will lock the Image Library for any write operation and run a task in the background.
-
When the task of checking the indices is done you will see that Last Updated changed.
-
If "Search Differences" is more than 0 and "Search Index Working" is not 0 you should fix the indices.
-
If "Search Index Working" is also larger than 0 you should wait some time and check indices again.
-
-
If you have differences and use fix differences the server will try to fix the differences.
-
After a while you can check the differences again.
-
Don't forget to unlock the server again.
Image library cannot import / ingest images
-
Check if you have the license properly configured
 . The Icon should not be red.
 -
Main and Replication need a licence, please check both servers.
-
-
Check if there is enough disk space available on Graphic Hub.
-
Ingesting does not allow all file types with every format. Make sure you are importing a common file type.
-
Make sure the Image library is not in "Locked" mode
 . The Lock should not be red.
In my cluster there are missing images or metadata is incomplete
-
Main and Replication might have differences due to a network issues.
-
Main and Replication might have differences due one server has not been available
Use built in tools to solve the differences:
-
Make Sure both servers are running and are in their native mode, with no open transactions.
-
Use the Image Library Administrative UI > Server page.
-
Server Synchronization > Select your server replication graphic hub (your ImEx should always be connected to the main server).
-
Show Differences: Will lock the Image Library for any write operation and run a task in the background.
-
After the task is done, a list of differences between both servers appears.
-
-
Hit Sync Servers to synchronize both servers again.
-
Don't forget to unlock the servers again.
Image library is not deployed via deploy agent, I need a backup solution!
There are multiple ways of making a backup:
-
Shutdown:
-
Shutdown you Servers properly at a service interval and let Graphic Hub Terminal handle the backup.
-
Shutdown your Servers properly and backup the data directory.
-
-
Manual Server Synchronization
-
You can synchronize your servers manually to a Multiuser server with a valid Image Library License.
-
Server Synchronization > Enter your destination server instead of choosing one: VizDbServer@Hostname:19396.
-
Show Differences: Will lock the Image Library for any write operation and run a task in the background.
-
After the task is done a list of differences between both servers appears.
-
-
Hit Sync Servers to synchronize both servers again.
-
Don't forget to unlock the servers again.
-
Images are not available for Playout / Cannot find images in the Graphic Hub
The images are only available in the Graphic Hub when they have been converted to the native Viz Engine format. They will not contain any "usable" name, because they are only intended for automated playout.
You should not be using those images for Designing Scenes, etc...
If your playout cannot load these images make sure to have a look in the Distribution plan:
-
You can view the distribution plan for the Image library in the ImEx configure web interface.
-
You can view the distribution plan for the Image library in the Image Library Administrative view:
-
If there are Pending imports, you need to either wait for the ImEx to import the images.
-
Check the errors by clicking on the status bar.
-
Check your Graphic Hub for corrupted files.
-
If the Import does not continue, Restarting Graphic Hub ImEx Agent & Graphic Hub REST triggers a complete fresh import.
-
Distribution Plan does not continue upload / shows errors
The distribution plan is not continuing and stops without recovery might happen for various reasons:
-
Check your Graphic Hub for corrupted files.
-
Restart Graphic Hub REST Service.
-
Restart Graphic Hub ImEx Agent Service.