Graphic Hub Administrator Guide
Version 3.6 | Published December 10, 2021 ©
Deploy Agent Properties
The Deploy Agent properties panel shows the properties and configuration settings for the Deploy agent.
This page contains the following topics and procedures:
Properties of a Deploy Agent
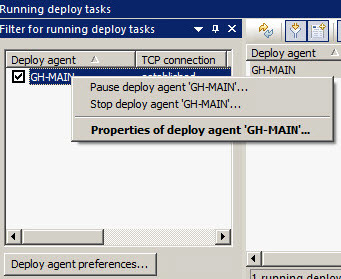
To access the properties of a Deploy Agent:
-
Navigate to Tools > Administer tasks > Running deploy tasks to show Running deploy tasks tab.
-
Right click a Deploy Agent.
-
Click Properties of deploy agent.
Information: Configuring a Deploy Agent is only possible if logged in on this machine locally. This is by design for security reasons.
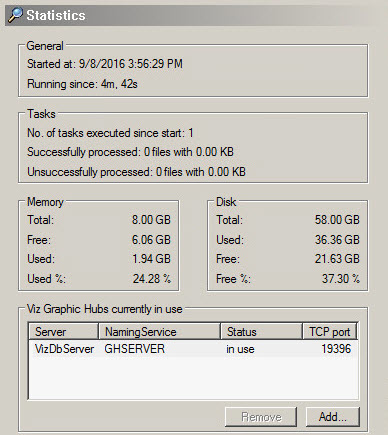
Statistics Panel
In the Statistics panel, Graphic Hubs currently in use shows Graphic Hubs currently used as Deploy Agents. These Graphic Hubs are the source servers of one or more deploy tasks. The Graphic Hub Deploy Agent automatically removes all unused Graphic Hub source servers.
In some cases, a Graphic Hub can be lost or cannot be contacted by a Graphic Hub Deploy Agent. If this happens the add and remove can be done manually.
Note: A Graphic Hub Deploy Agent, which is configured as High Availability Partner originally, cannot remove or add Graphic Hubs.
To Add a Graphic Hub
(Which is not registered in the Deploy Agent)
-
Open the Properties of Deploy Agent window.
-
Open the Select Graphic Hub to add window.
-
Click Add, or
-
Right click in the Graphic Hubs currently in use box, and click Add.
-
-
Select a Graphic Hub to be added, from the drop down box.
-
Click OK or Apply.
Note: The added Graphic Hub status is to be added until OK or Apply has been clicked (when not highlighted, the to be added Graphic Hub shows purple).
Note: If an added Graphic Hub does not contain a valid task for the current Graphic Hub Deploy Agent, the Graphic Hub is automatically removed again. It is not possible to add or remove multiple Graphic Hubs at once.
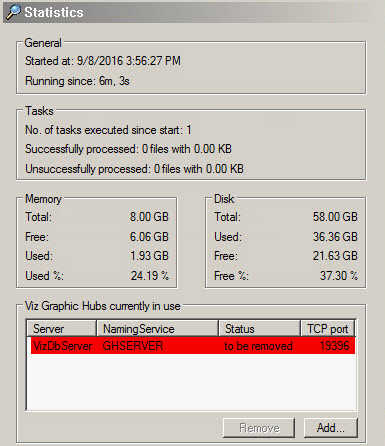
To Remove a Graphic Hub
-
Open the Properties of Deploy Agent window.
-
Click the Graphic Hub to be removed.
-
Remove the Graphic Hub:
-
Click Remove, or
-
Right click the selected Graphic Hub and click Remove selected from the context menu.
-
-
Click OK or Apply.
Note: The selected Graphic Hub status is to be removed until OK or Apply has been clicked (when not highlighted, the to be removed Graphic Hub shows red).
Note: If a Graphic Hub to be removed contains any running tasks, the remove will not be successful. Either click Cancel or undo the change via the context menu. If a removed Graphic Hub is not reachable by Graphic Hub Deploy Agent, a message displays where it is possible to select a forced remove or cancel the action. It is not possible to add or remove multiple Graphic Hubs at once.
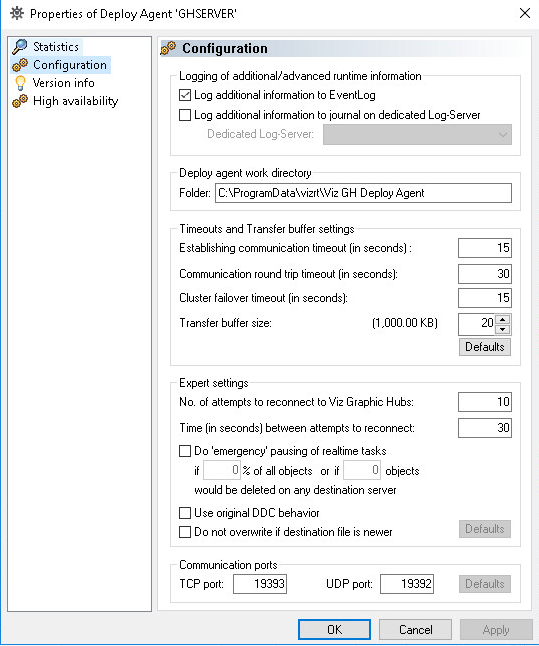
Configuration Panel
-
Logging of additional/advanced runtime information
-
Log additional information to EventLog: Configures the Deploy Agent to log warnings and errors to the event log of the source server of the task that caused the issues.
-
Log additional information to journal on dedicated Log-Server: Configures the Deploy Agent to log warnings and errors of all tasks to the event log of a specified server.
-
-
Deploy agent work directory
-
Folder: Shows where the Deploy Agent keeps its configuration file and temporary data.
-
-
Timeouts (related to communication with Graphic Hubs): Changing the values of the timeout settings may have a significant impact on how Deploy Agent works. The default values have been tested in a LAN setting as well as for long range deploy tasks and should only be changed if the Deploy Agent has problems with servers that are connected via a slow / congested network or have a high server load. Increasing the timeout values may solve the problems in this case, decreasing does not improve the general performance of the agent and is not recommended.
-
Establishing communication timeout (in seconds): Specifies the maximum amount of time for a Deploy Agent is allowed to connect to a server. If the server does not respond in this period due to network characteristics or server load, it is considered as offline.
-
Communication round trip timeout (in seconds): Specifies the maximum amount of time for the Deploy Agent to wait for a reply from the server. If the server does not respond in this period due to network characteristics or server load, the affected task may be paused by the agent.
-
Cluster failover timeout (in seconds): This option is relevant for agents that operate in a setting with a failover server. If a main server becomes unavailable, this timeout specifies the period that a task is waiting for a notification from the failover server to switch over. If this time exceeds, the agent attempts to manually connect to the failover server.
-
Transfer Buffer Size: Adjusts the buffer size used by the Deploy Agent for communicating with the Graphic Hub.
-
-
Expert settings
-
No. of attempts to reconnect to Graphic Hubs: Set the number of times the agent is to attempt to connect to Graphic Hubs
-
Time (in seconds) between attempts to reconnect: Set the time between each attempt to reconnect to Graphic Hubs
-
Do emergency pausing of real-time tasks: Click in the box to do emergency pausing of real-time tasks. Set the % of all objects or the number of objects.
-
Use original DDC behavior for non real-time tasks: This option is set globally for the Deploy Agent and affects all tasks. The major difference to the normal mode is that the “deploy under target folder” restriction of having no folder on source and destination that has the same UUID but an incompatible path does not apply. If the Deploy Agent discovers a folder with the same UUID but different path, a new folder with a new UUID is created in the expected path. This feature has a significant impact on the performance of the Deploy Agent, and should be chosen wisely as it affects all non-real-time tasks that are executed by the agent
-
Do not overwrite if destination file is newer: If set, the file on the destination server is not overwritten, if it has a modification date/time newer than the source file. The default setting (=option is not checked) is always overwrite the file with the source-file.
-
-
Communications ports
-
TCP port: Sets the TCP port number.
-
UDP port: Sets the UDP port number.
-
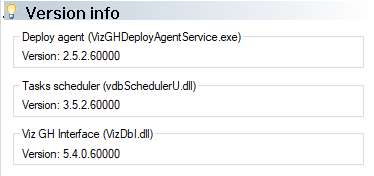
Version Info Panel
The Version info panel shows the version information for:
-
The Deploy Agent.
-
The Tasks scheduler.
-
The Graphic Hub interface.
High Availability Panel
When a new High Availability Partner is configured, the configuration of these values automatically transfer to the High Availability Partner:
-
Timeouts
-
Establishing communication timeout (in seconds)
-
Communication round trip timeout (in seconds)
-
Cluster failover timeout (in seconds)
-
-
Expert settings
-
Do emergency pausing of real time tasks
-
-
Use the original DDC behavior for non real time tasks.
IMPORTANT! When disabling the High Availability partner, the configuration values return to their default values.
Note: Since Deploy Agent version 1.4.1, it is possible to configure high availability partners using host names or IP addresses.
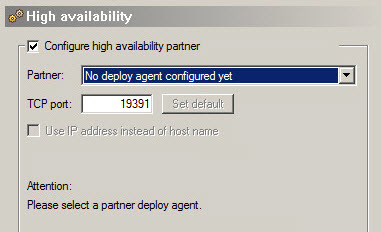
To Configure a High Availability Partner
-
Click in the Configure high availability partner check box.
-
Select the Deploy agent from the Partner drop down box.
-
Click the Use IP address instead of host name box, if required.
Note: If the High Availability partner configuration is set to use IP addresses, the clients need to have static IP addresses.
-
Click OK or Apply.