Graphic Hub Administrator Guide
Version 3.6 | Published December 10, 2021 ©
Backup and Restore
The Backup menu shows the backup, restore and data recovery options. As the Graphic Hub server cannot be backed up or restored while running, the server must be shut down to enable changes to the configuration settings.
The internal backup and restore operations of the Graphic Hub are incremental processes. If one backup or restore operation succeeds, all subsequent operations copy the difference from the successful backup/restore to the current operation. Restore points are created to accomplish this process.
-
The first restore point holds information about the original data directory.
-
The second point holds information about changes from the startup to the first backup.
-
The third point holds information from the first to second backup, and so on. If no changes have been made since the previous backup, the Graphic Hub does not create a new restore point.
Example: The first backup finished successfully at 01.01.2009 00:00:10 and the second at 01.01.2009 12:00:00. Between the backups, one scene was modified: MyScene. The latest restore point would then only contain data regarding this scene. If restoring to the previous point, only MyScene resets to its status at 01.01.2009 00:00:10.
There are two kinds of backup, internal and external, both of which are configured in the Graphic Hub Terminal. Make sure to shut down the Graphic Hub before configuring a backup.
Internal Backup
Internal Backups are incremental backups as described above. It is possible to limit the number of restore points after a backup. Reducing the amount of restore points vastly reduces the amount of disk space required on the server.
External Backup
External backups are executed via a command line call of the Graphic Hub Terminal. It is a full backup, and requires the creation of a batch file for execution. Output from the batch file to the console is visible in the Terminal logging window.
This example batch file copies the data directory to C:\COPY:
@ECHO offecho Starting copy of data dir: "%~1"IF [%1] == [] ( echo ERROR: NO DATADIR SET EXIT 1)robocopy "%~1." "C:\COPY" /MIR /COPY:DAT /DCOPY:Techo "robocopy exit code: %ERRORLEVEL%"IF %ERRORLEVEL% LEQ 7 ( echo FINISHED SUCCESSFULLY EXIT 0) else ( echo ERROR DETECTED EXIT 1)Backup Configuration
This section details the parameters and configuration of the backup and restore system.
Tip: Backup can only be configured when the Graphic Hub server is not running.
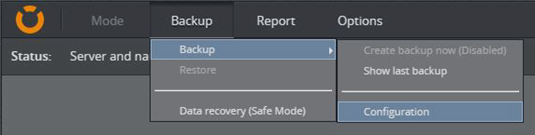
Go to Backup > Backup > Configuration to open the Backup configuration window:
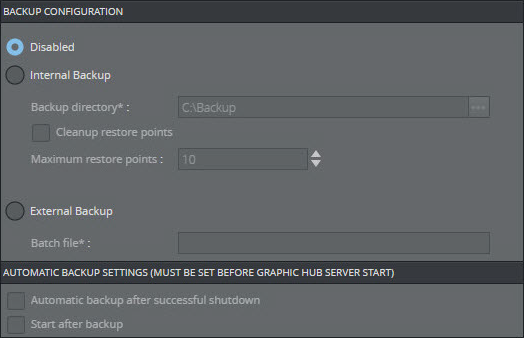
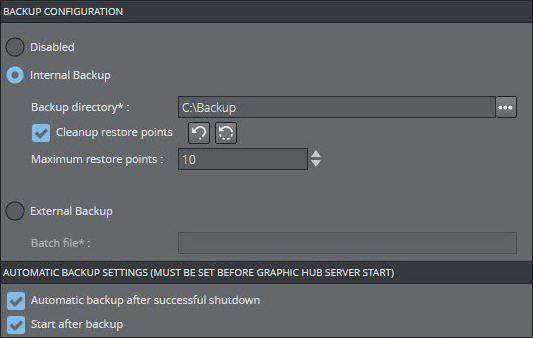
Backup Configuration
-
Disabled: Disables backup.
-
Internal Backup: Activates internal backup.
-
Backup Directory: Determines backup directory path. Only local drives are allowed as backup directory path.
-
Cleanup restore points: Enables limits to the number of stored restore points when checked. All restore points beyond the maximum are deleted. This can save considerable hard disk space.
-
Maximum restore points: Sets the maximum number of restore points.
-
-
External Backup: Activates external backup.
-
Batch file path: Sets the path to and name of the batch file to execute.
Note: As Graphic Hub Terminal runs as a service under the SYSTEM account, it cannot access network drives mapped by another user. Make sure that the destination path for the external backup is a local drive.
-
Automatic Backup Settings
This is used in combination with a shut down task to do periodic automated backups:
-
Automatic backup after successful shutdown: Performs automatic backup on server shutdown when checked.
-
Start after backup: Starts the server automatically upon completion of the automatic backup when checked.
Note: Start after backup is only applicable when shutting down the server through the Graphic Hub Manager or when the server is shut down by Scheduled Tasks.
To Configure Backup
-
Shutdown the Graphic Hub server if it is running, in accordance with the Graphic Hub Shut Down procedure.
-
Open the Graphic Hub Terminal.
-
Go to Backup > Show Configuration.
-
Select the required backup type, Internal or External.
-
For Internal Backup:
-
Select Internal Backup.
-
Enter the Backup Directory path.
-
If required, check the Cleanup restore points checkbox and set the maximum number of restore points.
-
-
For External Backup:
-
Select External Backup.
-
Enter the Batch file path.
-
-
Select as required:
-
Automatic backup after successful shutdown
-
Start after backup.
-
-
Click Apply to perform the backup operation.
Perform Database Backup
This section details the backup of a Graphic Hub database. The procedure depends on whether an internal or an external backup has been configured.
To Do an Internal Backup
-
Shutdown the Graphic Hub server if it is running, in accordance with the Graphic Hub Shut Down procedure.
-
Open the Graphic Hub Terminal.
-
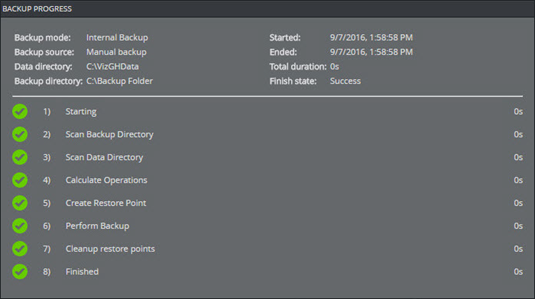
Select Backup > Create backup now.
-
The backup is created in the directory specified in the backup configuration, as indicated by the Create backup now link.
To Do an External Backup
-
Shutdown the Graphic Hub server if it is running, in accordance with the Graphic Hub Shut Down procedure.
-
Make sure that the a batch file has been created and is available.
-
Open the Graphic Hub Terminal.
-
Select Backup > Create backup now (External Backup).
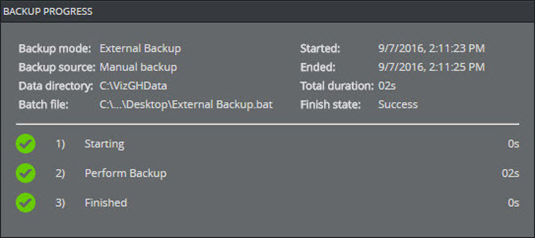
Restore Files
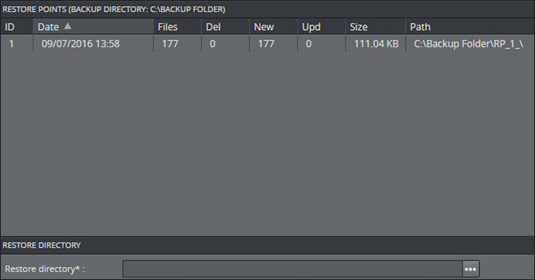
To open the Restore Points panel, open the Graphic Hub Terminal and select Restore from the Backup menu. The panel contains information about the restore points available according to the current backup configuration, such as the date and time the restore point was created, how many files it contains, and the location.
The Restore Points panel is accessible when the Graphic Hub is running. However, it is not possible to perform a restore task while the Graphic Hub is running.
Restoring Files: Best Practices
When files are restored, observe these best practices:
-
Data directories: It is not recommended to restore files to an already existing data directory. Create a new directory and restore the files there. Then start a new configuration of the Graphic Hub Server using the location of the restored files as data directory.
To Restore Backup Files
-
Shutdown the Graphic Hub server if it is running, in accordance with the Graphic Hub Shut Down procedure.
-
In the Graphic Hub Terminal, go to Backup > Restore.
-
Select which restore point to restore.
-
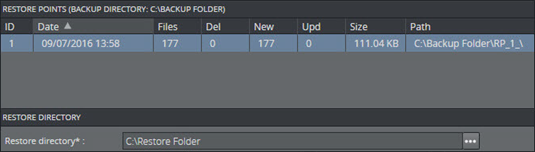
In the Restore directory field, enter the location which the files should be restored to, or press the browse button to browse to the desired location. New directories can be created either by typing in a non-existing path in the Restore directory field, or by right clicking the directory tree while browsing and selecting New folder.
Caution: Do not restore files to an existing data directory, as this overwrites any existing data. Instead, create a new directory and restore the files there.
-
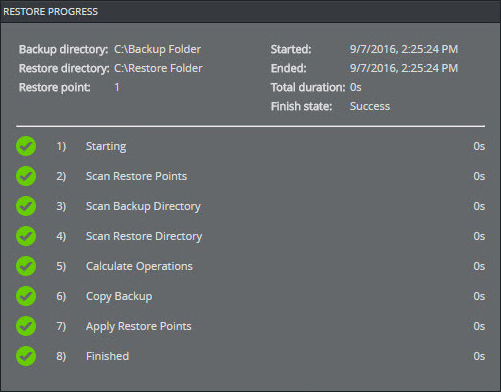
Click Restore. The Restore progress window appears, providing information about the restore process.
Safe Mode
The Graphic Hub Terminal should be started in Safe Mode if the database has crashed and needs to be restarted. Rebuilding the database in Safe Mode can take several hours, depending on the amount of data that needs to be reconstructed. The recovered directory cannot be accessed by clients such as Viz Artist. It can only be accessed by a system administrator using the Graphic Hub Manager.
Caution: Do not use Safe Mode for valid data directories.
To Prepare for Database Repair
-
Back up the current data directory.
-
Close all Graphic Hub Deploy Agent connections to the server.
-
Close all Graphic Hub Rest Agent connections to the server.
-
Make sure that the instance is not part of a Graphic Hub Cluster environment.
-
Make sure that the latest version of Graphic Hub is installed.
To Start Graphic Hub Terminal in Safe Mode
-
Prepare the repair procedure as described above.
-
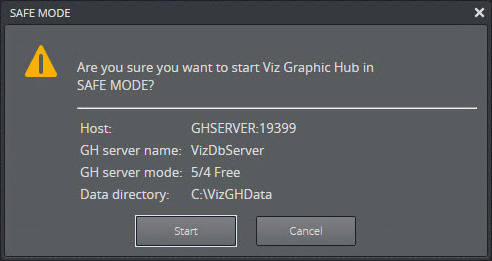
In the Graphic Hub Terminal, go to Backup > Data recovery (Safe Mode):

-
Carefully read the information, then click Start to proceed.
-
Check the configuration settings, then click Start.
This begins the rebuild process. Rebuilding a large database may take several hours to complete.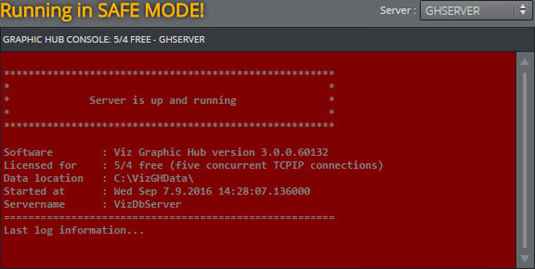
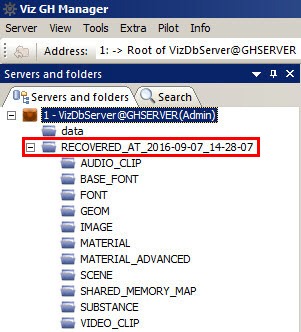
When the data has been rebuilt, the Graphic Hub Manager contains a folder called RECOVERED_AT_YYYY-MM-DD_HH_MM_SS. The date and time in the folder name serves as a timestamp for the last modification.
Successful Restore Operation
The database has been successfully restored when:
-
The red console panel shows that the server is up and running.
-
All processed files are listed in Reports.
-
Files can be viewed in the Graphic Hub Manager.
-
Depending on the severity of the database corruption, it might be required to run a full server check on the recovered data. Found issues can then be repaired from there (see Data Errors).
IMPORTANT! A Graphic Hub server in a production environment must never run in Safe Mode. Safe Mode is only for restoring a corrupted database. This instance can now serve as a source for rebuilding an empty destination database through the DDC functionality (see Graphic Hub Deploy Agent).