
Viz Multiplay User Guide
Version 2.3 | Published August 10, 2018 ©
Viz Multiplay Settings
![]()
Open the Settings window from the tool bar. It has the following tabs:
General Tab
Settings > General
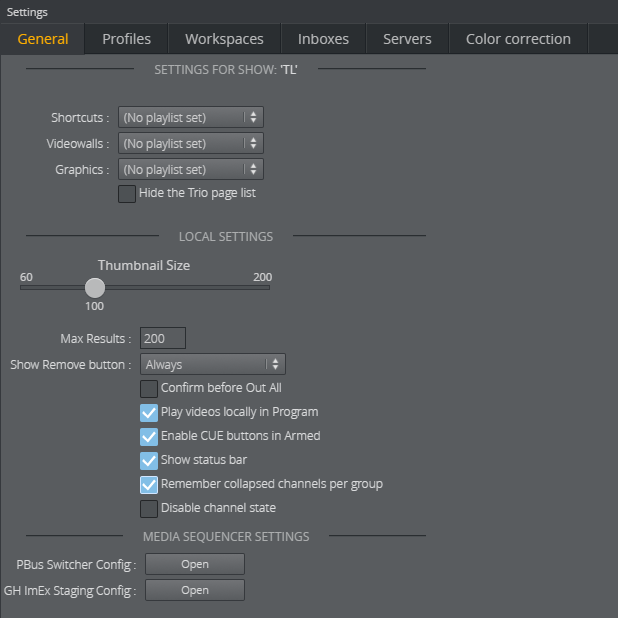
The settings are as follows:
-
Settings for Show:
-
Shortcuts: Select the playlist that contains your preset layouts and background scenes. The shortcuts are then displayed in the Shortcuts Bar at the top of the main window.
-
Videowall: Select the playlist that contains your videowall preset layouts. You can drag the presets onto the Shortcuts Bar or the main channel, edit them in the Video Wall Designer and create filled presets in the Preset Content Editor.
-
Graphics: Select the playlist that contains graphics imported with Trio. You can drag Trio pages into the Media Column in Viz Multiplay and edit them in the Preset Content Editor.
-
Hide the Trio page list: Check this box to hide the Trio page list. This can be useful if the Pilot workflow is used.
-
-
Local Settings:
-
Thumbnail size: Controls the appearance of media icons in the Media column.
-
Max Results: Enter the max number of elements to be listed in the Media tab and Pilot data elements in the Templates tab in Sources.
Note:
The current search refreshes when the setting is changed.
-
Show Remove button: Select when to show the remove button (the X) on playlist and elements. Use this to prevent accidental removal of elements and playlists. The choices are:
-
Always
-
Only when Off Air
-
Never
-
-
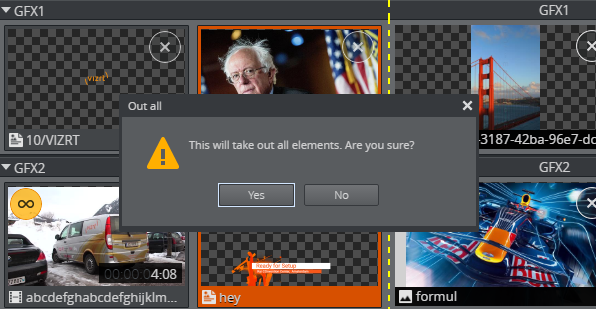
Confirm before Out All: Enables a dialogue box, which appears after clicking Out All, asking if you want to take out all elements.
-
Play videos locally in Program: When enabled, clips will display a preview in the Program column when they are taken to air. When disabled, only a thumbnail will be displayed.
-
Enable CUE buttons in Armed: Enable cuing of clips, images and graphics, which sends elements to the first frame of the renderer.
-
Show Status Bar: Show or hide the Status Bar at the bottom of the screen.
-
Remember collapsed channels per group: If checked, Multiplay stores the collapsed/expanded state for each channel, per group. This is handy if one group contains content for a subset of the channels, while another group mainly contains content for another subset.
-
Disable channel state. When checked, Multiplay will show the last taken element in the Program column. This element is private for Multiplay. The Out and Continue buttons will operate only on this element. Other clients will not update the Program column. When unchecked, Channel State is used - given that the Media Sequencer version is equal to or above 5.0. When Channel State is used - the Program column will contain a more accurate snapshot of the content of the renderer - and the Out/Continue buttons will operate on all the current layers in the renderer.
-
-
Media Sequencer Settings
-
PBus Switcher Config button: Available if the Media Sequencer supports the PBus protocol for communicating with switchers. This requires a Media Sequencer version 5.0 or higher. When clicked, a new browser tab opens with the configuration application for communicating with the switcher.
-
GH ImEx Staging Config button: Available if the Media Sequencer supports image staging to Graphic Hub. This requires a Media Sequencer version 5.0 or higher. When clicked, a new browser tab opens with the configuration application for the ImEx service. When this service is in use - all images in the active playlist originating from HTTP resources are automatically transferred to the Graphic Hub. The transfer status is shown on top of the images in the Media column, where the status starts on 0% and counting up. When the status disappears, the image is ready to be played out on the Viz Engine, where it appears instantly, without any delay.
-
Profiles Tab
Settings > Profiles
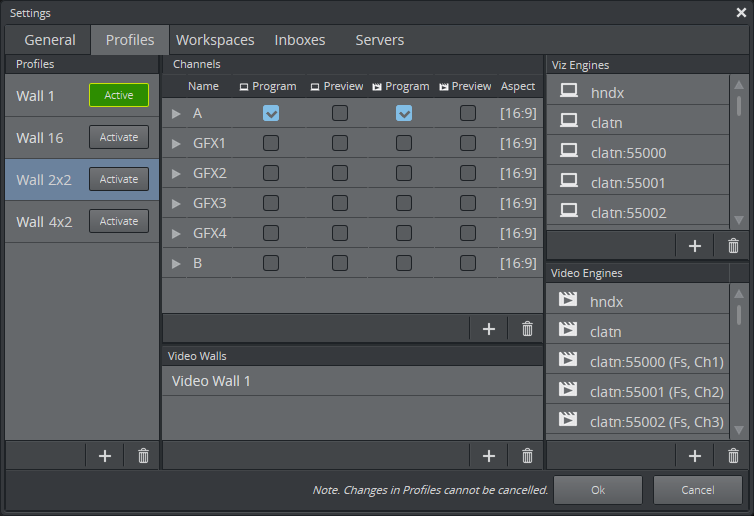
Use the Profiles tab to individually configure Profiles, Channels, Viz Engine handlers and Viz Video handlers, as well as easily configure video walls.
Profiles
The Profiles tab in Viz Multiplay works in much the same way as profile configuration in Viz Trio and Viz Pilot. It also uses the same data as Viz Trio, so changes made via either application are reflected in both.
Note:
Profile changes cannot be cancelled.
Activate/deactivate profiles using the buttons in the Profiles list.

Note:
Always set the Active Profile for a show in Viz Multiplay. If a show is activated by a Viz Trio client, then it will be deactivated if that Viz Trio client shuts down, and Viz Multiplay will lose its active profile.
Note:
Renaming an active profile (from Viz Trio or Viz Multiplay) automatically deactivates the profile. Go back to Settings >Profiles Tab and click the Activate button for the profile again.
For more information see the section Preparing Channels and Shows.
Channels
When elements are added to the channels in the Media Pane, the channel name is reflected in the Viz Trio page list.
However, in Viz Trio, you can also specifically assign elements to channels. If an element is assigned to a channel name that is not present in the active profile, then that element will not be visible in Viz Multiplay. The element can also be invisible if the element's channel is hidden in the active workspace.
Elements that are assigned to the [PROGRAM] channel will be displayed in the channel set to viz/video program in the active profile in Viz Multiplay, regardless of that channel’s name.
Note:
Terminology: “Main channel” in Viz Multiplay refers to the main channel of a video wall, while [PROGRAM] refers to the program channel of the profile.
For more information see the section Preparing Channels and Shows.
Video Wall Setup
In addition to manually creating profiles and channels, you can also setup a new video wall using the Video Wall Setup tool.
Open the Video Wall Setup Tool tool by clicking on the Add button at the bottom of the Video Walls pane.
Status
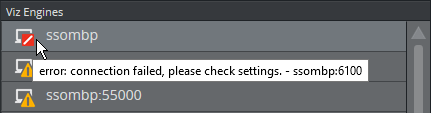
The status of the handlers is shown by their icons. The status is refreshed when either the Media Sequencer needs to refresh them, or the user opens a handler editor. Hover over a handler to see the error message.
Workspaces Tab
Settings > Workspaces
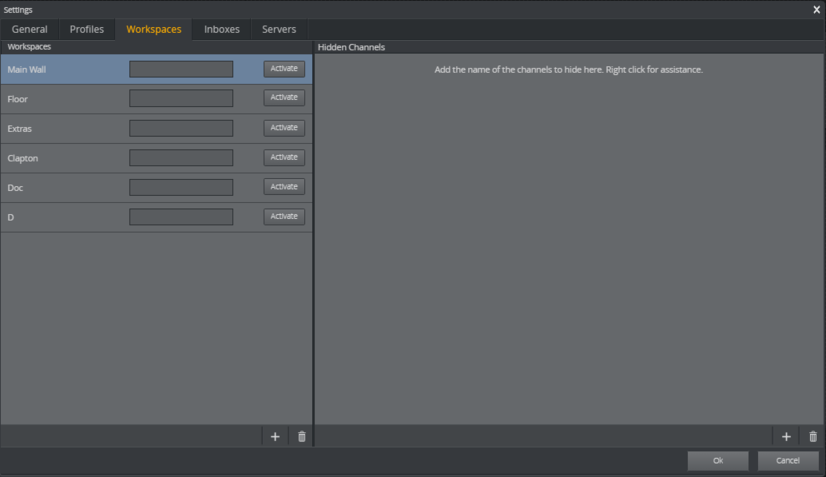
Use this tab to create Workspaces, which define the set of channels that are hidden from view for each type of user.
Defining several workspaces allows different users to have access to different channels. For example, an operator in the control room may have access to all channels, whereas a presenter in the studio can just see the channels that they want to control.
To Create a New Workspace
-
In the Workspaces pane on the left, click Add
 , and give your new workspace a name.
 -
In the Hidden Channels pane on the right, click Add
and type the name of the channel that you want to be hidden in this workspace. Tip:
Alternatively, hide multiple channels with a single click. See the Hide channel context menu section below.
-
Set the active workspace for this user by clicking the Activate button.
Sharing Armed and Program Status with Workspaces
The status of the Armed column is shared according to the workspace. So users with the same workspace will see the same armed content.
In contrast, the Program column is a global resource, which always shows what is currently on air in each channel. All Multiplay clients have a synchronized view of what is playing on air, independent of which user triggers it.
Hide channel context menu
The Hidden Channels panel has a context menu that allows you to hide multiple channels. Hide channels based on their type (GFX or Main channels) or on the video walls they are associated with.
Tip:
Right-click the Hidden Channels panel to open the hide channel context menu.
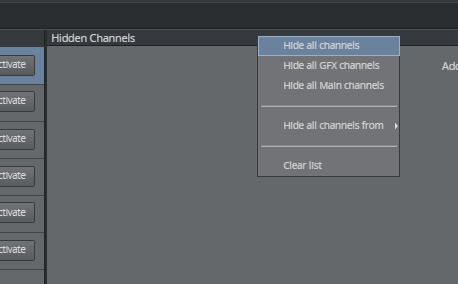
The context menu has the following options:
-
Hide all channels: Hides all channels in all profiles
-
Hide all GFX channels: Hides all GFX channels only
-
Hide all Main channels: Hides all Main channels only
-
Hide all channels from: Select a video wall to hide its associated channels
-
Clear list: Click to clear the list of hidden channels.
Set keyboard shortcut per workspace
Switch workspaces with a custom keyboard shortcut. This allows you to switch workspaces without opening the Settings panel.
First, assign a keyboard shortcut with the following procedure:
-
Open the Settings window.
-
Click the Workspaces tab.
-
Type a shortcut into the field between the workspace and the Active button.
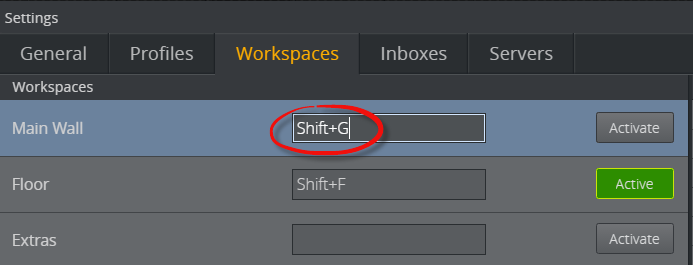
-
Click away from the field to confirm your choice.
Tip:
Do not press ENTER to confirm your shortcut choice. Pressing ENTER will assign ENTER as a shortcut.
-
Click OK.
To use the shortcut:
Type the keyboard shortcuts at any time while viewing the main interface to switch between workspaces.
Inboxes Tab
Settings > Inboxes
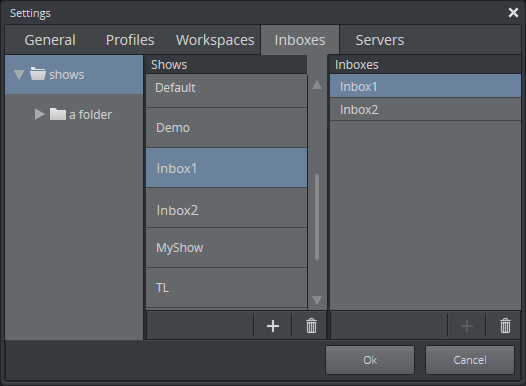
Inboxes are sources of content that are always available as an Inbox Tab in the Sources Pane. You can configure multiple inboxes.
Any show on the Media Sequencer can be used as an inbox. Note that the inboxes you configure are global, so will be available in all shows.
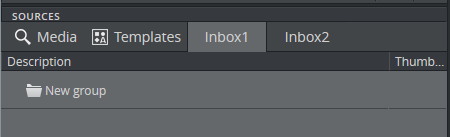
To configure a show as an inbox, drag the show from the Shows list to the Inboxes list, it will then appear as an Inbox Tab in the Sources Pane, as in the image below. Any content added to this show will be available as an Inbox tab, and can be dragged to a channel.
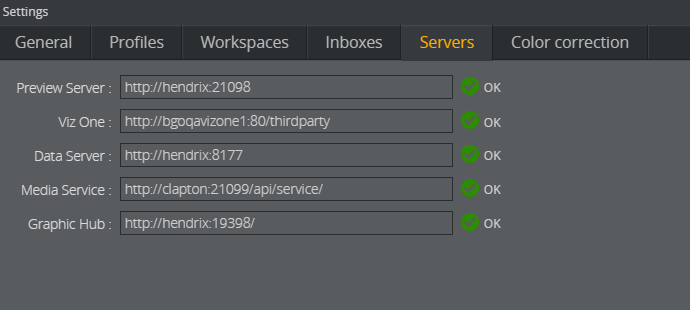
Servers Tab
Settings > Servers
Workflow
Enter the URLs for the search providers that you want to use to search and preview media. The Media Tab search will then search in all sources and aggregate the results.
The search providers that you configure will appear in the Media Search Filters in the Media Tab. You can search in a subset of these sources by deselecting some of them in the Media Search Filters.
Note:
Multiple search providers can be used. However, we do not recommend configuring a Viz One and a Media Service simultaneously.
Pilot Data Server
When a Pilot Data Server is configured, you get access to the Viz Pilot workflow. You can access Viz Pilot concepts and templates by dragging templates from the Templates Tab to your channels.
Server connection icons
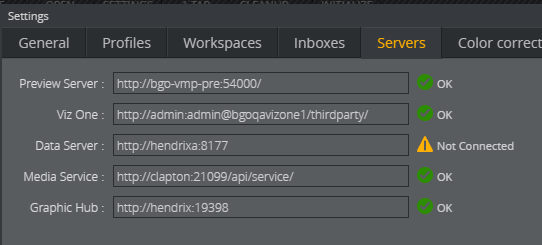
Icons next to the URL input boxes show the status of the connection to the server.
Color correction tab
Settings > Color correction
Correct colors for a particular monitor or group of monitors on a video wall.
Four steps to color correction:
-
Select profiles and walls
-
Map outputs to monitors
-
Create a preset
-
Adjust colors and other options
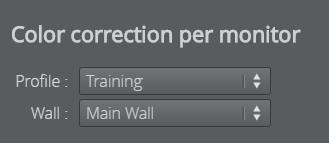
Select profiles and walls
Load the wall you want to edit by selecting the relevant profile and wall.
-
Select the profile and wall from the menus.
Map outputs to monitors
This step involves matching outputs (1) and with cubes (2). This is usually only done once.
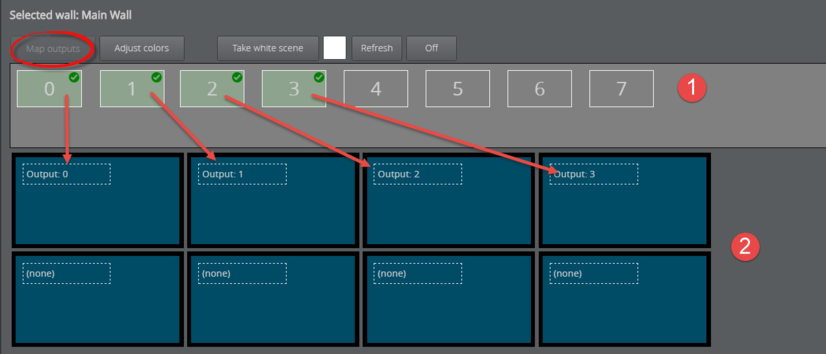
By cubes is meant the physical screens on your video wall. The task here is to drag outputs onto cubes to map them. Ideally, for the sake of organization, the cube layout should match the layout of the actual video wall.
Note:
The Map outputs view opens by default as long as outputs remain to be mapped. The Color correction tab always opens to the Adjust colors view after all outputs are mapped.
The easiest way to match outputs with screens is to load a white scene.
-
Click Adjust color -> Take white scene. All monitors on your video wall now display white.

-
Click an output.

-
The video wall screen matching that output turns red. Here the bottom left screen corresponds to output four.
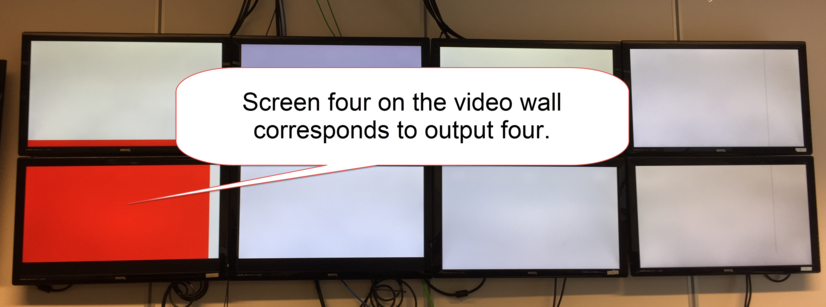
-
Then drag the output to the same position in the editor to map.

Note:
Remember that graphics channels feed content to the screens. Channels are mapped to screens in the output. So in the video wall above, output four is mapped to screen four, which could be receiving content from any GFX channel.
-
Map output 1.
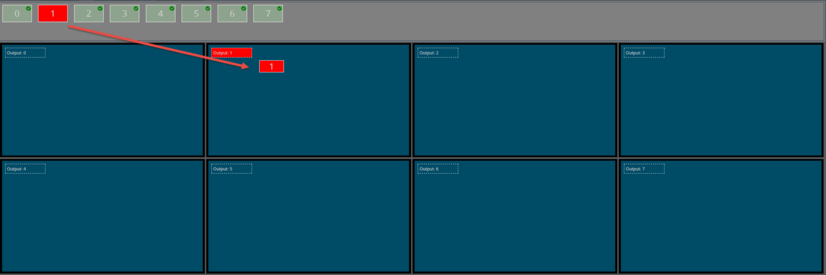
Note:
The output turns green and a check mark appears when it is successfully mapped to a monitor.
Tip:
Un-map an output by hovering the mouse over a mapped cube and clicking the red icon.

Create a preset
Create a color correction preset. This is useful in the case of multiple shows where each requires screens with different color intensity. A blue border appears around selected presets.
-
Click the Adjust colors button.
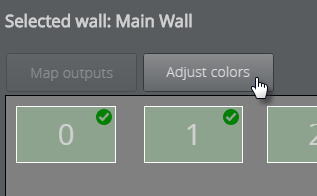
-
Click the Add new color preset button.
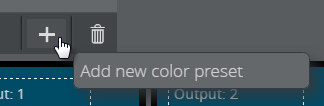
-
Give it a title and type Enter.
Adjust colors and other options
Adjust screen color on a monitor-by-monitor basis.
Note:
Color corrections are only visible on the physical screen; they are not shown in VizMulitiplay. Therefore, a physical video wall is recommended when adjusting color.
-
Click a cube or screen to adjust its color.
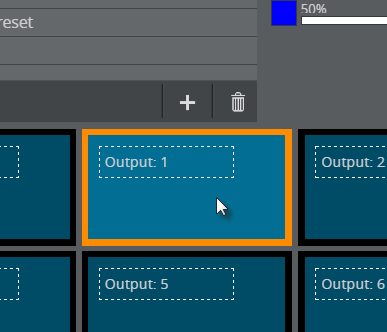
Adjust colors in the following five areas of the Adjust Colors view. Click Ok when finished to save the values for the selected preset.
Note:
Changes in color correction cannot be canceled.
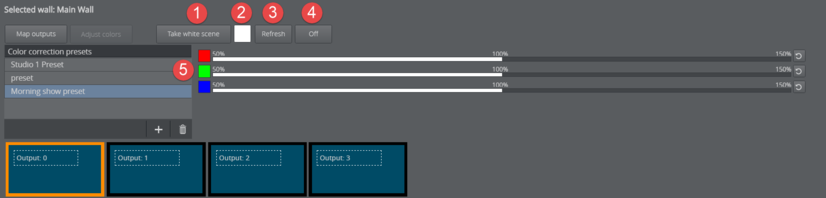
-
Take white scene: Take a completely white scene in the renderer.
-
Select a color: Alter the background color of the current screen.
Note:
The Take white scene button must be clicked to expose the color picker.
-
Refresh: Sent the configuration of entire preset (all monitors) to air.
Note:
It is also possible to send presets to air using commands in the media sequencer.
-
Off: Removes all currently-applied color corrections for the video wall.
-
RGB sliders: Click or drag along the slider to adjust the screen’s RGB intensity. Select a value between 50 and 150 %, where 100% is default. For example, a 50% setting for red will deprive media in that screen of red.
Note:
The luminosity in the color block next to the slider brightens or dims to reflect changes in luminosity. View the monitor on the physical video wall to see the changes in real time.
Group screens
Apply the same color correction edits to multiple screens.
-
In Adjust colors view, hold down CTRL and click the screens you want to group together.
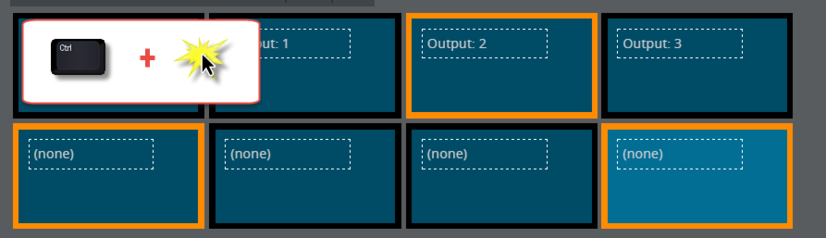
-
Right-click a screen and select Group.