
Viz Multiplay User Guide
Version 2.3 | Published August 10, 2018 ©
Video Wall Setup Tool
When setting up video walls with graphics channels, each graphics channel needs one Viz handler and one video handler. The Video Wall Setup tool allows you to add all the necessary handlers and channels in one step. You can also combine the video wall with manually created channels and handlers.
Open the New Video Wall Setup tool by going to Viz Multiplay Settings > Profiles Tab and clicking the Add ![]() button at the bottom of the Video Walls pane.
button at the bottom of the Video Walls pane.
This section contains the following topics:
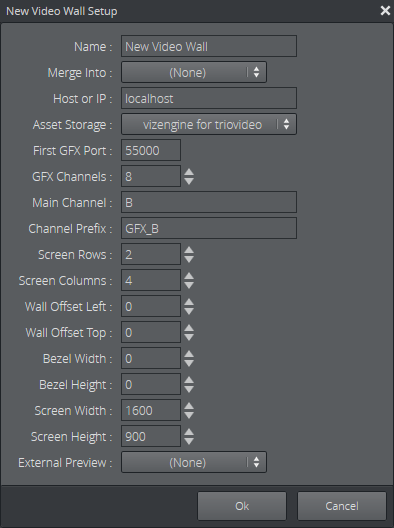
Video Wall Setup Fields
-
Name of the video wall
-
Merge Into: Merge this video wall with other video wall to setup a multi video wall control. (See Studio Editor)
-
Hostname or IP of the Viz Engine
-
Asset Storage: Select the Viz Engine storage point to which the Viz One can send assets
-
First GFX Port for the Viz Engine ports (eg. localhost:55000, localhost:55001, etc)
-
GFX Channels to be created (1-16)
Note:
The number of graphics channels is not necessarily linked to the number of screens you have. The graphics channels are virtual, whereas the screens are the physical outputs on the video wall.
-
Main Channel name
-
Channel Prefix for the sub-channels (eg. GFX1, GFX2, GFX3, etc)
-
Number of Screen Rows and Screen Columns in the video wall
-
Wall Offset Left and Wall Offset Top: Define the relative position of this video wall compared to the main wall if using several Viz Engines combined in a _multi video wall setup _(See Studio Editor). Use the same units as you use for Bezel width/height and Screen width/height.
-
Bezel Width and Bezel Height define the width/height of the bezel around a screen. That is, the distance between the edge of the video display area (screen) and the outer edge of the physical device.
-
Screen Width and Screen Height define the total width/height of a particular screen or a video wall screen.
-
External Preview: Armed elements are taken to air on the external preview video wall to check the appearance before sending it to the main wall. For more detail, see External Preview.
See Also
Clip Channels
Viz Multiplay supports up to 16 clip channels, and will start at clip channel 1.
This may cause a conflict if you have a graphics scene which uses clip channels (for example, a butterfly scene which plays video clips inside the graphics using clip channels 1 and 2). If these scenes are played out on a GFX channel on the video wall at the same time as the clip channels inside the scene are used to play out content on the corresponding GFX channels, it creates a conflict.
The solution is to redesign the scene to use clip channel numbers that are higher than the highest GFX channel. For example, if you have 8 GFX channels in the video wall, the clip channels used in the scene should start at 9.
Multi Video Wall Control
It is possible to control multiple Viz engine, video walls and screens with the Multi Video Wall Controller. It supports playing out content across the screen, controlled by multiple Viz engines.
External Preview
An External Preview for a video wall can be generated by a separate Viz Engine. When one video wall is configured as a preview for another, elements that are armed on the main video wall are played out on the preview video wall. In this way, it is possible to see what the program channel looks like on a physical screen, before elements are taken to air on the main screens.
After you have created your main video wall and your preview video wall, you can set up the external preview as follows:
-
In the Profiles Tab, double click your main video wall. The Video Wall Setup Tool will open.
-
In the External Preview field, select the name of your preview video wall.
-
Click OK.