
Viz Multiplay User Guide
Version 2.3 | Published August 10, 2018 ©
Arming and Taking Elements
This section explains the functionality in the Media pane, including:
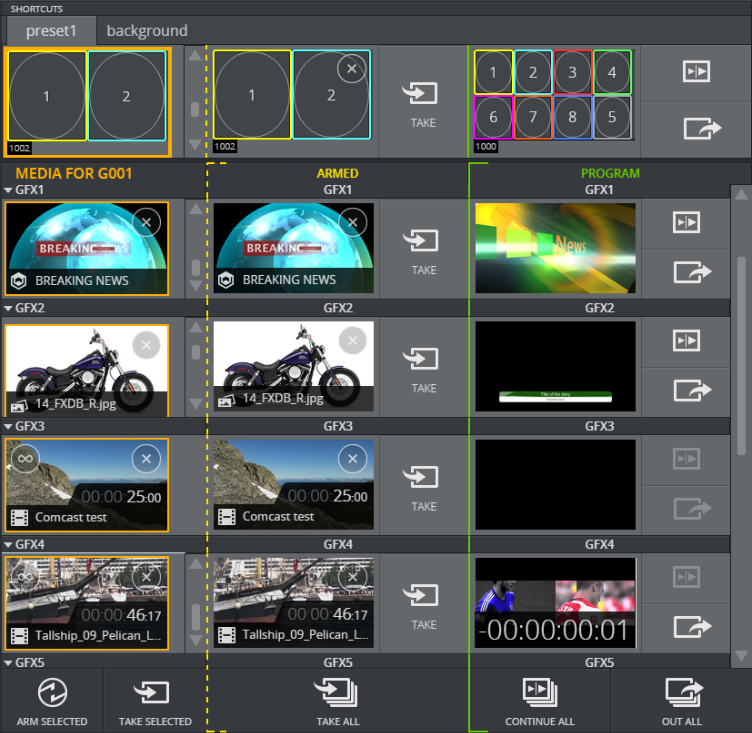
Media Pane
The Media pane is used to manage elements that have been prepared for the story.
Each channel is displayed on a separate row and can be managed individually or together with other channels.
Elements that are ready for use listed in the Media Column, while the Armed and Program columns display the elements that are currently armed or on air.
To manage multiple channels simultaneously, you can Arm and Take Multiple Elements.
The Shortcuts Bar is used to arm and take presets and other shortcuts.
Note:
Adding videos to a graphics-only channel or graphics to a video-onlychannel,will result in the element not being played out correctly. Composite elements will only work on channels that support both graphics and video.
Media Column
The elements listed here have been sourced from Viz Trio or the Newsroom Control System playlists.
Note:
All changes made to elements in this column will be reflected in Viz Trio.
This section covers the following topics:
-
Options in On Air mode.
-
Shortcut menu for videos and images in the Media Column.
Options in On Air mode
With On Air Mode enabled it is possible to:
-
Right click on an element to open context menu that contains supported actions for that element.
-
Click an element to move it to Armed.
-
Drag an element to Armed or Program in another channel to make a copy there (original remains in source channel).
-
Drag an element to the Media Column in another channel (removes it from source channel).
-
Turn Looping of the video ON
 or OFF
  .
. Note:
You cannot change the looping setting once the clip is playing. To stop the looping you need to take out the clip.
-
Delete an element (X Button) or Remove from the context menu.
Note:
To show or hide the X button can be set in the General tab in Settings.
-
The thumbnail indicates when the element is still loading, as shown below.
In 1-Tap Mode, you can:
-
Click an element to move it directly to Program.
When elements have been selected in several channels (1 element per channel):
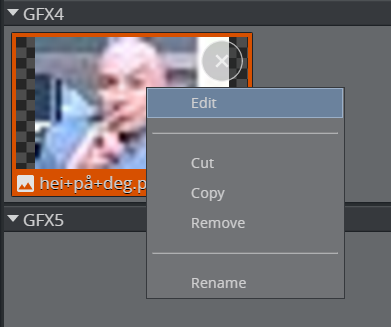
Shortcut menu for videos and images in the Media Column
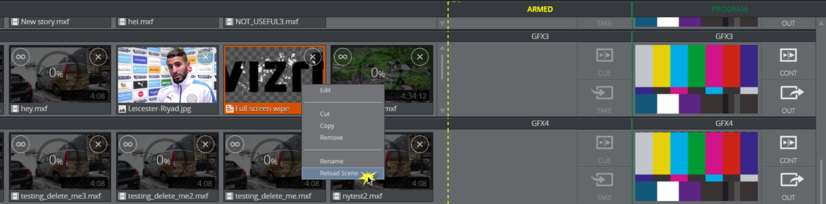
Right-click elements (videos, images and graphics) in channels in the Media Column to expose a context menu.
-
Edit: Opens the Image Effect Editor.
-
Cut: Cut an element.
-
Copy: Copy an element.
-
Remove: Remove element from the channel.
-
Rename: Rename an element.
-
Reload scene: Reload the scene from the Graphic Hub.
Note:
This option is only visible when right-clicking graphics in the media, armed and program columns. See Reload Scene for more information about this feature.
Armed
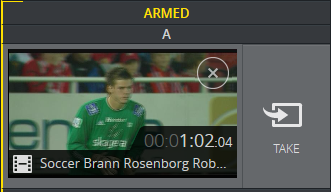
When clips are moved to Armed, they are cued on the Viz Engine.
Clips that are Armed will be cued on the Viz Engine clip players so they are ready to be taken with less latency than if they were not armed. The cueing is done in the background, without disturbing the running clips.
Users which have the same active workspace, share the armed column. For more information see Sharing Armed and Program Status with Workspaces.
It is possible to:
-
Click an element to take it to Program.
-
Click the Take button to take the element to Program.
-
Click the CUE button to send the element to Program in the first frame in the renderer ready to be played out.
-
Drag an element to Armed or Program in another channel to make a copy there (this does not affect or take the original armed element).
-
Take All: Send all armed elements, for all channels, to Program.
-
Cue All: Send all armed elements, for all channels, to Program in the first frame in the renderer ready to be played out.
-
See the Looping status of the video.
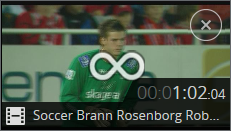
Note:
It is not possible to change the looping setting in the Armed column. Use the looping button in the Media column.
-
Remove an element from the Armed column by clicking X.
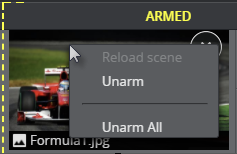
Armed Shortcut Menu
-
Reload scene: See Reload Scene.
-
Unarm: Unarm the selected element.
-
Unarm All: Unarm all armed elements.
Program
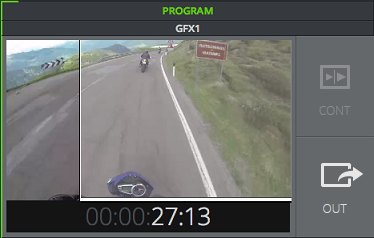
The elements in the Program column are playing on air in the given channel.
Note:
Using a Media Sequencer version 5.0 or higher, the Program column will not only show the last taken element, but snapshots of all the layers that are in the renderer at a given moment. This means that when a Transition Logic layer is taken in (for instance a banner), and another layer is taken in (for instance a clock or a side panel) - the Program column will actually show both of these layers, and not only the last taken element.
User can:
-
Click the Continue button to continue a graphic element or cued elements.
-
Click the Out button to take out the element.
Note:
Using a Media Sequencer version 5.0 or higher, the Out button takes out content on all layers in the renderer, also Transition Logic layers - and not only the last taken element.
IMPORTANT!
OUT will not be enabled for a main- or shortcut channel having a video wall preset on air. When operating a video wall, a preset should always be on air - even if the channels are empty. The preset will ensure that content always can be played out directly in the GFX channels on the wall.
-
Drag an element to Armed or Program in another channel to make a copy there (this does not affect the original program element).
-
Continue All: Continue all program elements-including cued elements-in all channels.
IMPORTANT!
You must click Continue All in order to play out cued content.
-
Out All: Take Out all program elements, in all channels.
Note:
Out All has a fail-safe that provides an extra confirmation step when clicked. See General Tab for more information.
-
See the Looping status of the video.
Note:
It is not possible to change the looping setting once the clip is playing. To stop the looping, take out the clip and toggle the looping OFF in the Media column.
-
Preview the clip/graphic (if Enable Program Video is ON in Settings).
Note:
The preview shown in the Program column may not be precisely in sync with the actual output.
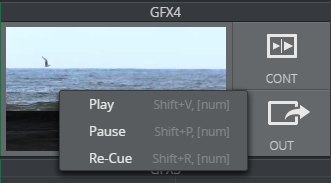
Program Shortcut Menu
-
Play: Play the video from the current frame, if the video is paused or cued (the same as clicking Continue).
-
Pause: Pause the playing video.
-
Re-Cue: Rewind the video to the first frame and freeze it (the same as Cue).
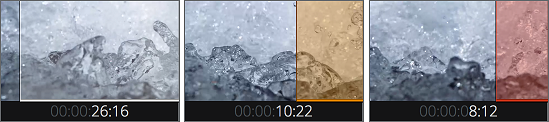
Time Remaining
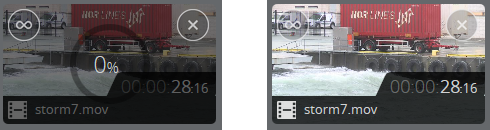
The time code is displayed for all videos and graphics. The time remaining for a clip is indicated with a gray progress bar. Orange shading indicates <20 seconds remaining, and red indicates <10 seconds remaining. Only the gray progress bar is shown on looping clips.
Arm and Take Multiple Elements
Action Bar
Note:
The Action Bar hides from the interface when in Off Air Mode, see //onairmode

-
Arm Selected: Send all selected elements in the Media Column to Armed.
Note:
Arming clips cues them on the Viz Engine clip players, so that they are ready to be taken with less latency than if they are not armed first.
-
Take Selected: Send all selected elements in the Media Column to Program.
-
Take All: Send all Armed elements, for all channels and shortcuts, to Program.
-
Continue All: Continue all Program elements, in all channels.
-
Out All: Take Out all Program elements, in all channels.
Note:
The Shortcuts Bar is unaffected by the Continue All and Out All buttons.
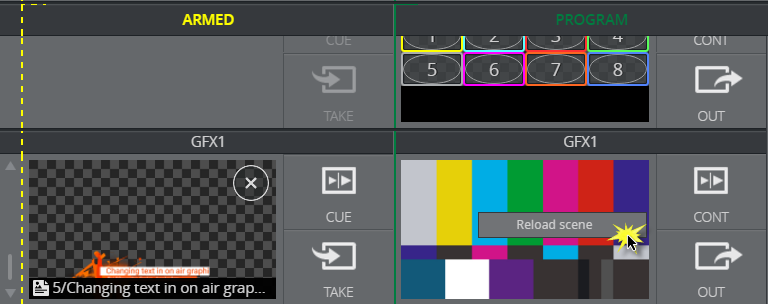
Reload Scene
Update on-air graphics with the reload scene option. This feature is useful when changing scenes on the fly in Viz Artist and quickly taking them to air.
To activate Reload Scene:
-
Right-click a graphic in the media pane (shown below) or in the armed or program columns.
Workflow
A graphic is showing live on a video wall. As the graphic is in use, a scene designer changes it in Viz Artist. Bring those changes to air by following these steps:
-
Send a graphic to air in the program column.
-
The scene, which is now in use on a video wall, is opened in Viz Artist and changed by a scene designer. The new scene with changes is the saved in the Graphic Hub.
-
You now want to update the on-air graphic to reflect the changes.
-
Right-click the graphic in the program column of the channel where the graphic is playing out and click Reload Scene.
Tips for using Reload Scene
|
Consideration |
Solution |
|
Reloading scenes is only possible on a channel-by-channel basis. |
Reload the scene in all GFX channels it plays out in. Imagine a scenario where the same scene plays out in two different channels. You reload the scene in one channel but not the other. The channel that was not reloaded will show the old version of the scene until Reload Scene is selected. |
|
Default data is inserted into an on-air graphic’s editable field after clicking Reload Scene. This only applies for graphics with a payload editor, not for, for example, graphics such as a bug. |
Once a graphic is ready to be reloaded, take it out from the program column. Locate it again in the relevant channel in the media pane and click Reload Scene. You can now send it to air with the new changes. |