Viz Multiplay User Guide
Version 2.3 | Published August 10, 2018 ©
Video Wall Designer
Use the Video Wall Designer to create and modify video wall presets. Each channel in the designer represents a graphics channel. Create desire layout by moving, layering and resizing the channels.
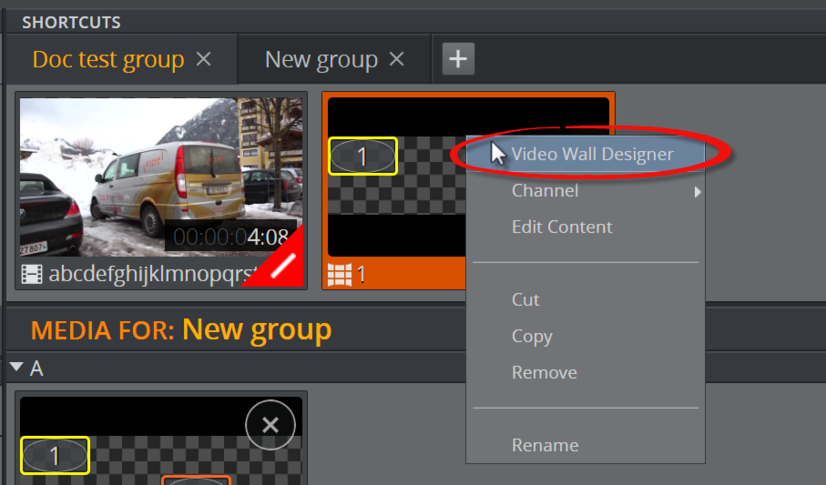
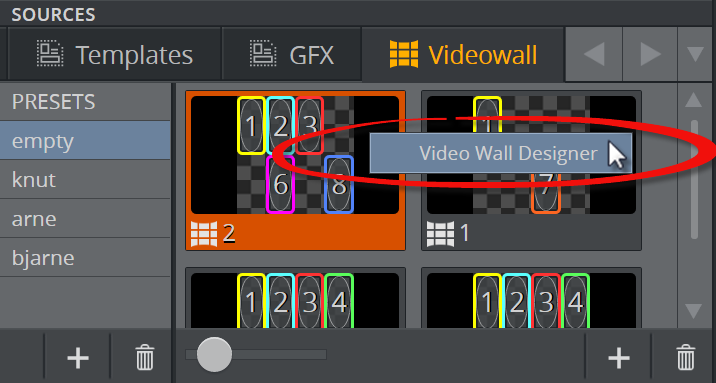
There are two ways to open the Video Wall Designer:
-
Right-click a preset in the Shortcuts Bar.
-
Right-click a preset in the Videowall Tab.
Areas of the Video Wall Designer
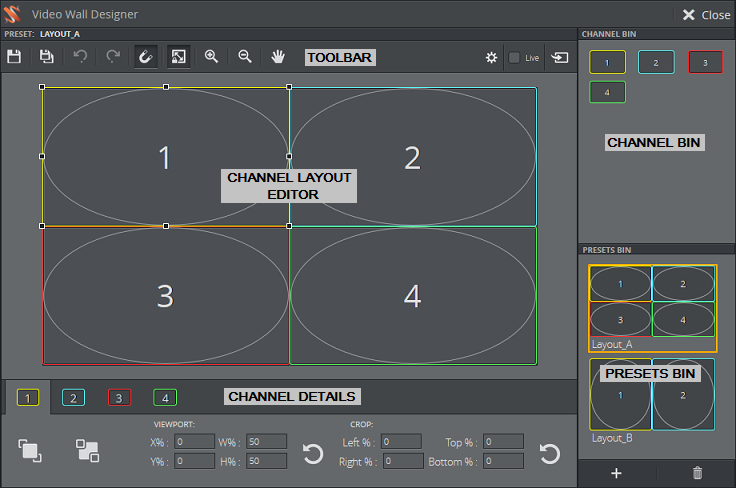
The Video Wall Designer is organized into the following areas:
Toolbar

-
Save: Save changes to the current preset.
-
Save As: Save the layout as a new preset.
-
Undo/Redo: Undo/redo last move.
-
Toggle snapping: snap to grid.
-
Keep aspect ratio: Maintains aspect ratio of the channel when the frame is cropped or resized.
-
Zoom in/out: Click to zoom in or out.
-
Pan mode: When Pan mode is on, pan by dragging the background or a channel. When Pan mode is off, you can still drag the background to pan, but dragging a channel moves the channel. Dragging a handle always moves the handle.
-
Studio Editor: Open Studio Editor.
-
Live Presets: When Live is checked, all changes done to the preset are taken on air immediately. This is useful while adjusting and testing video wall configurations. Note that although the changes have been taken on air, they have not been saved - this must be done manually. The live presets check box is disabled in Off Air mode.
-
Take Presets: When the Take button is clicked, the current state of the preset, including any unsaved changes, is taken on air. This is useful while adjusting and testing video wall configurations.
Channel Bin
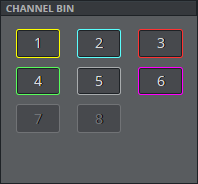
Click an item in the Channel Bin to turn it on or off in the Channel Layout Editor. You can also drag channels from the Channel Bin to the video wall.
Presets Bin
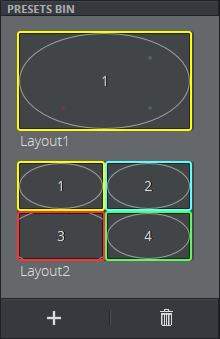
The Presets Bin lists the presets which are available. These presets are available in the shortcuts bar with their saved names.
-
Add or delete presets
-
Double click on the preset to open it in the editor
-
Double-click the name to rename it
Note:
If the preset or element is shown in a playlist in Viz Trio, the name given in Viz Multiplay will be shown in the Description column in Viz Trio.
Note:
Presets can also be deleted from within Viz Trio.
Channel Details
For each channel, you can modify the Layer Order, Viewport and Crop.
Layer Order
-
Bring to front / Send to back: Move the selected channel to the front or back. This changes the order in which items are layered, from front to back. Each channel is drawn on its own layer, which means all channels are independent and can be moved on top of, or behind, other channels.
A dashed line indicates that a part of the channel is behind another channel.
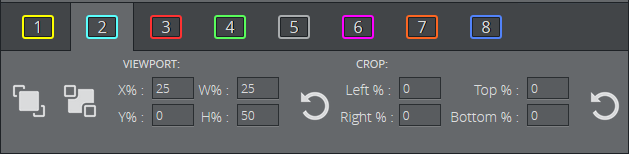
Viewport
Position of the channel frame relative to the video wall. Either type inside the text boxes, or drag your mouse to change the values.
-
X%/Y%: position of channel’s top-left corner, relative to the width and height of the video wall.
-
W%/H%: Width/height of the channel’s frame, relative to the width/height of the video wall.
-
Reset: Resets the Viewport values to (0, 0, 50, 50) which relocates the channel to the upper left corner of the video wall.
Tip:
Adjust the Snapping and Keep aspect ration settings in order to achieve the precise viewport you require.
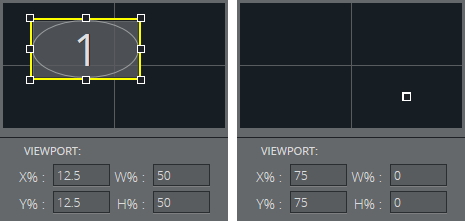
Example:
In the example on the left, the Viewport has been dragged from the top left corner, into a new position. On the right, the width and height have been set to 0 to make the channel shrink to nothing.
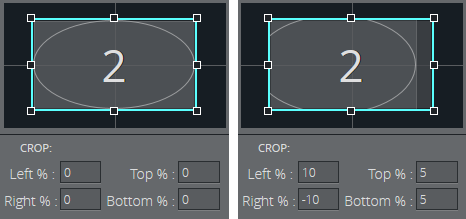
Crop
Position of the content of the channel relative to the content size. With this control you can perform cropping, shifting and zooming. Any part of the frame which is not filled with content will be transparent. Alternatively, use the Crop Editor to make these changes.
The Crop values in the channel tabs control the cropping. Either type inside the text boxes, or drag your mouse to change the values.
-
Left %/Right %: Position of channel content’s left/right border, relative to the channel frame (positive values push content outside the frame, negative values bring the content inside the frame)
-
Top %/Bottom %: Position of channel content’s top/bottom border, relative to the channel frame
-
Reset: Resets the Crop values to (0,0,0,0), so that the content fills the frame.
Tip:
Adjust the Snapping and Keep aspect ration settings in order to achieve the precise crop you require.
Example: In this case, the user has set the crop values in order to shift the entire content to the left by 10%, and zoom in by 5%.
Channel Layout Editor
Use the Channel Layout Editor to arrange and resize the channels on your video wall.
Each channel is “drawn” on its own layer, which means all channels are independent and can be moved on top of other channels.
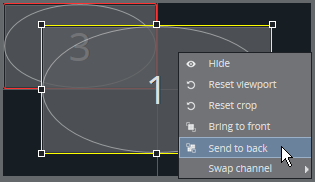
Context Menu
Right-click a channel to access the context menu:
-
Hide: Hide this channel from the video wall. To show it again, choose it in the Channel Bin.
-
Reset viewport: reset Viewport to (0, 0, 50, 50).
-
Reset crop: reset Crop to (0, 0, 0, 0).
-
Bring to front: Put this channel in front of the other channels. See Layer Order.
-
Send to back: Send this channel behind the other channels. See Layer Order.
-
Swap channel: select another channel with which to swap all Viewport and Crop values.
-
Set Mask: Create a Video Wall Layout Mask.
-
Clear Mask: Clear a Video Wall Layout Mask.
-
Hide All Channels: Hide all GFX channels.
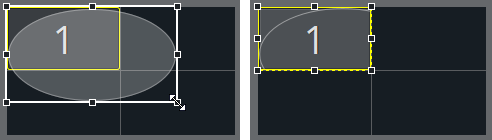
Crop Editor
Double-click a channel frame to allow dragging and resizing the channel content, relative to the frame. In this mode, aspect ratio is forced on. Press <Esc>, or double-click the channel, to exit this mode. Any part of the frame which is not filled with content will be transparent. Alternatively, use the Crop values in the channel tabs to make these changes.
Example:
In the image below, the user has double-clicked Channel 1 to enter edit mode. They have dragged the handle (left-hand image) and then pressed Esc to see the final result (right-hand image).
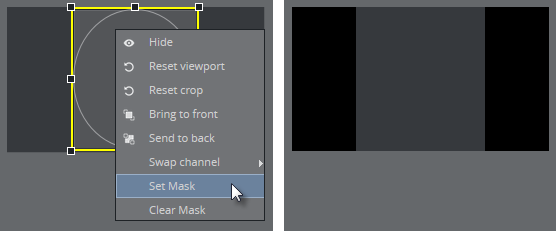
Video Wall Layout Mask
It is possible to set a mask for each screen in the video wall, meaning that an inner rectangle specifies the active area in that screen.
Due to the way video walls are implemented in Viz Multiplay, all of the screens in a video wall are depicted as having the same rectangular resolution. However, it is possible that the physical screens in the video wall have different dimensions. Masking gives a visual indicator of the active area, but it does not effect the actual output.
To add a mask, drag a channel to the area you want to mask, right-click and select Set Mask. The masked area is shaded black, as in the image below. When channels are dragged to that area in future, they will snap to the masked area. To remove the mask, drag a channel to the area, then right-click and select Clear Mask.
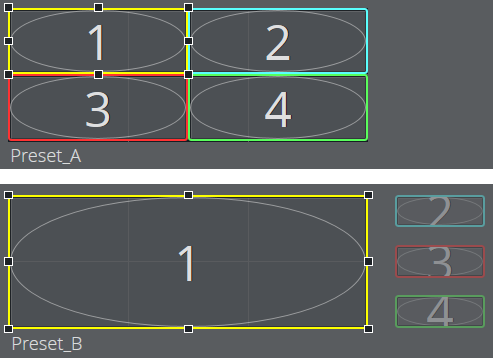
Animation between Presets
You can move channels outside the visible area of the video wall area, by dragging them or setting the Viewport values. This allows interesting in/out animations to be made when switching between presets.
Example 1
When switching from Preset_A to Preset_B (see diagrams below), channels 2, 3 and 4 will become smaller and sweep to the right, off screen, and channel 1 will stretch to fill the whole video wall.
Example 2
Animate a channel so that it shrinks into nothing by using the Viewport settings to set the channel frame width and height to (0, 0).

Example 3
Control the order of the items using the layering of the channels relative to one another. Either right-click a channel frame and select Send to back/Bring to front, or select a channel frame and use the Layer Order buttons.