
Viz World Classic User Guide
Version 23.0 | Published December 12, 2023 ©
Setting Map Features
The style sheet selected for a map layer specifies a number of general settings. You can override these using the Map Features dialog box.
This section contains information on the following procedure and topics:
To Display the Map Features Dialog Box
Click the Map Features button in the top right corner of the map layer Contents panel. This provides the following sections:
Global Map Data
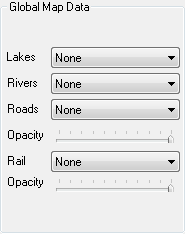
Allows you to specify the following settings for the selected map layer:
|
Parameter |
Description |
|
Lakes, Rivers |
Allows you to specify which lakes and rivers are visible. |
|
Roads |
Allows you to specify which roads are visible. |
|
Rail |
Allows you to specify which railways are visible. |
Local Street Data
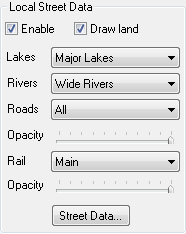
Allows you to specify which lakes, rivers, roads, and railways are visible in street data, and the opacity of roads and railways. The options are the same as for Global Map Data opposite.
Enable allows you to choose whether or not street data is displayed in the map layer.
The Street Data... button displays the Street Data Directory dialog box and is equivalent to the Street Data... command on the Import menu.
For more information see Working with Street Maps.
Scale Roads/Rail with Map and Rivers Master Scale
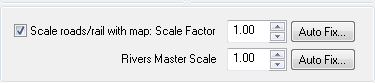
Determines how roads, railways, and rivers are scaled as the map is scaled.
The Scale Factor setting is used to scale all line features, such as road, rail, and rivers. You can adjust the value to achieve particular effects; for example, reduce it below 1.00 to make all line features thinner.
For line features, such as roads and rivers, a minimum and maximum line width is specified in the Styles Editor dialog box Styles Color panel to ensure that the features have an appropriate appearance at extreme zoom settings. However, it can look unnatural if a line feature reaches its maximum width before you get to the closest zoom point as you zoom in to a map.
To solve this problem, choose the closest zoom setting in your animation and click the appropriate Auto Fix… button. This automatically sets the corresponding scale value to scale the maximum line width so it only reaches its maximum width at the closest zoom point.
Physical Feature Animation
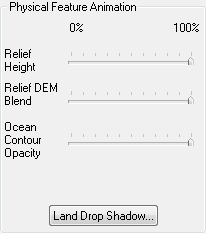
Allows you to animate the relief height, relief DEM blend, ocean contour opacity, and land drop shadow.
-
Relief Height: Typically used to reduce the amount of relief at close zoom settings, when full scale relief can appear distracting.
-
Relief DEM Blend: Imported DEM (Digital Elevation Model) relief data does not always match up exactly with the built-in relief. As a result, seams may be visible where they meet. This control allows you to hide imported relief data until you are zoomed in far enough for the seams to fall outside the display window. For more information about importing relief data see how To import relief data.
-
Ocean Contour Opacity: Allows you to animate the intensity of ocean contours.
-
Land Drop Shadow: Allows you to animate the land drop shadow over time.