
Viz World Classic User Guide
Version 23.0 | Published December 12, 2023 ©
Animating Shapes
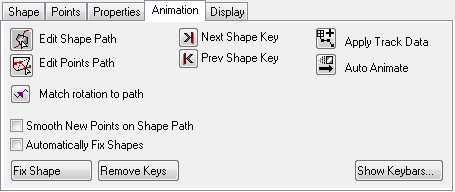
The options on the Animation panel allow you to animate individual shapes on a shape layer. This panel is not available for shape overlays.
-
Edit Shape Path: Enables you to edit the shape’s path by adjusting the points on the path (for example, the start and end points).
-
Edit Points Path: Enables you to edit the shape’s points (for example, giving the shape another shape during the animation).
-
Next Shape Key: Jumps to the shape’s next keyframe.
-
Prev Shape Key: Jumps to the shape’s previous keyframe.
-
Apply Track Data: Applies a tracking path to a layer in your project.
-
Auto Animate: Enables you to set animation properties like slide in/out and fade on/off.
-
Match rotation to path: Enables the object’s rotation to follow the direction of the path.
-
Smooth New Points on Shape Path: Converts an angle point to a smooth curve point on a shape path.
-
Automatically Fix Shapes: Automatically makes the current frame a key frame for every point on the shape.
-
Fix Shape: Adds a keyframe (for example, to an animated path).
-
Remove Keys: Removes a keyframe. Use Next and Prev Shape Key to jump between the keyframes.
-
Show Keybars: Opens the Shape Keybars editor. This allows you to edit the shape’s animation properties (for example, transformation) on its timeline.
This section contains information on the following procedures:
To Fix a Shape
-
Select a shape from the Layers list.
-
Select the Contents tab and then the Animation tab.
-
Click the Fix Shape button. This makes the current frame a key frame for every point on the shape.
To Remove the Keys
-
Select a shape from the Layers list.
-
Select the Contents tab and then the Animation tab.
-
Click the Remove Keys button. This removes all keys for the current frame.
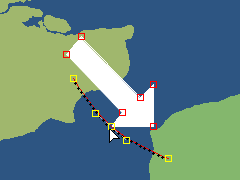
To Animate an Individual Shape

-
Select a shape from the Layers list.
-
Select the Contents tab and then the Animation tab.
-
Select the shape in the Shapes list.
-
Select the Edit Shape Path tool.
-
Open the Animation Controls and set the marker where the animation should end (for example, 50 fps).
-
Drag the center of the shape to define its path throughout the animation.
-
Hold down CTRL and drag from a point on the animation path to extend tangent handles from that point and create a curved animation path.
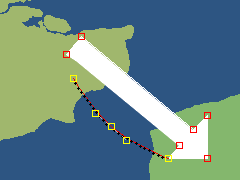
To Animate Individual Points on a Shape

-
Select a shape from the Layers list.
-
Select the Contents tab and then the Animation tab.
-
Select a shape in the Shapes list.
-
Select the Edit Points Path tool.
-
Drag the points to the positions you want them to have at each frame of the animation.

-
Hold down CTRL and drag from a point on the animation path to extend tangent handles from that point and create a curved animation path. The keys for individual points are not displayed in the Keybars panel.
To Show the Keybars for a Shape
-
Select the shape in the Shapes list.
-
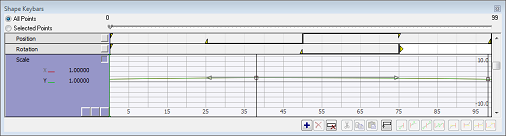
Click the Show Keybars... button on the Animation panel. The Shape Keybars window shows a keybar for each shape in the Shapes list. You can click the arrow to the right of each shape to show a Transform bar showing the transformations applied to the entire shape, followed by a keybar for each point on the shape:
-
Select All Points to include a keybar for every point in the Shapes list, or Selected Points to show only selected points on those shapes. The Shape Keybars window works in the same way as the Keybars panel; for more information see the Using the Keybars Panel section.