
Viz Trio User Guide
Version 4.1 | Published September 25, 2023 ©
Datacenter
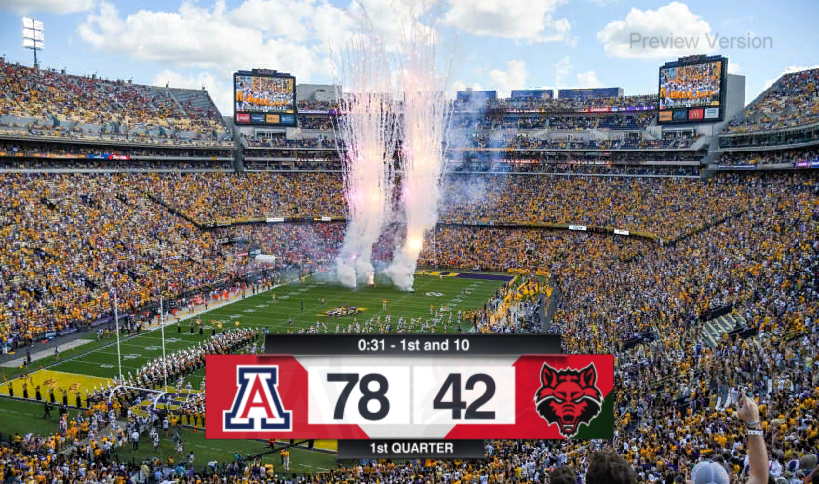
The Viz Trio Datacenter allows you to connect data live sources to fields in the graphics without any scripting or special knowledge, and connect incoming live data fields in scenes. It is ideal to connect to, for instance a scoreboard on a venue to clock-and-score graphics.
This section covers the following topics:
Overview
The Datacenter runs automatically as a service on the Viz Trio machine. The user interface can be opened in a web browser in Viz Trio by going to Tools > Datacenter. The user interface can also be opened explicitly in a web browser by entering http://localhost:5700/. The user interface can also be reached from other machines on the network.
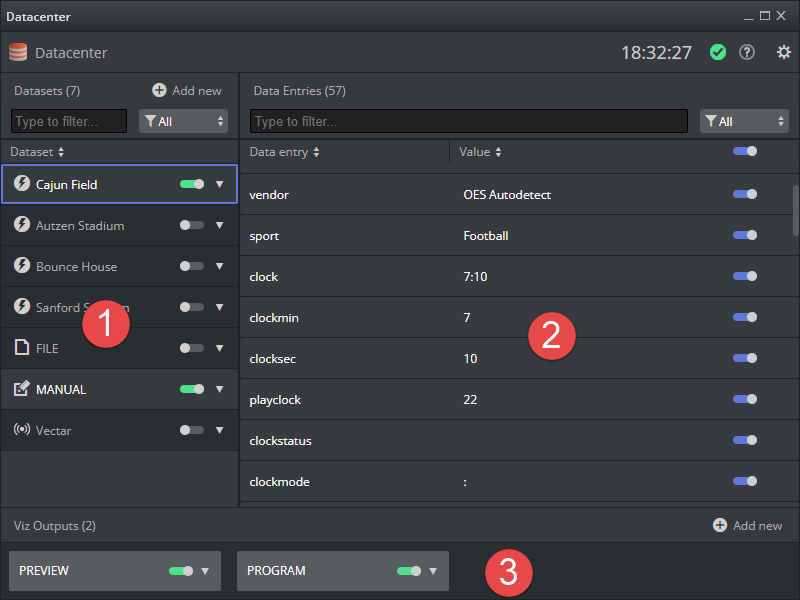
The user interface consist of these main parts:
-
The data sets. Each data set is coming from a specific data source, with key/value pairs.
-
The key/value pairs in the selected data set. The values can be used in Viz Artist Control plugins by using the notation ${key|default value} as field input value. The default value is optional and only displayed in the graphics if the key is not available.
-
The Viz Engines receiving the key value pairs as Shared Memory data over UDP.
Requirements
Datacenter live input requires Viz Engine 4.4.1 or newer.
Control Plugins supported (these plugins can be fed with live data from the Datacenter):
-
ControlText
-
ControlParameter
-
ControlImage
Getting Started
Getting started with live updated graphics in 9 easy steps:
-
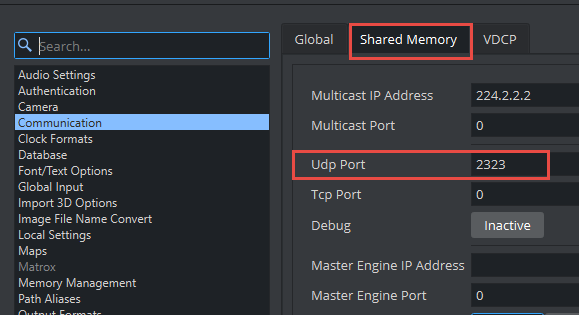
In order for Viz Engine to receive live data, open configuration and enter a port for incoming UDP Shared Memory input under Communication > Shared Memory > Udp port.
-
In Viz Artist, open the scenes that contains one or mode fields that should be controlled with live data from the Datacenter.
-
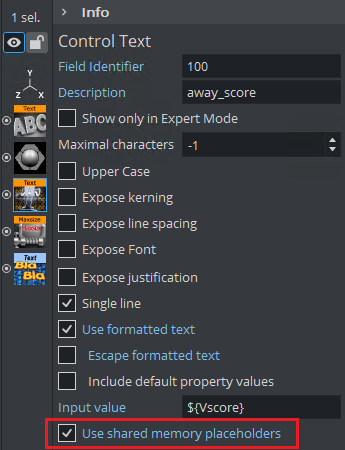
For each field, locate the Control plugin and check Use shared memory placeholders.
-
Save the scene.
-
In Viz Trio, import the scenes as templates into a show.
-
Go to Tools > Datacenter.
-
In Datacenter, configure one or more Viz Engines as receivers of the live data.
-
Configure one or more data sets as input.
-
Each data set contains a list of key/value-pairs. In Viz Trio, in the Field Value for the fields being fed with live data, use the notation ${key|default value}. Now the "key" will be replaced automatically by the value of the key in the Datacenter.
Configuring Viz Engine
Each Viz Engine receives live data from Datacenter, and it must be configured to listen to Shared Memory input over UDP. This should also be done for the local preview Viz Engine on the Viz Trio machine.
-
Open The Viz Engine configuration.
-
Go to Communication > Shared Memory > Udp Port.
-
Enter any port number that is available on your network.
-
Save the configuration and quit. Your Viz Engine is now ready for Datacenter live input.
Prepare Scenes for Data Input in Viz Artist
The scenes that should receive live data from Datacenter, must enable Use shared memory placeholders for the control plugins that should be updated with data. The following control plugins are supported:
-
ControlText
-
ControlParameter
-
ControlImage
To enable live data input from Datacenter:
-
Open the scene in Viz Artist.
-
Locate the control plugin for the field that should receive live input.
-
Check Use shared memory placeholders. Note that this will enable listening for shared memory in the System (Global) memory map.
-
Save the scene.
Note: If you already have a Datacenter running and have opened the SHM UDP listener port to the local preview engine, you may test the input value from Datacenter by entering the shared memory placeholder syntax in the Input value field, for instance ${Vscore}. This requires a key called Vscore in a Datacenter dataset.

Configuring Datacenter (Admin Page)
The Datacenter runs as a service. When going to Tools > Datacenter in Viz Trio, the user interface for the service is opened in a web browser window.
If you are on localhost (the same host as running the Datacenter service), the Admin page is available. Click the cogwheel symbol in the GUI, or go to http://localhost:5700/admin.html.
License
The Datacenter requires a WIBU based software license. The CodeMeter license service will check for available licenses and present the relevant license containers in the dropdown in the bottom of the Admin page:

Select an available license container. If successfully licensed, the status bar should look like this:

The CodeMeter Control Center for license configuration is normally running on http://localhost:22352/dashboard.html.
File Paths
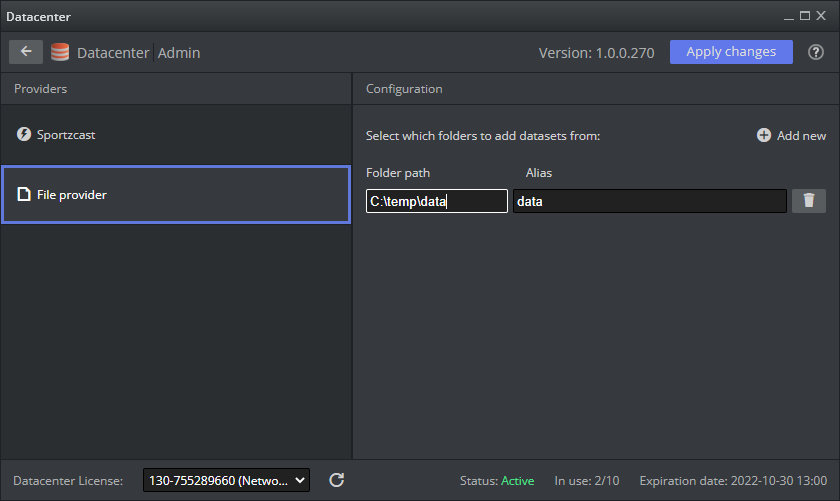
Datacenter can be configured to look for files in specific input folders. For the Datacenter to be able to open and monitor files on these locations, they need to be added to the File provider configuration.
-
Type the path in the folder path box, for example C:\temp\data.
-
Enter an alias for this path to have auto suggestion for files on this location when selecting the file later, for example data.
-
Click the Apply changes button.
Sportzcast
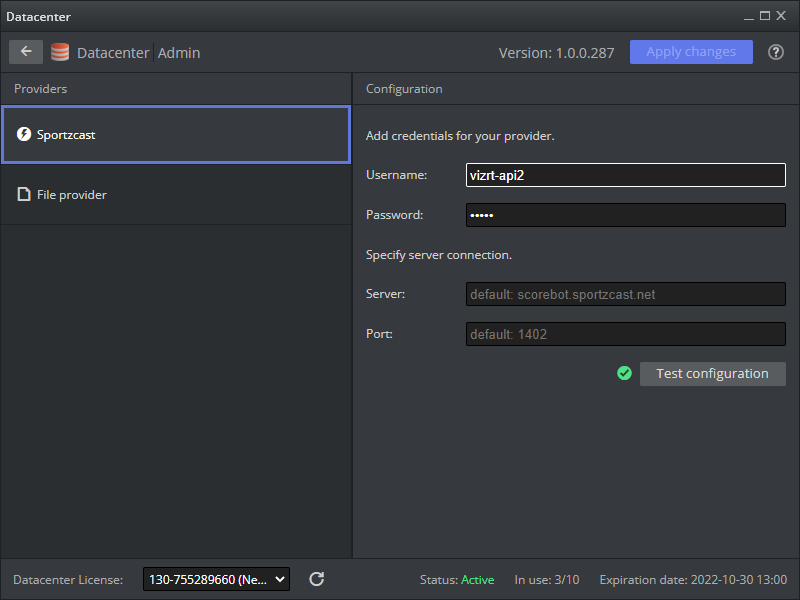
The cloud service from Sportzcast by Genius Sports requires a username and password obtained from Sportzcast. Enter the username and password and in most cases, use the default server and port. Click Test configuration to check whether the connection to the Sportzcast server is valid. When successfully configured, you will get access to a range of scoreboard bots from the Sportzcast cloud service. Each of these bots are connected to an electronic scoreboard, feeding data center with live data.
Setting Up Data Flow for Datacenter
Adding Data Sources
There are five types of data sources that you can choose from:
-
Manual: Enter data manually.
-
File: Data from a specific file.
-
Sportzcast: Provides live data from electronic scoreboards in stadiums.
-
Replicator: Collects data from a different datacenter.
-
Vectar: Any data source configured in Viz Vectar can be used in Viz Trio Datacenter.
Common for all data sets is that there is an optional field Prefix. This can be used if keys from different data sets are equal and you need to make them unique. If two data sets contain the same key, the value in the scene will be randomly taken from one of the data sets, with a unique prefix this situation can be avoided.
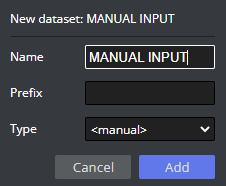
Manual Input
-
Click Add new.
-
Enter a Name for this dataset.
-
In Type select <manual>.
-
Click Add.
You can now add manually new key-value data entries that work together with other data sets. These entries will update scenes with the data that was entered.
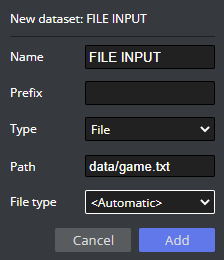
File Input
Local files can be used as input for the datacenter. The files are monitored, so whenever a file is saved with a new value, datacenter is updated instantly.
-
Click Add new and select the File option.
-
Choose a Name for this dataset.
-
Go to Path and specify where the file is. As you write, the tool will suggest configured aliases for folders, and after the slash it will suggest files in this folder, for example "data/game.txt", where data is configured as an alias for c:\temp\data and game.txt is a file in this folder.
-
Pick a File type and choose from the dropdown menu one of the available options:
-
<Automatic>
-
Text (key-value pairs)
-
Ini-file
-
JSON
-
-
Click Add.
-
After adding the dataset, all of the data Entries will be live and visible in right window pane.
Note: You can deactivate and activate the Data Entries that you are interested in, making this more resource effective for Viz Engine.

Sportzcast
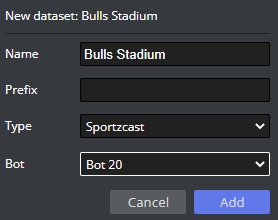
-
Click Add new and select Sportzcast as a provider.
-
Write a Name for this dataset.
-
In Type, select the Sportzcast option (configured previously with a username and password).
-
Select the Bot number with the Data Entries you require.
Note: In the Sportzcast API, the user is required to select the bot number that corresponds to a specific venue.
-
Click Add.
-
You will see live data feeding Datacenter.
Note: Data from the Sportzcast data provider is event based, meaning that the data is pushed to datacenter, and the graphics is updated instantly when data change.
DataLink in Viz Vectar
Datalink in Viz Vectar allows live data input from a wide range of data sources, such as:
-
Daktronics devices
-
DSI devices
-
Nevco devices
-
OES devices
-
Ranbow devices
-
Translux devices
-
Whiteway devices
-
Access to all external databases (anything supported by ODBC)
-
All sorts of internal clocks
-
External CSV files, Excel Files, Text files, XML files
-
Web based score controllers
-
Web page real-time updates
Combining a Viz Vectar system (or Newtek's Tricaster) with Viz Trio makes data from Datalink available as a dataset in Datacenter.
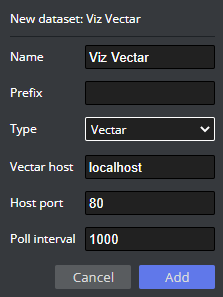
-
Click Add new and select Vectar.
-
Choose a Name for this data source.
-
Select Vectar in Type.
-
Add the hostname where Viz Vectar is running. It will connect automatically and show the data from the Viz Vectar system.
After adding the hostname, the Host port and Poll interval will be filled automatically. -
Click Add.
Remote Datacenter Input (Replicator)
The replicator data input can be used to use one Datacenter as input for another one. Specify the hostname and port of the remote Datacenter and select a dataset, or $datasets for the list of data sets or $outputs for a list of outputs.
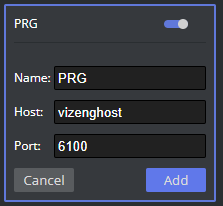
Add Viz Engine Receivers
Any number of Viz Engines can be receivers of data from Datacenter. Each Viz Engine needs to have the Shared Memory UDP port set. In Datacenter, add a Viz Engine as a receiver by following these steps:
-
Click Add new on the Viz Outputs bar in the bottom of the screen:

-
Add a Name to this Viz Output.
-
Add a Host or IP to the Viz Engine.
-
Specify the Port of the main renderer (not the UDP port).
-
Click Add.
When configured, each Viz Engine can be set as active or inactive:
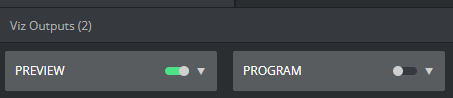
An active Viz Engine will receive all active Data Entries from Datacenter on startup, and all changes. An inactive engine will not receive anything.
Connect Data to Fields in Scenes
After specifying data sets as input to the global key-value map, and specifying Viz Engines as receivers, you should specify where exactly the values will appear in the scenes.
Each field will have to be enabled for Use shared memory placeholders in the control object. See Prepare Scenes for Data Input in Viz Artist. If the scenes were already imported into Viz Trio, the templates need to be reimported after the scene has changed.
To connect one or more keys from Datacenter to a field:
-
Open the template in Viz Trio.
-
Locate the relevant field in the Tab Fields list.
-
Go to Tools > Viz Artist and enable shared memory placeholders for the control field, and reimport the template in Viz Trio.
-
In the input value, enter the following notation to use a value of a key in Datacenter: ${key|default value}.
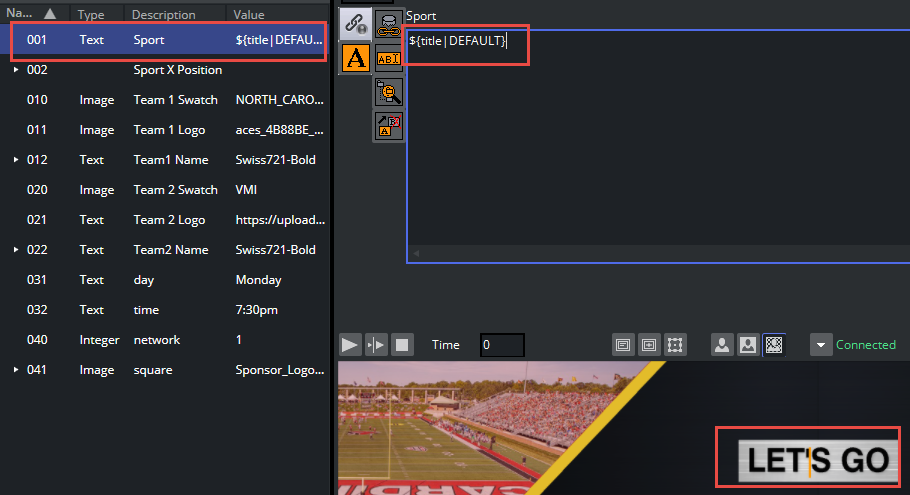
The key must be defined in one of the data sets in the Datacenter.
After the pipe, a default value can be entered (in case the key is missing or the data source is broken).
It is also possible to build up a field value from multiple keys and text, for example: Current time is: ${clock|00:00:00} and we are in ${qtrtext|1st} quarter.
ControlImage
When enabling Shared memory placeholders for a ControlImage plugin in Viz Artist, note that this field is converted to a ControlText when imported or reimported into Viz Trio.
The control field can then only be controlled by entering the image path, either a Viz path or an URL. For example, the field value can contain a value from Datacenter being the full URL of an image, or the Viz scene path can be constructed with a path to the folder and a value representing the image name: IMAGE*/0_Tool_Kit/GenericLogos/A/${teamname}.
The full path will then be the path plus the value of the Datacenter key "teamname".