Viz Channel Branding User Guide
Version 5.1 | Published October 26, 2023 ©
Playout Configuration
Playlist Importer
Viz Channel Branding 5.0 introduced a re-written Playlist Importer (PLI) that exclusively communicates with Integrations Hub via v2 of the REST API, that in turns pushes it to Media Sequence Engine (MSE).
Client Placement
The main typical install-location of the Viz Channel Branding Client application is the master control room (MCR), for monitoring purposes and manual update of data. It can also be used for manual playout.
Integrated with an automation system, Viz Channel Branding can import its schedule(s) and allow the automation system to control the playout of video and graphics without any manual intervention.
The following software components must be installed on the client machine in the MCR:
-
Viz Channel Branding Client
-
Viz Engine (local preview core)
See Also
Installation of Viz Engine Machines for Playout
It is recommended to install Playlist Importer, Integrations Hub and Media Sequencer on the same machine as the Viz Engine defined as your program output channel.
IMPORTANT! Ensure that clocks on all machines in the installation are synchronized. It is also recommended to set all date formats on all machines to the same format.
Media Sequencer
There must always be a connection to Media Sequencer(s) when running Viz Channel Branding playout system. By default, the Media Sequencer runs as a Windows service, and is automatically launched on machine startup. You can check Media Sequencer by starting the Media Sequencer Launcher application. From the Launcher you can start, stop and set run-mode. Alternatively, start the Windows Services component and make sure Sequencer is running and set to autostart. You can see the complete Media Sequencer Documentation (assuming it’s running on standard port) at:
http://YourMediaSequencerhost:8580/docOptional Startup Parameter for the Viz Channel Branding Client
|
Parameter |
Description |
Example |
|
-msehost |
Hostname or IP address for Media Sequencer. If none is used Channel Branding Client will work in MCR mode, reading each channel’s Media Sequencer from will read channel.ini file from the default path, [ProgramData]\Vizrt\Viz Channel Branding\channels.ini -- See Configuring Playout and Configuration of Channels with channels.ini. If no parameter is provided, MCP will attempt to connect to localhost. |
-msehost none -msehost 10.210.0.10 -msehost hostname |
See Also
-
Vizrt’s Documentation Center for more information on setup and configuration of Viz Engine
Configuration of Channels with channels.ini
In order for the Master Control Room machine(s) that use the MCR-mode of Channel Branding to have access to all channels, you must populate its channels.ini file with all channels defined on the Media Sequencer machine(s). If the channel.ini configuration file is not present or incorrectly formatted, the Channel Branding Client in MCR-mode will abort startup with an error message.
To configure channels with channels.ini
-
In Windows Explorer, locate the Viz Channel Branding's directory where the channels.ini is:
-
For Windows 7 or Windows Server 2008 R2 and higher (64-bit Windows) this will normally be:
-
[ProgramData]\Vizrt\Viz Channel Branding\channels.ini
-
-
-
Open the channels.ini file in the text editor of your choice.
-
The file could be empty if not previously configured.
-
-
Enter each channel as a separate line in the text file.
-
The format is: ChannelName=<IP address> or <hostname>.
-
Example: If you have two channels named channel1 and channel2 then the content of channels.ini would be (using a random example IP-address):
channel1=10.10.10.10channel2=20.20.20.20
-
-
Save and close the file.
Note: The channels.ini is a normal text file so make sure you save the file as type text.
-
Start Channel Branding Client using the Viz Channel Branding Client - MCR Mode shortcut.
See Also
Forked Execution
Forked execution allows you to set up a single channel with multiple concepts, triggering one Viz Engine per concept. Forked execution supports standalone and Transition Logic scenes. Concepts are defined per channel when Configuring Device Channels.
Note: As an option you can also use this setup to have the same graphics concept being rendered on multiple Viz Engines.
See Also
-
Viz Artist User Guide section on Transition Logic
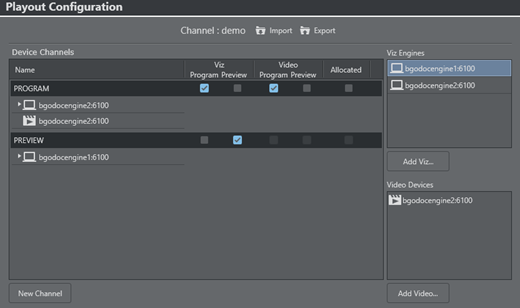
Configuring Device Channels
Viz Channel Branding is able to handle multiple TV channels. In order to accomplish this you need to define separate configuration settings per channel. You therefore need to define playout devices as part of the configuration. Playout is defined as graphics and/or video output.
Viz Engines must be assign for graphics output. For video output, you can either assign Viz Engines or other video playout servers that are able to handle your video output. For more information, see Upstream and Downstream workflows in the Graphics Workflow section.
Device channels are essentially placeholders for playout devices. You use device channels to group the graphics and video devices into logical areas of responsibility (program and preview channels for graphics or video devices).
Graphics device channels may also be configured to apply a given graphics design concept (for example weather, sports, election, news).
Click the Playout configuration icon on the main menu-bar to display the Profile Configuration panel:
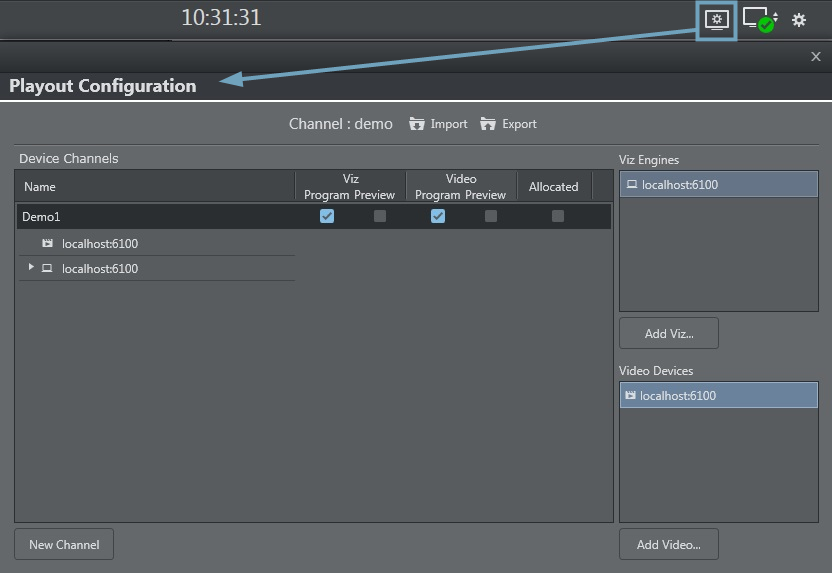
You can use the Import and Export buttons to import (or save) a configuration to an XML-file for safekeeping. Importing a configuration from an XML-file makes it easy to quickly change configuration parameters.
This section contains the procedures:
To add a playout device to the Device Channels list
-
Click the New Channel button, or drag and drop a playout device to the Channels list.
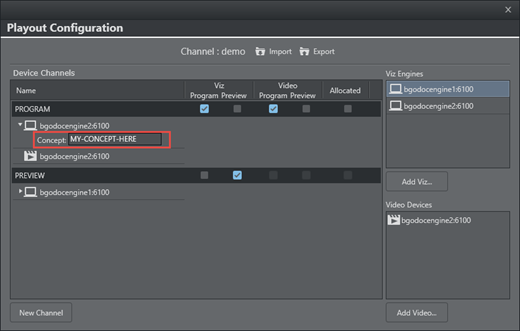
To add a Concept Override for a Channel’s playout device
-
Expand the device channel’s playout device and append the concept name.
This will override any concepts set elsewhere. -
Click OK.
Caution: Concept names are case sensitive.
To rename a playout device in the Device Channels list
-
Right-click the channel and select Edit Channel Name from the context menu, or double-click the name.
To remove a playout device in the Device Channels list
-
Select the channel and press the Delete button or right-click the device and select Remove Output.
Configuring Playout Devices
Playout devices are physical output devices that play out program or preview content of graphics or video. These devices are added to device channels for the purpose of logically grouping playout devices into functional areas of responsibility; they act as program or preview channels for either graphics or video.
This section contains the procedures:
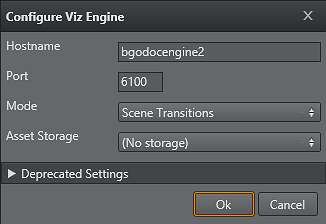
To configure a graphics device
-
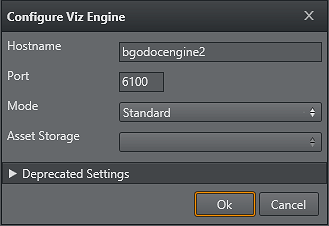
Click the Add Viz button to open the Configure Viz Engine dialog box.
-
Enter the hostname and port.
-
Default port for Viz Engine is 6100.
-
-
Optional: Select Mode.
-
Scene Transitions: See To Enable Scene Transitions.
-
Still Preview: See To Enable Scene Transitions.
-
-
Optional: Select an Asset Storage location.
-
Asset Storage lists available Viz Engine storage for clip transfer and playout.
-
-
Click OK.
A status indicator will show if the renderer is on-air.
Note: Deprecated Settings are not used with Viz Channel Branding.
To configure a video device
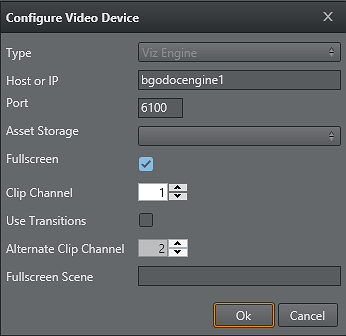
-
Click the Add Video button to open the Configure Video Device dialog.
-
Select the video server Type.
-
Enter the Host or IP address and the port.
- Default port for MVCP is 5250.
- Default port for Viz Engine is 6100. -
Select an Asset Storage location.
- Asset Storage lists available Viz Engine storage for clip transfer and playout. -
Enable/Disable Fullscreen mode.
- When Fullscreen is enabled, which is the default behavior, stand-alone video clip elements are played out full screen in the back layer. Graphics in the middle or front layer will still play.
- When Fullscreen is disabled. stand-alone video clip elements will only replace the current video clip without triggering animations or transition effects. -
Select Clip Channel (only relevant for Viz Engine).
-
Click OK.
A status indicator will show if the device is on-air/online.
To configure a dummy video device
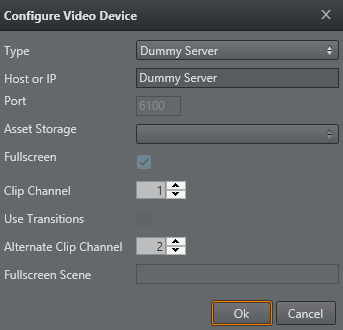
-
Click the Add Video button to open the Configure Video Device dialog.
-
Select the video server Dummy Server.
-
Enter a name for your dummy server (e.g. Dummy Server).
-
Click OK.
Note: This will enable use of the Timeline Editor when Viz One is simply a gateway and video is served from an alternative asset management system.
To edit a video device
-
Right-click the video device and select Edit from the context menu, or simply double-click it.
To delete a video device
-
Right-click the video device and select Delete from the context menu, or simply select it and press the Delete button.
To add a video device to the Channels list
-
Simply drag and drop a Viz Engine or video device onto the channel in the Channels list, or select it and from the context menu and choose:
- Add to profile (creating a new channel) or
- Add to selected channel.
To enable Scene Transitions
Transition Effect scenes are made in Viz Artist and can be applied to data elements to create custom transition effects from one scene to the other. If an effect is specified, the effect will be shown when the scene is taken on-air.
Effects include wipes, dissolves and alpha fades.
-
Configure the Viz Engine settings as described in how Configure a Graphics Device.
-
Set the Mode to Scene Transitions to allow the renderer to copy (or snapshot) the scenes for creating a transition effect between them.
-
Click OK.
-
Add the program renderer to the program channel.
Note: The program channel must be configured and on-air in order for the effects to be visible.
Logging
Enabling Logging
To enable logging
-
On the Media Sequencer machine, create the following folder path: %ProgramData%\Vizrt\Media Sequencer to generate a Daily Log.
Note: The log produced by Viz Channel Branding only shows what the Media Sequencer attempted to play out (and not what was actually played out).
For more information on how to format the output, see the Media Sequencer manual. See also the Appendix topic Logging.