Viz Pilot User Guide
Version 8.1 | Published August 16, 2017 ©
Object Inspector

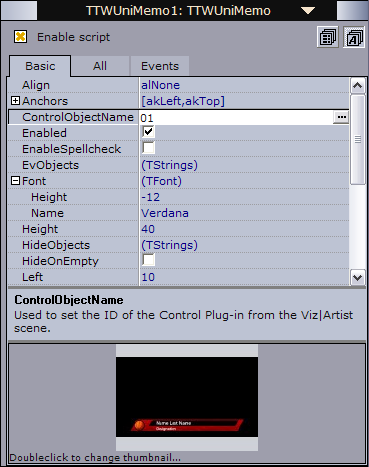
The Object Inspector basically displays Component Properties which enables the designer to configure them, and add Component Events through scripting. All properties use the ControlObjectName property that ties the Exposed Objects or Scene Objects (see the Resource Panel) from the graphics scene to the template.
The majority of components have a lot of properties where most are only used in special cases; hence, the inspector’s separated properties view.

It is also possible to sort properties by category or name by clicking the sort buttons. By default properties are sorted by name.
It is also possible to use the inspector to change the Template Thumbnail.
Note: The property editor in Template Wizard does not support Unicode directly. To edit properties like "UTF8Text", the user needs to press the ellipsis button (...) and then edit the text.
ControlObjectName

All components that support graphic scenes with Control plugins have the ControlObjectName _property which shows the exposed object property it is connected to. The value is linked to the structure and numbering of the exposed objects. The value below the _01 (Headline) entry named 01 holds the default value since its name is the same as the main entry (01(Headline)). In this case it is a text string. The ControlObjectName for this value is then 01. The kerning value for the text string is grouped under the 01 node and gets the ControlObjectName 01.kerning. The naming convention is objectname.propertyname.
Note: It is good practice for scene designers to name the scene’s Field Identifiers as 01, 02, and 03 instead of 1,2,3,4 ... 11,12 and so on. The latter will cause data to be assigned to the wrong fields when using the Import Components components because the Media Sequencer will place 11 and 12 before 2 and so on.
To see a component’s properties
-
Start Template Wizard, add a component to the template, and use the Object Inspector on the right to browse through the different properties.
See Also
Component Events
If scripting is enabled for a template (see Template Wizard Components ), each component will show the Events tab. The Events tab lists all possible events that can call scripts when certain user actions, functional or procedural events are triggered.
Example I
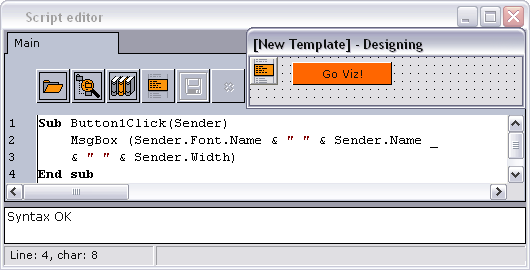
Scenario; A user clicks a button on a template and an OnClick event triggers a new event that loads a piece of data into a dialog box.

The above image depicts a solution to the scenario with an OnClick Event where the button’s Sender object is an argument to the Sub procedure Button1Click. The event name is comprised by the Name (Button1) property and the event type (OnClick). The Sender object contains all the component properties of the sender.
Note: Do not mistake the Name property for the Caption property. The Caption property is what is displayed on the button, and the Name property is what is used to reference it.

A click on the button triggers the OnClick event, and displays a message box with the button’s font type, name, width in pixels and its label.
Example II
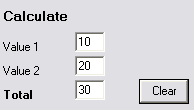
Scenario; A user adds two numbers to summarize a score result.
The scenario from Example I can be used to extend to fit scenario of Example II by using the same event on several components, linking them to the same piece of code. The example uses a small piece of code with one global value, two procedures and a function to calculate the value.
Dim globalTotalValue Sub clearClick(Sender) globalTotalValue = 0 txtValue1.Text = "" txtValue2.Text = "" txtSum.Text = "" End sub Sub addValue(Sender) calculate(CInt(Sender.Text)) End sub Function calculate(value) globalTotalValue = globalTotalValue + Value txtSum.Text = globalTotalValue End Function 
The two text fields are named Value 1 and Value 2, and they both have the OnExit event defined as addValue. Entering a value in field 1, and exiting it, will trigger the event addValue which sends the value (Sender.Text) to the calculate function. The calculate function calculates the value and sets the new globalTotalValue in the text field, named txtSum. The two value fields share this small piece of code.
To add an event
-
Check the Enable script option in the Object Inspector (CTRL+F12) to enable scripting
-
Click the Events tab, and double-click an the empty field to the right of the event. This creates a default event name and inserts a script framework (sub procedure) into the script editor.
Template Thumbnail

All templates use the thumbnail generated when the scene was saved in Viz Artist. Multi-scene templates (e.g. Transition Logic) use the thumbnail from the first scene that is added to the Wizard’s Selected scenes pane (Wizard’s step 2).
It is also possible to select a custom image (e.g. jpeg, bmp) by double-clicking the Thumbnail image (lower-right) in Template Wizard; however, these cannot be based on Viz Artist scene icons.
Thumbnails are visible in Director and Viz Pilot News.
Scripting Support
Visual Basic Scripting (VBScript) is supported by Template Wizard. The supported version is dependent on the installed version on the computer(s). To find the VBScript version that is installed, localize and see the properties of the vbscript.dll file.
Example: C:\WINDOWS\system32\vbscript.dll
For a user’s and language reference guide on VBScript, see the Microsoft Developer Network (MSDN).
As part of the component descriptions, some VBScript examples are given to show how the components can be used with scripting.
To enable scripting
-
Check the Enable script option in the Object Inspector (CTRL+F12) to enable scripting
Note: CTRL+F12 will toggle between the Template Editor and Script Editor.