Viz Plug-ins User Guide
Version 5.1 | Published December 12, 2023 ©
Pointer

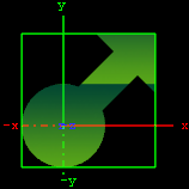
The Pointer plug-in is similar to the Arrow plug-in. The main difference is that the pointer has a joint link, so it looks more like a bend arrow. The pointer has two reference points which controls the pointer’s position. The first point is in the joint link and the second point is at the arrow’s head.
Note: This plug-in is located in: Plugins -> Geom plug-ins -> Default
Pointer Properties
-
Use LOD: Enables/disables dynamic level of detail.
-
Point 1 X: Sets the position of point 1 on the X-axis.
-
Point 1 Y: Sets the position of point 1 on the Y-axis.
-
Point 2 X: Sets the position of point 2 on the X-axis.
-
Point 2 Y: Sets the position of point 2 on the Y-axis.
-
Width: Sets the width of the pointer shaft.
-
Cap Style Begin: Allows you to select the style on the pointers beginning. The options are Flat, Circle or Arrow.
-
Cap Style End: Allows you to select the style on the pointers end. The options are Flat, Circle or Arrow.
-
Arrow Length: Sets the length of the arrow head.
-
Arrow Width: Sets the width of the arrow head.
-
Circle Radius: Sets the radius of the circle, if cap style is selected.
-
Circle Segments: Sets the resolution of the outer side of the pointer angle. Switch to wireframe to see the effect as you change the value.
-
Joint Style: Sets the style of the pointer joint, either Round or Miter.
To Create a Pointer

-
Create a new Container.
-
Add the Pointer plug-in to it.
-
Add a material and/or a texture to the group.
-
Open the Pointer editor and set the following parameters:
-
Set Point 1 X and Y to 50.0.
-
Set Point 2 X and Y to 75.0.
-
Set Width to 20.0.
-
Set Cap Style Begin and End to Circle and Arrow, respectively.
-
Set Arrow Length, Width and Radius to 50.0.
-