Animation Store Creator
Version 1.1 | Published May 07, 2021 ©
Menus
Two primary menus sit at upper left, just beneath the application title bar. Let’s consider the features found in the File and Help menus.
The File Menu
The file menu permits you to save and re-open transition projects and export your results.
-
New: Opens a new, blank project.
-
Open: Opens a previously stored transition project to continue working with it.
-
Recent: Shows a list of recently active transition projects.
-
Save: Stores the current project.
-
Save As: Saves a copy of the current project with a new name.
-
Export to: Compiles the finished transition and store it in the correct location for live use. Note that the optional targets listed in the menu can include various types of NDI systems detected on the local network; naturally only supporting live video mixing systems are suitable destinations.
-
Create Installer: Creates a standalone installer (.exe) file that you can share with another Vizrt live production suite user.
-
Exit
Create Installer
Select the File menu point Create Installer to open the dialog panel shown below.
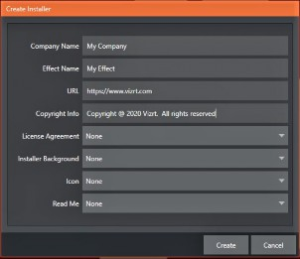
Enter information for the different fields listed and select either Browse (to locate a custom file you have prepared) for the file entries listed below or select Use Default.

Once you have completed these steps, press the Create button at the bottom of the panel. After you supply a filename, a progress gauge will be shown as the standalone installer file (.exe) is prepared.