Animation Store Creator
Version 1.1 | Published May 07, 2021 ©
Effect Type
Consider a simple transition. Overlay Animations (Overlay Animation Sequence) generally either begin with a fully transparent frame, gradually dissolving onto the screen; or it comes into view from an off-screen location. In both cases, the overlay is removed from view by the end of the effect in one manner or another, fully revealing the newly introduced source.
![]()
Often, the Overlay Animation is designed to completely fill the screen at some point, allowing the actual transition to occur as a cut behind the animation. In this case, there is no need for a separate animation sequence to define the transition. Therefore, the Wipe Sequence controls allow you to simply specify (or Set the frame you are currently previewing as) the Cut Frame.
Hint: The title of the Wipe/Warp Sequence control group varies depending on the Effect Type selection.
Otherwise, you can supply a simple black and white animation to define a transition as an animated blend of source A and B . The “Wipe” Effect Type supports both of these types of transitions (Details about animation sequences for Wipe transitions are provided in Wipe Sequence).
Warp A, Warp B, or Warp A and B
The Warp options in the Effect Type menu unleash some of Animation Store Creator’s most powerful capabilities. Using these options, the corresponding source (A, B or both) is completely governed by the animation you supply. The designated source can be moved, rotated, and distorted in endless ways:
Select Warp A to:
-
Fly source A off the screen, revealing source B behind it.
-
Or roll source A into a ball and roll it off the screen.
Select Warp B to animate source B:
-
Fade it up with a ripple to hide source A.
-
Or unroll source B like a scroll over top of source A.
Note: Transitions prepared using the Warp A option are unsuitable for use in an Overlay or DSK channel.
The Warp A and B option in the Effect Type menu allows both sources to be completely governed by the animation you supply. This is achieved by adding blue to the warp gradient of the B source.
Note: Information on preparing warp animations is provided in Warp Sequence. Be sure to supply an Overlay Animation when using this effect type.
Overlay Animation Sequence
The next step when creating a new Animation Store Transition is to load an Overlay Animation.
The Overlay Animation supplies the full color overlay imagery that appears on top of all Switcher video layer content (both sources: A and B) as they are displayed or removed when the effect is applied in the Live Desktop.
File Sequences
You will likely supply the Overlay Animation to the Animation Store Editor as an incrementally numbered file sequence. Typical animation and effects programs are capable of outputting suitable file sequences. File naming conventions for sequences often takes the form filename0001.png, filename0002.png, etc. (or perhaps filename.0001.png, or filename_0001.png).
The files should be prepared in a 32-bit format (with embedded alpha channel) of course, so the underlying Switcher sources is visible behind the overlay. Most common 32-bit file formats are supported, including PNG, TIFF, TARGA, and (flattened) PSD.
Hint: If your graphics application of choice does not automatically export 32-bit files in straight or non-premultiplied format, you should choose that option.
As an alternative to file sequences, the most common 32-bit animation file formats are also supported.
Frame Count
The number of images in the file sequence depends on your specific need. Typically, this sort of transition effect is not very long, often just one or two seconds. A two second transition intended to be played at normal speed (Medium, or [M] in the Transitions group on the Live Desktop) would look great with a sequence of 60 frames for NTSC, or 50 for PAL.
If you expect the transition will primarily be applied with a shorter duration you could use less frames, say just fifteen. (Using the lesser frame count when possible has the benefit of reducing demands for Effects Memory in the Switcher.)
The Media Browser
Click the drop-down menu labeled Frame Seq and click on Select File to open your media browser to locate your Animation Store sample files.
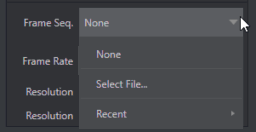
The samples folder contains sub-directories holding the overlay file sequence (the folders are titled “overlay” or “warp”), the transition file sequence (“transition”) and sound files (“sounds”). Once you have selected your sample animation, select any one the PNG (or EXR) files in that folder and click open. The system automatically detects that it is an image sequence and loads it up in proper order.
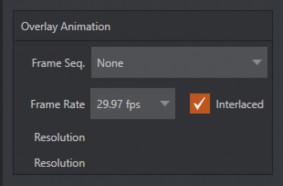
Frame Rate and Interlace
The Frame Rate control allows you to choose appropriate settings for your target session format (PAL, or NTSC). As mentioned earlier (in File Sequences), you can choose a double-rate setting when you think it might be necessary to do so, but normally you should avoid this option, to minimize unnecessary use of Effects Memory.
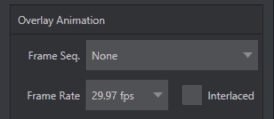
Select Interlaced switch when the animation sequence is fielded to ensure smooth motion.
Hint: Interlace support assumes upper field first order. NTSC SD D1 format frames (720x486 resolution, lower-field-first) are converted to this format if detected.