
Viz Pilot User Guide
Version 7.2 | Published May 08, 2017 ©
Legacy Playlist
IMPORTANT! In Viz Pilot 6.0 and later, the new Playlist Window is available. The playlist described in this section is still available, but is deprecated.
The old playlist can be enabled in the Playlist - General Preferences options.
Legacy Playlist Toolbars
There are several toolbars available which can be displayed or hidden using the Toolbar Context Menu.
Toolbar Context Menu
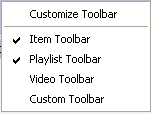
To access the Toolbar Context Menu, right-click on the toolbar.
-
Customize Toolbar: Opens the Button Configuration dialog box. For details about this dialog box, see Legacy Playlist Custom Toolbar.
-
Item Toolbar: Displays the Legacy Playlist Item Toolbar (enabled by default).
-
Playlist Toolbar: Displays the Legacy Playlist Toolbar (enabled by default).
-
Video Toolbar: Displays the Legacy Playlist Video Toolbar (disabled by default).
-
Custom Toolbar: Displays the Legacy Playlist Custom Toolbar (disabled by default).
See Also
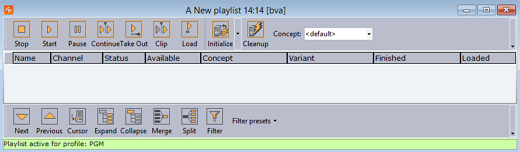
Legacy Playlist Item Toolbar
At the top of the playlist window is the Item toolbar:
-
Stop: Cancels a playlist item that has been scheduled to run. Stop is only relevant when groups with elements with timecode set have been triggered.
-
Start: Runs the scene from the current time frame.
-
Pause: Pause the scene at the current time frame. Pause is only relevant for clip playback.
-
Continue: Continues to play the scene from the current time frame. To be able to use the Continue function, the scene must either have been affected by the Pause function or have a stop point.
-
Take Out: Clears a scene based item, and takes a transition logic based scene to the out state stop point.
-
Clip: Ignores the animation and takes the scene to a defined Clip point. A Clip point is defined by adding a tag named noanim. To learn more about adding Clip points, see the Tag points section of the VizArtist User’s Guide.
-
Load: Loads the scene into Viz Engine.
-
Initialize: Initializes or re-initializes the entire playlist. Scenes are loaded in memory for the channel that is defined per data element (see the channel column in the playlist). A status indicator at the bottom of the playlist is displayed while initialization is in progress.
-
Initialize Playlist: Initializes or re-initializes the entire playlist (default).
-
Initialize Selected: Initializes the selected items in the playlist.
-
-
Cleanup: Cleans up all renderers that have an item in the current playlist (i.e. clears all loaded graphics from memory for those channels). To clear all renderers, go to the Main Menu > Viz Engine Menu > Cleanup Renderers
-
Concept: Sets a concept for the whole playlist. If the value is set to default, all data elements will use the concept that is set in the Concept column (see also Legacy Playlist Concept ).
Legacy Playlist Toolbar

At the bottom of the window is the Playlist toolbar:
-
Next: Selects the VizBoldCurrent Item cursor (black pointer) to the next element in the playlist.
-
Previous: Selects the VizBoldCurrent Item cursor to the previous element in the playlist.
-
Cursor: Jumps the VizBoldCurrent Item cursor to the location of the External GPI cursor (yellow arrow).
-
Expand: Expands the groups in the playlist.
-
Collapse: Collapses the groups in the playlist.
-
Merge: Merges the current folder, so that the subfolders become unavailable.
-
Split: Splits a folder that is merged.
-
Filter: Opens the Filter dialog box.
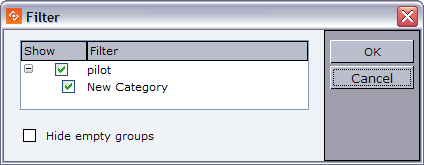
The Filter window is used to enable or disable playlist filters. Each playlist can enable or disable different filters. Filters are based on how templates are categorized in Template Wizard.
See Also
-
Using Categories and Channels in Template Wizard.
Legacy Playlist Video Toolbar
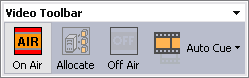
The Video toolbar is not displayed by default, and is only available for MVCP integrations.
When selected, the Video toolbar is by default positioned below the Playlist toolbar.
Note: The Video Toolbar settings only work if the system is configured to be integrated with a video server.
-
On Air: Sets the playlist in On Air mode. When the playlist is set to On Air an On Air icon
 appears in the MSE Playlists list.
 -
Allocate: Automatic channel allocation starts, the first clips are cued up, and the External GPI cursor is set to the first story that contains a video clip.
-
Off Air: Sets the playlist in Off Air mode.
-
Auto Cue:
-
Enable Auto Cue: Enables the automatic channel allocation.
-
Disable Auto Cue: Disables the automatic channel allocation.
-
Example
If a playlist uses two channels (A and B) and the playlist is set in On Air mode, the first clips allocated to these channels will be cued. Channel A is taken On Air by a vision mixer GPI (advance and take). This also takes the studio tally (red light on monitors) high. This is received by the Media Sequencer as a GPI, and the Timecode Monitor indicates high tally on that channel. The vision mixer cuts to camera or to another video source. This takes tally low on that channel, and Media Sequencer receives a GPI low signal. After 5 seconds, the tally goes low, and the next clip allocated to that channel will be cued.
Legacy Playlist Custom Toolbar
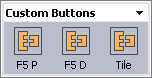
The Custom toolbar is not selected by default. When selected, the Custom toolbar is positioned above the Playlist toolbar.
Configuring Buttons
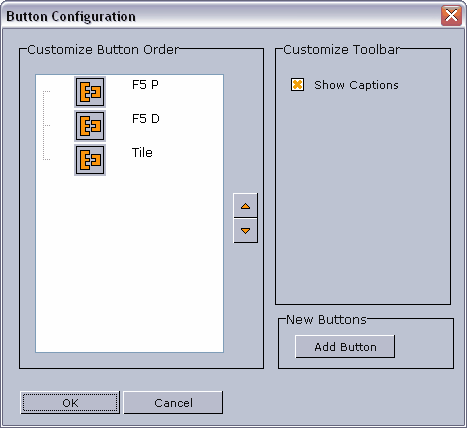
Selecting Customize Toolbar from the Toolbar Context Menu will open the Button Configuration window as depicted above. The customized buttons list is empty by default. If the list contains two or more custom buttons, the order of the buttons can be rearranged with the Up and Down buttons.
If Show Captions is enabled, the buttons in all buttons in all toolbars will be displayed with their respective names.
Add Command
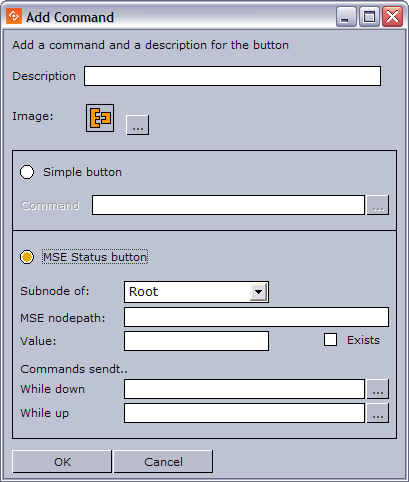
Clicking Add Button in the Button Configuration window will open the Add Command window.
-
Description: Add a descriptive text to the new command button.
-
Image: Add an image or icon to visualize the new command button.
-
Simple button: Add a predefined function by clicking the ellipsis (...) button to use macro commands or Viz Engine commands (see image below).
-
Command: *Click the ellipsis (...) button to open the Predefined Functions window. Select a function to add to the button.
-
-
MSE Status button: Depending on the status of a button (i.e. “on” or “off”), it can have different behaviors and trigger different functions. An MSE button is defined to monitor the Media Sequencer.
-
Subnode of: Root, Profile or Playlist
-
MSE nodepath: Sets the relative path of the sub node.
-
Value: Any given value in the Media Sequencer.
-
Exists: When checked the button is turned “on” if the node exists. Independent of the value field.
-
While down: Command that is triggered while button is down
-
While up: Command that is triggered while button is up
Both the Simple and the MSE buttons can use Predefined Functions. The functions can be user defined or built-in functions.
-
Example
-
Example 1: The button is “on” if the path "/hello" in the Media Sequencer has the value "aaa"
-
Subnode of = Root
-
MSE nodepath="hello"
-
Value="aaa"
-
-
Example 2: The button is “on” if the path "/config/profiles/Studio/top/sub" in the Media Sequencer has the value "aaa".
-
Subnode of = Profile
-
MSE nodepath = "/top/sub"
-
Value = "aaa"
-
To create a custom button
-
Right-click a toolbar and select Customize Toolbar.
-
In the Button Configuration window click the Add Button button.
-
In the Add Command window enter a description for the button in the Description text field.
-
Select the Simple button option, and click the ellipse (...) button to add Predefined Functions.
-
Click OK.
Note: When adding button images, use BMP images of approximately 30 x 40 pixels.
The Legacy Playlist Overview
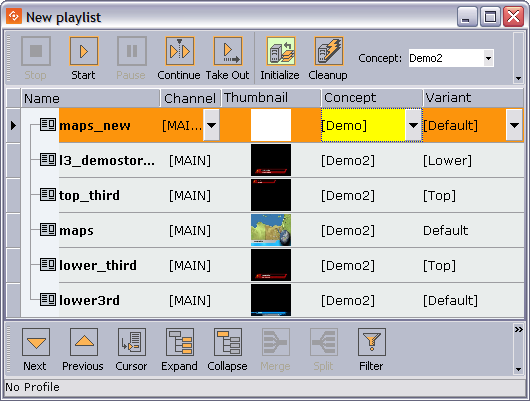
A playlist can contain various groups and elements. Each group and element is presented as a row in the Playlist.
Legacy Playlist Cursors
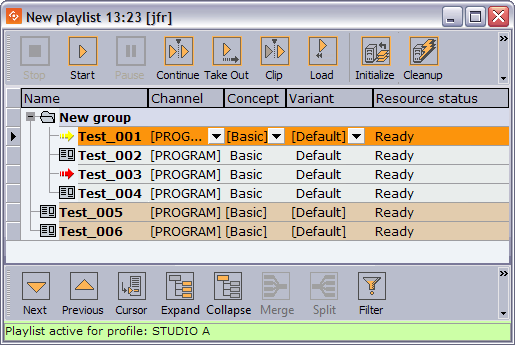
There are three cursors in the Director playlist:
Current Item cursor
-
Red arrow
 , this is the current selected element.
 -
Indicates that this is the next element that will be taken on-air.
External GPI cursor
-
Yellow arrow
 the next element that will be focused (selected) when the currently selected element is taken. Referring to the screenshot above: When Test_003 is taken, Test_001 will then be the next current element and displayed with a red cursor.
 -
When GPI is enabled, the external GPI system’s cursor will be displayed in any client that is using the same profile as the external system.
-
The Cursor options in the Playlist Context Menu apply to this cursor.
Director cursor
-
Black pointer in the grey sidebar
 . This is the orange highlighted row.
 -
Shows the item that has been manually selected in the Director playlist.
-
The Next, Previous and Cursor buttons in the Legacy Playlist Toolbar apply to this cursor.
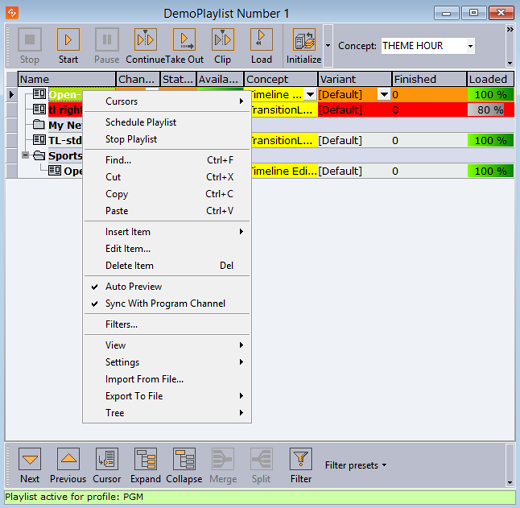
Legacy Playlist Context Menu
Playlist Context Menu
-
Cursors: Shows three options for setting, clearing and resetting the External GPI cursor (yellow arrow).
-
Reset Cursor: Sets the external cursor back to the point it was before a Set Next was executed.
-
Set Next: Sets the external cursor for a selected element. The cursor indicates the element that will be taken next if, for example, a “take and advance” General Purpose Input (GPI Tab) action is executed.
-
Clear Next: Clears the Set Next cursor. This option is only available when clearing a cursor set with the Set Next option.
-
-
Schedule Playlist: Activates the playlist. If for example Begin time has been set, the playlist must be scheduled before the changes take effect.
-
Stop Playlist: Stops a previously scheduled playlist.
-
Find: Shows the Playlist Search area below the Playlist.

Typing the first letters of the name of a playlist element in the Find text box, marks the closest element in the playlist (either above or below the current element, depending on whether the Find Next or Find Previous button is clicked) that corresponds to the letters in the text box. The Find Next button is selected by default. Clicking the X button hides the Playlist Search area.
-
Cut: Removes the current element from the playlist.
-
Copy: Copies the current element in the playlist.
-
Paste: Adds a copied element above the currently selected element in the playlist.
-
Insert Item
-
Group: Adds a new group to the playlist, above the currently selected element. To place an element into the group, press the CTRL key, and then drag and drop the element onto the desired group. The action is indicated by an angled arrow. Groups can also be organized as sub-groups.
-
-
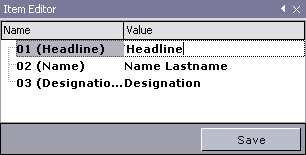
Edit Item: Displays the editable text elements in the item editor. Allows last minute changes to text in graphics.
-
Delete Item: Deletes the current Playlist element. It is only removed from the playlist.
-
Auto Preview: Automatically displays selected playlist elements using the preview channel.
-
Sync With Program Channel: This is an option for the Auto Preview feature available above. If Auto Preview is on, this setting affects what is shown on the preview channel when a user selects a new element.
-
If on, the current state of the preview channel is synchronized with the program channel before the selected element is taken on it. This mainly affects transition logic scenes as this means that the selected element will be shown in-context with the same elements on-screen as in the program channel.
-
If off, the preview channel will be cleared before the current element is taken. For example, this means that a transition logic element will be shown alone on the preview screen regardless of what is shown currently on the program channel.
Note: Sync With Program Channel is permanently enabled in situations where the Media Sequencer does not support clearing before a take.
-
-
Filters: Opens the Filter dialog box, where types of elements that should be hidden in the playlist can be selected.
-
View
-
Visible Toolbars: Selects which toolbars are visible (Item Toolbar, Playlist Toolbar, Custom Toolbar).
-
Show Item Editor: Shows the Item editor at the right side of the Playlist list. The Item editor displays editable text for the selected graphics item in the playlist. The editor can be expanded, hidden or closed by clicking the arrow and X buttons in the upper right corner.
-
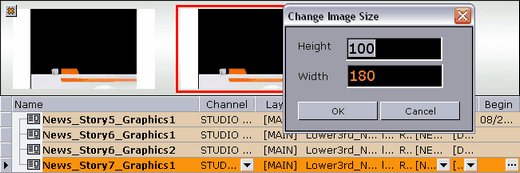
Show Image Bar: Shows a bar with thumbnails of the elements in the playlist. To hide the Image bar, click the X button in the upper left corner. Right-clicking the Image bar opens the Change Image Size dialog box.
-
Auto Width: When enabled, the columns are minimized, so that they fit perfectly to the content. This setting stores the setting for the current playlist. See also the Store as Default option.
-
Font: Opens a dialog for setting font, font style, size and so on. The font settings change the text in the Playlist list.
-
Image Size: Sets the thumbnail images to the selected pixel size.
-
-
Settings
-
Store as Default: Sets the current settings (selected columns, column widths, filters, etc.) as default for all new playlists. Remember to disable Auto Width for this function to work properly.
-
Restore Default: Restores the settings to the original setup.
-
-
Import From File: Opens the Open dialog box, where a previously exported XML file can be searched for and imported.
Note: The Import from File does not accept characters outside the Basic Multilingual Plane (BMP). If a non-BMP character is found, the import will stop and return an error message stating the position of the first non-BMP character.
-
Export To File:
-
Playlist: Opens the Save As dialog box, where the entire playlist can be exported.
-
Selected Items: Opens the Save As dialog box, where the selected elements in the playlist can be exported.
-
-
Tree
-
Select All: Selects all the items in the playlist.
-
Expand All: Expands all groups in the playlist.
-
Collapse All: Collapses all groups in the playlist.
-
To group elements in a playlist
-
Right-click the Playlist and select Insert Item -> Group from the Legacy Playlist Context Menu.
-
Place an element in a group by holding the CTRL key down while performing a drag and drop operation. An angled arrow indicates that the element may be dropped.
Legacy Playlist Columns
Playlist columns can be displayed or hidden by using the Column Context Menu. Dragging and dropping the column headings changes the order of the columns.
Many of the columns are presented by default. These are; Name, Channel, Status, Available, Concept, Variant, Finished and Loaded.
Tip: F2 can be used to change the value of a data element’s column setting.
Column Context Menu
The context menu which appears when right-clicking the column headings includes:
-
Video: Displays the following four video options:
-
Available: Displays the status of external resources needed by the Viz Engine (e.g. transferred video, and if it is available on the video playout engines). This column was previously named Progress.
-
Mark In: Sets mark in times for video clips.
-
Mark Out: Sets mark out times for video clips.
-
Postroll: Sets postroll for video clips. When a video clip is played, the time and remaining time are shown in the Timecode Monitor. The remaining time; zero at clip-end if postroll is set to 0. Normally it is desirable with a few seconds of postroll so that the vision mixer can cut to another source without risking displaying a freeze frame. With a postroll of 3, the countdown/remaining time will be zero 3 seconds before clip end and count from zero and downwards for three seconds.
-
-
Misc: Displays miscellaneous options. Begin, end, timecode and duration can be set directly in the playlist. Some newsroom systems also propagate timing information to their control applications for monitoring and playout of newsroom playlists. Such information can for example be sent using the MOS protocol.
Note: Director is able to override timing information from newsroom playlists, however, this is not recommended.
-
Begin: Shows the start time of a group. Hence, begin and end times can only be set for groups and not elements of a group. To set time for elements, use the Timecode and Duration columns. See also the Legacy Playlist Time Editor section.
-
Category: Shows the category the Sub Category resides under. Default category for Template Wizard templates is the pilot category.
-
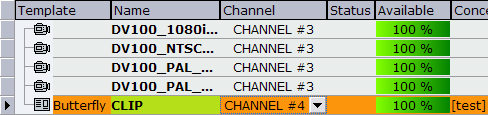
Channel: Shows which output channel an element should be sent to. Various elements can be sent to different output channels. The output channels can be set directly in the column. By default the main (program) output channel is selected, but this can be overruled by setting an alternative channel in a template (that all data elements made from it will have). This column is presented by default.
-
Duration: Sets the length of the element. This time is relative to the Begin and Timecode parameters.
-
End: Shows the end time for a group. See also the Legacy Playlist Time Editor section.
-
External Id: The External Id can be set directly in the column. It attaches a data element execution to a specific external signal that comes from a button box or similar device. An External Id is used with the Quick CG feature for adding embedded MOS objects to a newsroom story.
-
Finished: If a data element is checked off as finished when saved it can be shown in the Finished column in the playlist displaying either 1 for finished and 0 for not finished.
-
Loop: Loops a fullscreen video clip on the video channel. Default behavior is to play once.
-
MOS ObjAir: Marks if the newsroom element is marked as ready. The element can only be taken on air if it is checked (ready). Using the macros playlist:next_ready and playlist:previous_ready will skip those elements that are not ready. Do not use the macros playlist:next or playlist:previous.
-
Name: Shows the element name as it was saved in the database. This is presented by default.
-
Resource Status: Indicates if an element is ready for playout. It will also show an error status if the element was not loaded or made available.
-
Status: Shows the status for video clips; cuing, cued, playing, paused, or aborted.
-
Story #: Shows the name or number of the Story as used in the NCS. This is an optional field originally intended for use by prompters.
-
Sub Category: Shows the category a template is assigned to. See Categories and Channels in Template Wizard.
-
Thumbnail: Shows thumbnails of the scenes.
-
Timecode: Sets the timecode for the element. This setting affects both graphics and video elements. The timecode can be set directly in the column. To trigger elements based on timecode, the elements must be in a group, and the group must be executed. An element’s timecode must be set within the group’s Begin and End time.
Note: To monitor video elements in graphics using the TimeCode monitor, the Viz Engine that renders graphics must also be defined in the profile configurations for video playout.
-
-
Graphics: Displays the graphics options.
-
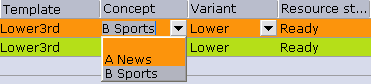
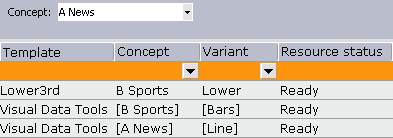
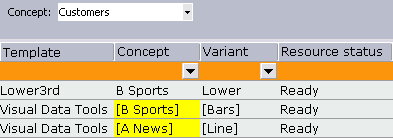
Concept: Shows which concept(s) the data element is associated with.
-
Effect: Displays transition effects that can be set per data element. When the effect is executed it will have an effect on the data element it was set for, and the next data element taken. See also how To enable transition effects.
-
Effect Image: Displays an image of the transition effect scene.
-
Layer: Allows loading of graphics in separate layers on Viz Engine (front, middle, back). For example, a lower third can be shown in front of a virtual studio set or any other background, or a bug can be shown in the front layer while a lower third is shown in the middle layer. This column is presented by default.
-
Loaded: Shows the loaded status (in memory) of the scene and images used for a data element of that scene.
-
Template: Shows the name of the template. This column is presented by default.
-
Variant: Select a concept’s variant from the drop-list (see the Concept column).
-
-
Index: Sets an index number for each row in the playlist. This number will always be sorted either ascending (lowest to highest). If a row is moved or deleted the index changes accordingly.
-
Auto Width: When enabled (selected), Auto Width expands the columns and distributes them evenly.
To enable transition effects
-
Configure a program channel that has a Viz in On-air mode.
-
Make sure the scene effects folder in Viz is named transitions and placed at the root level of the scene directory.
To add a transition effect
-
Right-click the playlist’s column headers, and select Graphics, and then Effect and Effect Icon (last is only for visual reference)
-
Click the arrow button in the Effect column and select, from the drop list, the transition effect.
See Also
Legacy Playlist Concept
In most cases Director playlists are created in Newsroom Computer Systems (NCS). A playlist created using an NCS client, can consist of data elements within a specific concept. For example a News or Sports concept.
Director is able to override a playlist’s concept. Data elements, saved to a specific concept, can belong to several concepts. Thus, a data element that does not belong to the overridden concept is highlighted in yellow.
Some newsroom systems support the use of master concepts (e.g. ENPS) set by the newsroom system itself. A master concept is able to override a concept set when creating a data element.
When a concept is overridden, the playlist will, when opened in Director for monitoring and playout, show all data elements with the concept they were saved with, but played out using the Master Concept. Hence, if a data element was saved with a Sports concept, and the master concept is News, the News concept is used.
If the Master Concept is changed, and the data elements are not part of the master concept, the data element’s concept column will be highlighted with a yellow color.
If a data element’s concept is manually changed in Director, the master concept will not override the new concept, and a warning is not issued since the concept is manually overridden.
The concept a data element is saved with is depicted with square brackets* [ ]*. A data element’s concept and variant, that are manually changed in Director, do not show the concept and variant name with square brackets.
MOS Graphics Concept
The concept implementation of the MOS protocol, that is supported by Director and Viz Gateway, can be used by any newsroom system that use the MOS protocol. However, the feature must be implemented.
Below is an excerpt of a MOS message sent from the newsroom system when a playlist is created with a master concept.
<mosExternalMetadata> <mosScope>PLAYLIST</mosScope> ... <mosPayload> ... <GraphicConcept>A News</GraphicConcept> ... </mosPayload> </mosExternalMetadata> 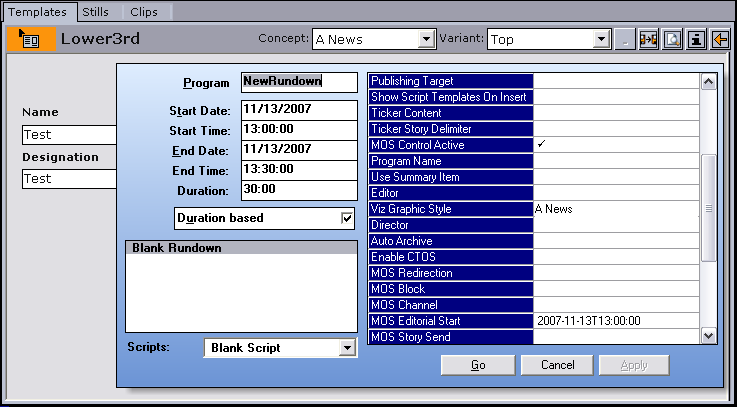
In ENPS it is possible to set the concept (or style) when creating a rundown (playlist). Set the rundown property Viz Graphics Style to the same as the graphics concept used.
Note: The naming convention must be the same for the scene design and the playlist created in the newsroom system.
See Also
Legacy Playlist Time Editor
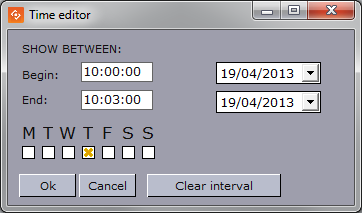
The Time Editor is displayed when clicking the ellipsis (...) button in the Begin or End columns. In this window, a group can be set to run between a start- and stop date and time. It can also be set to run on specific weekdays. Once a start and stop time has been set, the date and time is shown in the Begin and End column.
Legacy Playlist Status Bars
The playlist displays two types of status bars at the bottom of the window, depending on the type of playlist that is open (Director playlist or MOS playlist). These two status bars operate independently from one another.
The Profile Bar is available for all playlists, while the Rundown Monitor Bar is only available for MOS playlists.
See Also
-
Profile Status Bars
Legacy Playlist Profile Bar

The Profile Bar is available for all playlists. It shows whether the playlist is active or inactive, and if active, the name of the profile it is active in.
This information is stored in the Media Sequencer, so can be accessed by all Directors that are connected on the same profile.
Context Menu - Profile Bar
When a playlist is opened, it retains the active/inactive status it had before it was closed. The context menu can be used to change the status.
-
Activate in current profile: Activates and monitors the selected playlist in the current profile, and enables the Media Sequencer to trigger transfer of video clips to all Viz Engines in the current profile.
-
Deactivate: Deactivates and stops monitoring the playlist.
Note: If the active profile is changed or renamed, the playlist must be reactivated in the new profile by deactivating and then activating the playlist.
Cleanup and Auto Preview will work on playlists that are either active or inactive. Initialize will only work on active playlists.
Legacy Playlist Rundown Monitor Bar

The Rundown Monitor Bar is available for MOS playlists (also known as newsroom playlists). It is used in Vizrt’s MOS integration, and shows the current MOS status for the playlist.
When a MOS playlist is first opened in Director, it is empty. Monitoring needs to be requested using the context menu so that the playlist can be populated.
Once Director requests the monitoring of a MOS playlist, it can be presented as a playlist in Director. Director can then monitor the playlist and receive updates from the newsroom system and Director. The operator can then take the graphics on air from Director.
Status Information
The information available in the rundown monitor bar is as follows:
-
Host: IP address of the Media Sequencer that has requested the playlist.
-
Start: Playlist start time, according to the Newsroom system.
-
Duration: Playlist duration, according to the Newsroom system.
-
MOS: The current MOS status for the playlist (Active/Inactive).
Context Menu - Rundown Monitor Bar
-
Request: Begin monitoring, and populate the Director playlist with the elements from the newsroom system. Once the monitoring is active, all subsequent updates done to the newsroom rundown will be reflected in the active Director playlist.
-
Release: Director will stop monitoring the newsroom system. A list of elements will still appear in the Director playlist, but any subsequent updates to the Newsroom rundown will not be reflected in the inactive Director playlist.
IMPORTANT! Any elements that are manually added to the playlist by Director will disappear if a released playlist is requested again.
Note: If using Director to take items on air, be mindful that the cursor position in Director may change if the related item is deleted from the newsroom rundown. That is, the Current Element cursor would move to the following item, and the Next Element cursor would be removed.
Cleanup and Auto Preview and will work on playlists that are either active or inactive. Initialize will work once the MOS playlist has been populated with content.
Example Scenarios
If two Directors use the same Media Sequencer and MOS Gateway, and have the same playlist Requested, then they will both get all updates.
If two Directors use the same MOS Gateway, but different Media Sequencers, and they both activate the same MOS rundown. The last Director to activate the rundown will get any MOS updates that come from the Newsroom system.
See Also
-
MOS Integration Workflow