
Viz Ticker User Guide
Version 4.1 | Published January 22, 2024 ©
Creating a Flipping Carousel Template Scene in Viz Artist
This section describes how to create a flipping carousel template scene in Viz Artist.
Tip: A copy of the flipping carousel template scene has already been created and can be imported by following the steps in To Import Viz Artist 3 Example Scenes.
When finished with the steps in this section, this template scene is used by the flipping carousel background scene. The Toggle plug-in in the background scene makes it possible to add text message templates to the carousel.
To Get Started
-
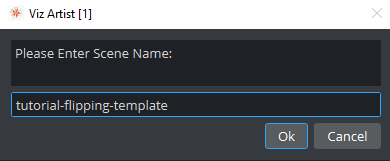
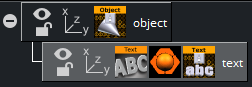
Create a new scene named tutorial-flipping-template.
-
Open the new scene.
To Add a Group
-
Add a new Group to the scene tree.

-
Rename it to object.
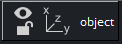
Note: All flipping carousel template scenes must have a root container named object.
To Add the ControlObject Plug-in
-
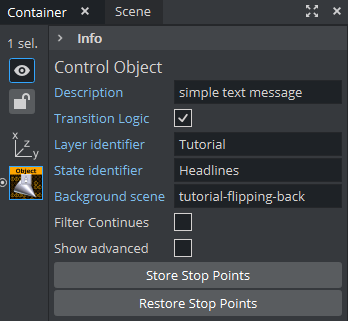
Drag the ControlObject plug-in to the object container (found in Plugins (/Built Ins) → Container Plugins → Control, sorted simply as "Object"). Placing the control plug-in on the root container optimizes the process, as the whole template scene tree is copied when a new template is added, and the root container is the first one to be scanned.

-
In the ControlObject Editor:
-
Enable Transition Logic.
-
Set the Layer identifier to Tutorial. The layer identifier refers to the layer director in the flipping carousel background scene.
Tip: The layer identifier should consist of alphanumeric characters only. For more details, see Global Conventions .
-
Set the State identifier to Headlines. The state identifier refers to the in state stop point.
Tip: The state identifier should consist of alphanumeric characters only. For more details, see Global Conventions .
-
Set the Background scene to tutorial-flipping-back.
-
Set the Description to simple text message. The description is used when selecting templates in Ticker Wizard and Viz Ticker Client.
-
To Add a Font
-
Drag a font to the scene tree, for example Arial-Black, and place it as a subcontainer of object in the scene tree.
-
Rename the new container to text.
-
Open the text container’s Transformation Editor and set the Scaling to X,Y,Z= 0.2.
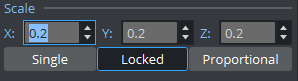
With this size, the text fits the background.
To Add a Material
Add a material, for example orange (R= 255, G= 102, B= 0), to the text container. If no color is added, the font inherits the color of the container holding the Toggle plug-in in the background scene.
To Add the ControlText Plug-in
-
Drag the ControlText plug-in to the text container (found in Plugins (/Built Ins) → Container Plugins → Control, sorted simply as "Text").

-
In the ControlText Editor, make sure that the Expose kerning option is disabled.
-
Disable Use formatted text.
-
Type Hi there! in the Input value text box. The scene tree now has the following appearance:
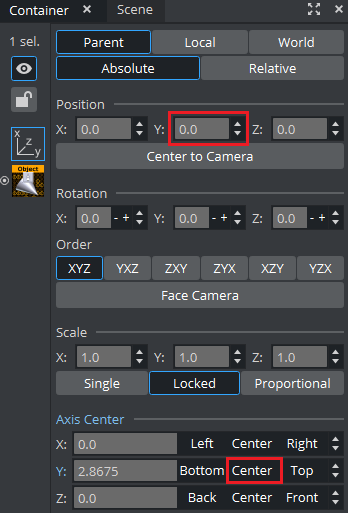
To Fine Tune the Position of the Template
-
Open the object container’s Transformation Editor and set the Axis Center to Y= Center.
When changing the axis center, the position changes too.
-
Reset the Position to Y= 0. These changes put the center of the template scene in the center of the Toggle plug-in placeholder container.
To Save the Scene
The template scene is now finished. Click the Save button.