
Viz Pilot User Guide
Version 8.0 | Published May 30, 2017 ©
Data
The data elements view enables the user to see a list of all data elements or see a filtered view by selecting concept and/or template from the drop-lists.
Data elements are described with name, template name, date of creation and a thumbnail (if the Thumbnail Generator is used).
Data elements are based on templates and can be created by the Director operator; however, in most cases data elements are created using Viz Pilot News, for example by journalists. Data elements are then used to populate the playlist.
Data elements that have been saved as library elements are suffixed with an asterix (*), (see Template Save Dialog Box).
This section contains the following topics:
-
Context Menu
-
To create a data element
-
To edit a data element
-
To delete a data element
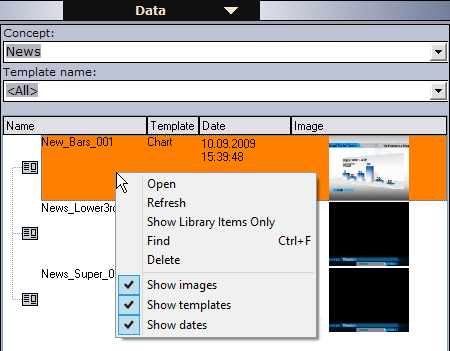
Context Menu
Context menu for the columns:
-
Date: Shows the date and time the data element was created.
-
Template: Shows the template the data element is based on.
-
Auto Width: When enabled (selected), Auto Width expands the columns and distributes them evenly.
-
Enable Sorting: When enabled (selected), Enable Sorting enables the user to sort the list (ascending/descending).
Context menu for the resources:
-
Open: Displays the selected data element in the Work area.
-
Refresh: Refreshes the elements in the Data list.
-
Show Library Items Only: Shows only the elements that have been created in previous versions of Director, and that are stored in the library.
-
Find: Displays the Resource Search.
-
Delete: Deletes the selected data element. A confirmation dialog box appears when trying to delete library elements.
-
Show images: Displays the Image column.
-
Show templates: Displays the Template column.
-
Show dates: Displays the Date column. This column is displayed by default, and the data elements are sorted by date. Clicking the title area of the Date column reverses the sorting.
To create a data element
-
Open a template from the Templates resource list.
-
Fill the template with data (e.g. images, text and so on).
-
Click the Save button.
-
Enter a name in the Template Save Dialog Box and click the Save as new button.
To edit a data element
-
Double-click the data element, or
-
Right-click it, and select Open.
To delete a data element
-
Select the data element and press the Delete button on the keyboard, or
-
Right-click it, and select Delete.