Viz Now LaunchPad
Version 1.2 | Published April 09, 2024 ©
Detailed setup of Nice DCV for Your Live Production
The Production Session
NICE DCV
AWS NICE DCV is a cloud-based remote access solution that enables users to safely access and engage with graphical workloads in the cloud, guaranteeing a smooth and high-performance experience.
You install NICE DCV on the client-machine that accesses the cloud TriCaster Now production.
Client-Side Prerequisites
Supported Operating Systems
-
Windows Server 2022
-
Windows Server 2019
-
Windows Server 2016
-
Windows 11
-
Windows 10.
User Rights
The user must have installation rights to run Nice DCV installer. This can be achieved by assigning local administrator rights to the user, or by explicitly granting the required privileges.
Note: Prior to installation, it is essential to consult the IT customer department to obtain necessary privileges and ensure compliance with all rules and regulations.
Ports
To ensure proper functionality, Nice DCV requires the opening of the following ports:
|
Source |
Destination |
Protocol |
Port |
|
<client network> example: 192.168.0.0/24 |
<Tricaster Now Public IP instance(s) > |
TCP |
8443 |
|
<client network> example: 192.168.0.0/24 |
<Tricaster Now Public IP instance (s)> |
UDP |
8443 |
Installation
-
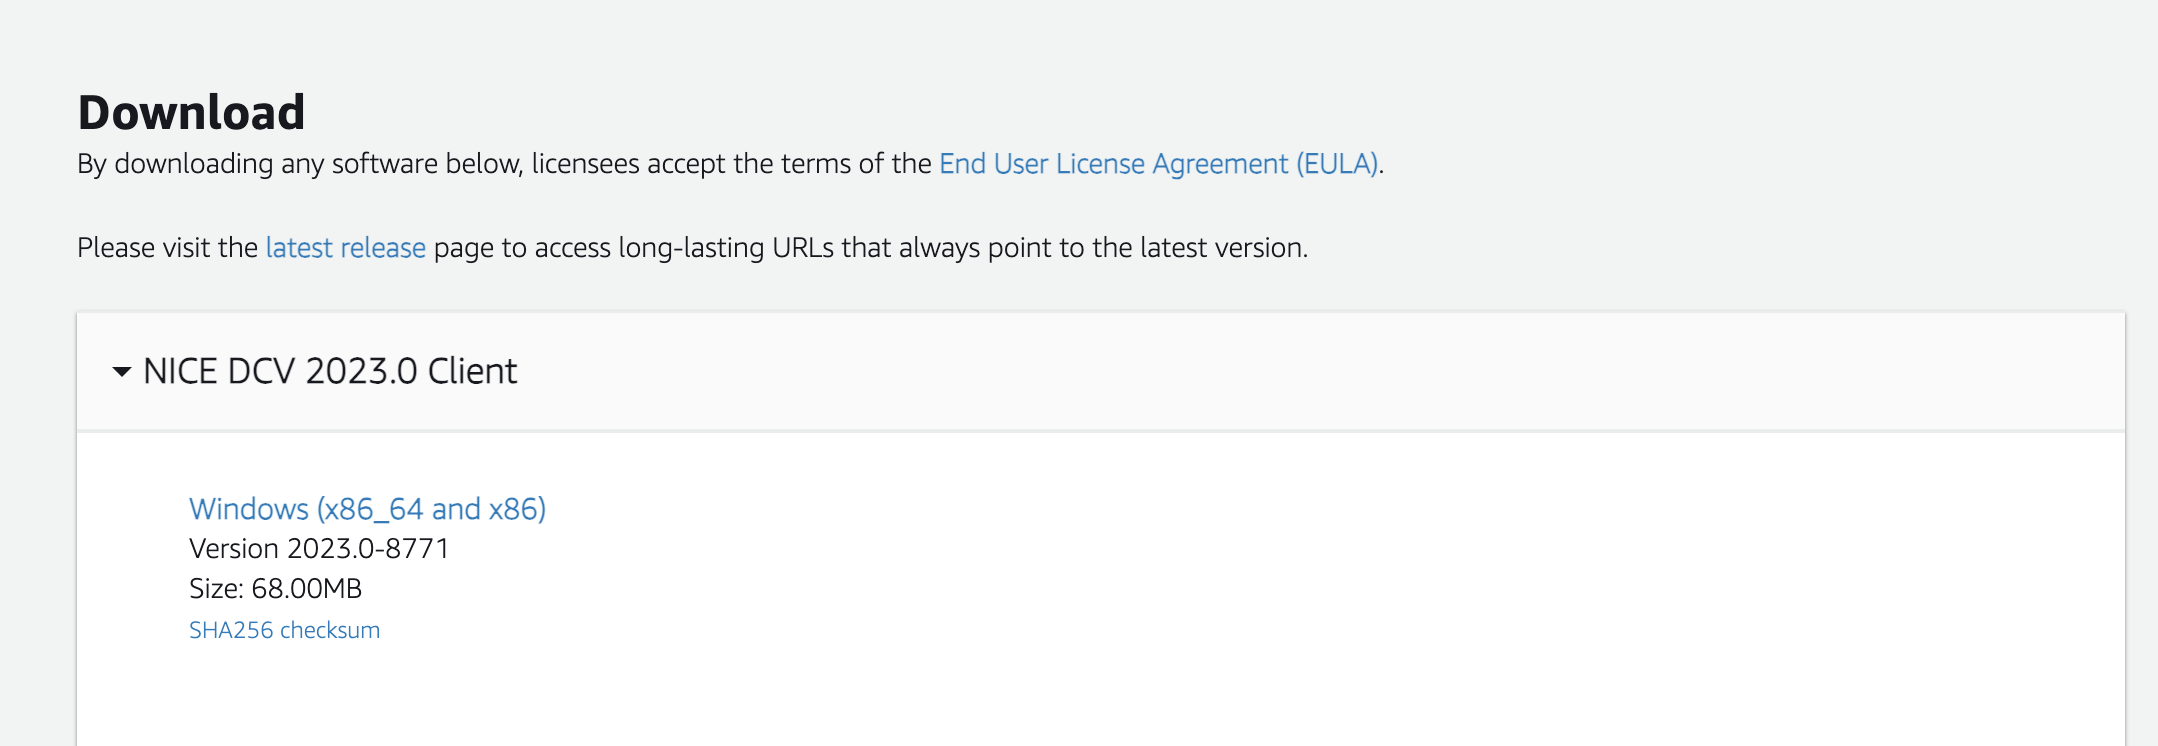
Find and download the latest version of Nice DCV client in https://download.nice-dcv.com/. The latest version can be found in the session Nice DCV <version> Client as shown below:
-
Run the installer that was downloaded.
-
On the Welcome screen, choose Next.
-
On the End-User License Agreement screen, read the license agreement. If you accept the terms, select the I accept the terms in the License Agreement check box. Choose Next.
-
On the Destination Folder screen, choose Next to keep the default installation folder. To install the client in a different folder, change the destination path, and then choose Next.
-
On the Drivers Selection screen, select USB device remotization . Choose Will be installed on local hard drive and then choose Next.
-
On the Ready to install screen, choose Install.
Connecting to TriCaster Now using NICE DCV
The system will automatically launch the NICE DCV PCoIP application.
-
Open the NICE DCV window and click Trust and Connect if prompted.
Connection protocol
By default, the NICE DCV client uses the QUIC protocol (based on UDP) for data transport when available.
Note: QUIC is only supported for direct client-server communication where there are no intermediate proxies, gateways or load balancers.
-
QUIC (Quick UDP Internet Connection) is a encrypted transport layer network protocol that was designed to make HTTP traffic more secure, efficient, and faster.
-
QUIC allows Nice DCV to provide a better performance and response when accessing TriCaster Now instance(s) using all the best qualities of TCP connections and TLS encryption.
If QUIC is unavailable, the client uses the WebSocket protocol (based on TCP). This option is always available and no configuration is needed client-side.
To enable a control surface in NICE DCV
-
Make sure that the control surface is connected in the USB port of your computer.
-
Launch Viz Now LaunchPad.
-
Open a TriCaster session.
-
After TriCaster session is opened, choose the Settings icon located in the upper left of the window in NICE DCV Client.

-
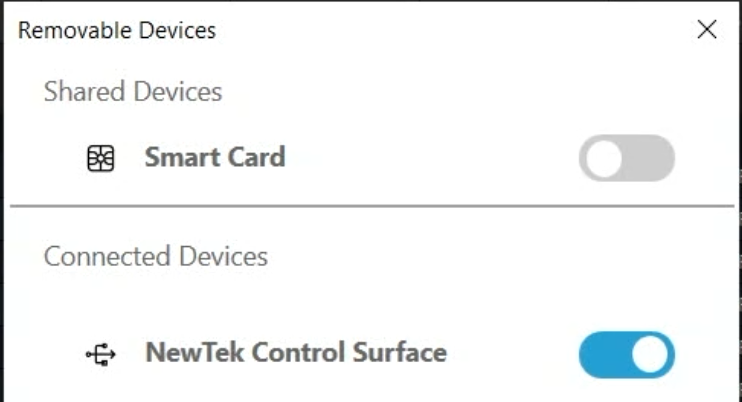
Select Removable Devices from the drop-down menu.
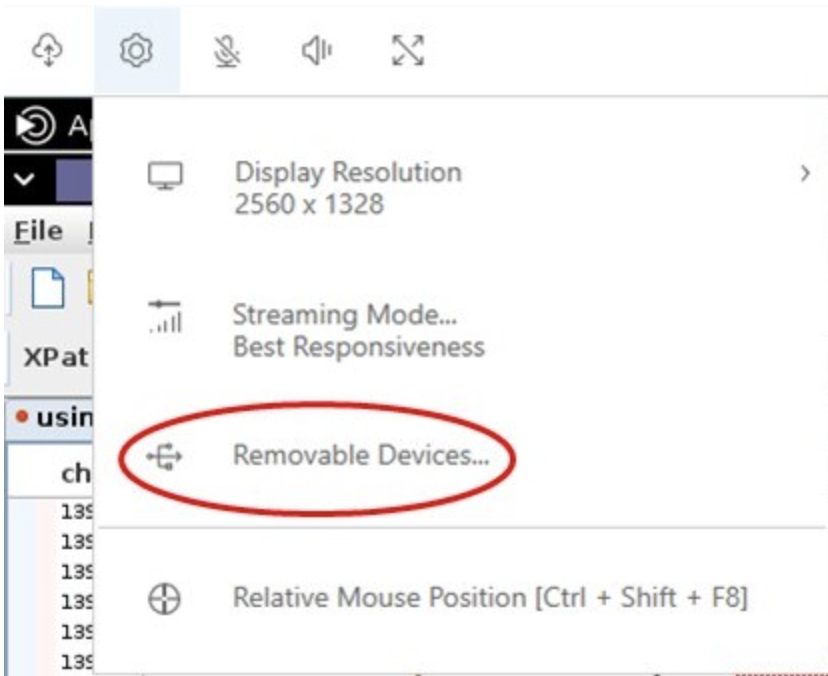
-
Activate the slider next to the USB device in the list
Monitors and Resolution Configuration
Note: When changing monitor configuration exit from TriCaster Now application back to windows desktop.
To change monitor resolution
NICE DCV automatically adapts the display resolution of the TriCaster Now instance to match the current size of the client. When the client window is resized, NICE DCV requests the TriCaster Now instance to change its display resolution to a size that fits the client window.
-
Click on the Settings icon from the menu at the top.
-
Select Display Resolution from the menu.
-
Select your preferred resolution from the drop-down menu.
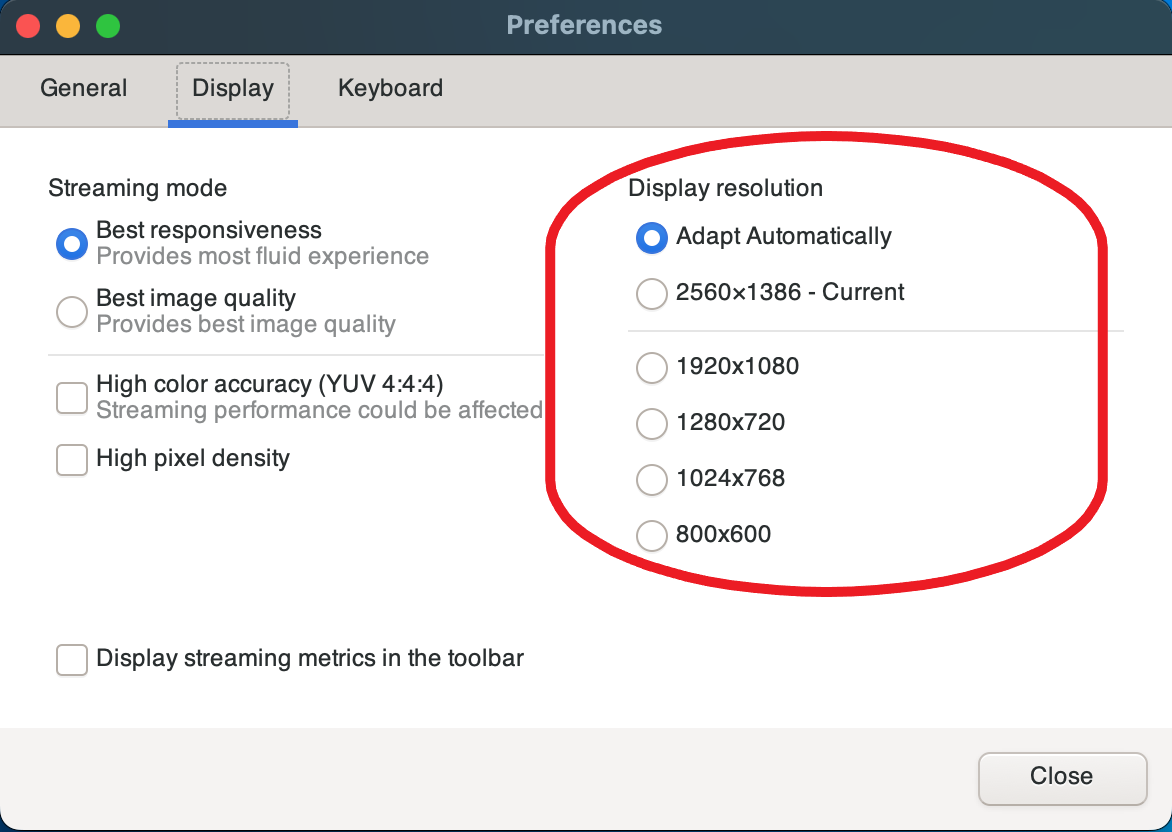
As shown above, a user can also choose a fixed resolution on the server, which does not change when the client window is resized. -
Select the Display resolution menu and specify the desired resolution.
For re-enabling automatic resize, you can select Adapt automatically.
Multiple Monitors and Display Layout
With NICE DCV, you can extend full screen resolution across a single monitor, a group of chosen monitors, or all of the available monitors.
You can also customize the display layout of a NICE DCV session.
The default setting for clients connecting to the session is specified in the display layout. You can explicitly override the defaults in your NICE DCV client or employ the default operating system display settings.
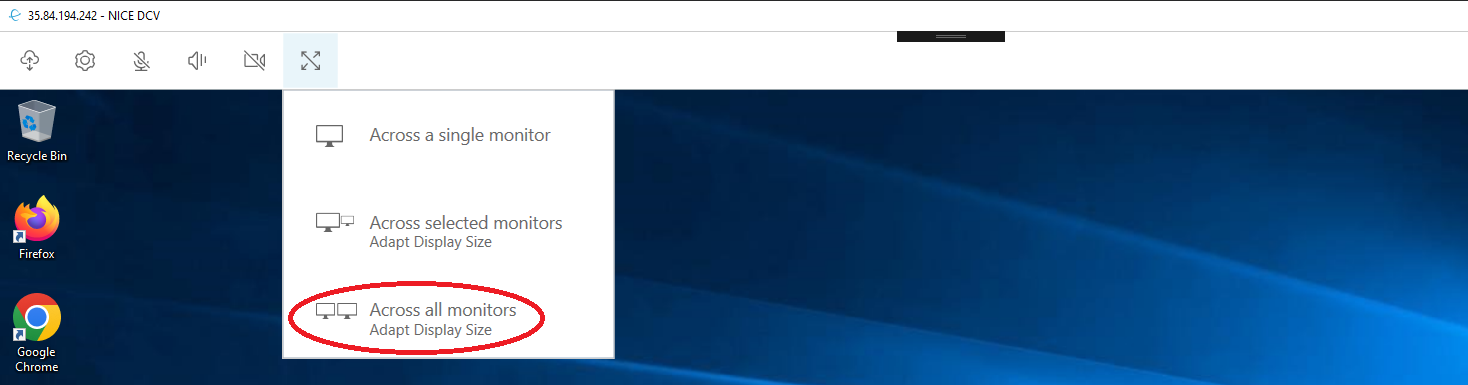
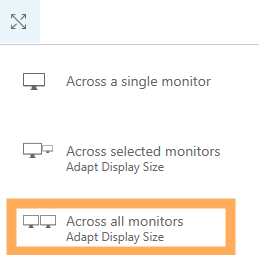
To extend full-screen across all monitors
-
Go to the toolbar at the top of the window
-
Choose the Full Screen icon
-
Select Across all monitors from the drop-down menu
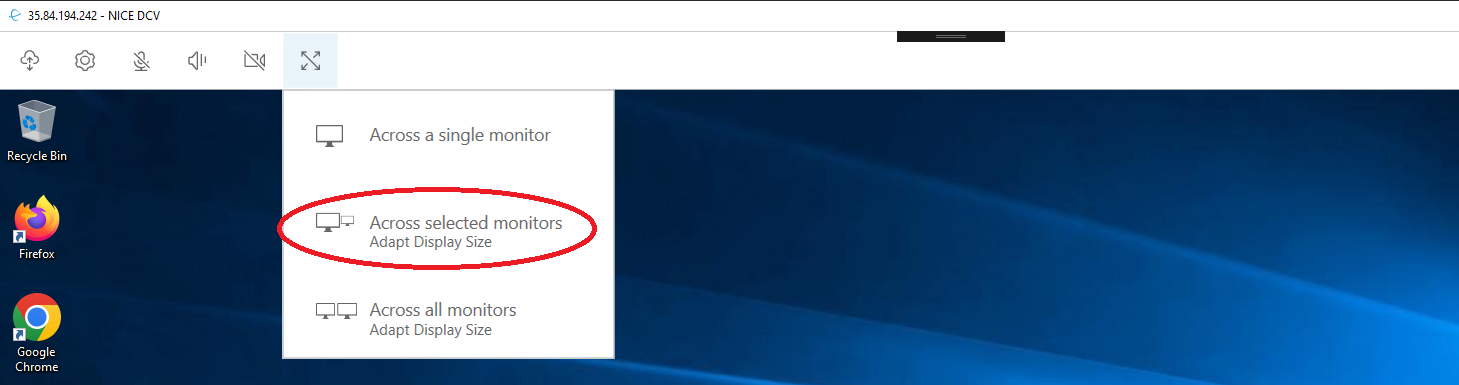
To extend full-screen across selected monitors
-
Go to the top menu
-
Select the Full Screen icon
-
Select Across selected monitors from the drop down menu
-
Select which monitors you want Nice DCV to be displayed full screen.
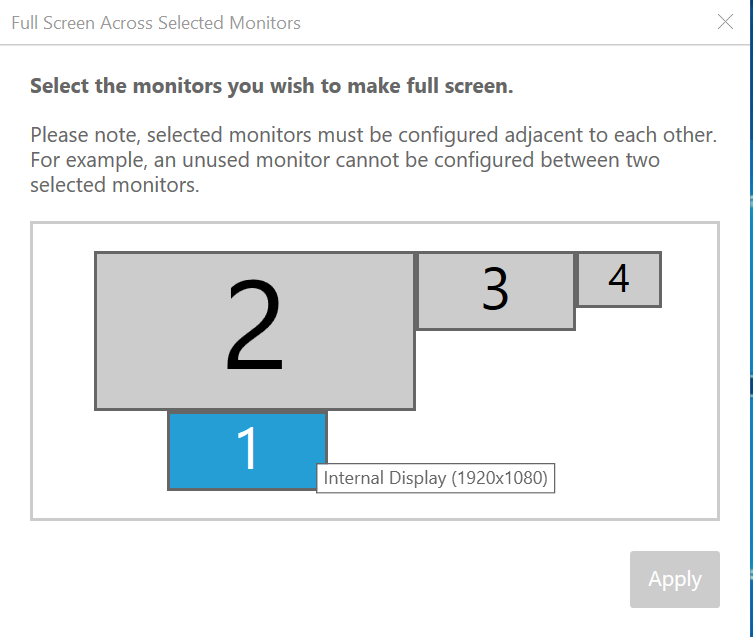
-
Click Apply.
Troubleshooting
Working around the ALT + number pad keyboard issue
There are two potential scenarios to address:
Scenario 1: Controlling the application
If you are experiencing issues with the application not recognizing the ALT + Numlock number command, you can change the shortcuts to CTRL + NumPad.
To change shortcuts
-
Launch the application through AWS NICE DCV using PCoIP.
-
Navigate to the application's Settings or Preferences menu.
-
Look for the keyboard or shortcut configuration options.
-
Locate the command or function that you want to use with the ALT + Numlock number combination.
-
Edit the shortcut and change it to CTRL + NumPad. Ensure that the new shortcut is not conflicting with any other existing shortcuts.
-
Save and Close the Settings/Preferences menu.
You should now be able to control the application using CTRL + NumPad instead of ALT + Numlock number.
Scenario 2: Inputting text
To input text into an edit area
-
Ensure that NumPad lock is enabled on your keyboard. This allows symbol injection to work correctly.
-
Focus on the application's input text area where you want to enter the text.
-
Press ALT to place focus on the menu of the Windows application.
-
Once the focus is active, input the symbol you want to inject using the ALT + Unicode combination.
For example, to input the symbol € (Euro), press and hold ALT and then enter the Unicode value for Euro, ALT + 0128, using the number pad. -
The symbol should now be correctly injected into the text area of the remote application.
Remember to adjust the application shortcuts or use the ALT + Unicode combination based on the specific scenario you are encountering.
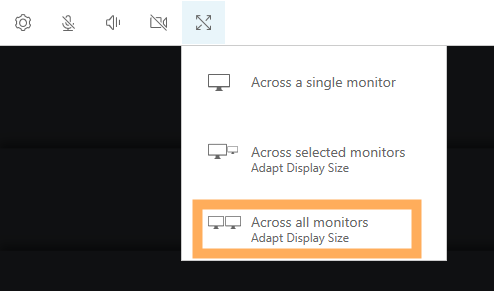
Issues with Monitors
To force monitors to display all elements on the interface
When connecting with NICE DCV, you may encounter display issues where certain elements of the application UI are not shown correctly or are hidden.
-
Launch the app, and connect through NICE DCV.
-
At initial connection, if the display layout it is configured to a single monitor, select Across all monitors Adapt Display Size to set the multiple monitors.
-
Verify display elements.
-
Check if all elements of the UI are now displayed correctly.
-
Ensure that no elements are hidden or missing.
-
-
If some element are hidden or missing (see example below)
Close the application and return to the Windows Desktop.
-
Restart the TriCaster.
-
Back on the Windows desktop, again try selecting Across all monitors Adapt Display Size.
-
Relaunch the TriCaster Now application.
These steps help to refresh the display and resolves any persistent display issues.
Note: If the issue persists after attempting these steps, please contact our Support team for further assistance.
NICE DCV Logs
Use the NICE DCV client log files to identify and troubleshoot problems with your NICE DCV client.
File location
Logs are not enabled by default on Windows clients. Once enabled, the log files are stored in the following location on your NICE DCV client machine:
Windows client > C:\ProgramData\client.log
To enable NICE DCV to store log files on a Windows client
-
Open a command prompt window, clicking in Run and typing cmd.
-
Navigate to the folder where the dcvviewer.exe file is located.
(By default cd\ C:\Program Files (x86)\NICE\DCV\Client\bin\) -
Launch NICE DCV client using the command line interface:
dcvviewer --log-level info --log-file-name C:/ProgramData/client.log