This section describes how to operate Story Recorder (SR) during a production, covering two workflows: story clip production, and show clip production with pause and retake.
For an overview of Story Recorder and its workflows, see section Story Recorder.
Story Recorder can also write a Mosart EDL file. An administrator configures that output, and it produces files for inspection rather than anything you drive from the Story Recorder panel. See Mosart EDL Setup.
Managing a Story Recorder Session
Enable/disable Story Recorder mode
You can enable or disable Story Recorder mode using any of these methods:
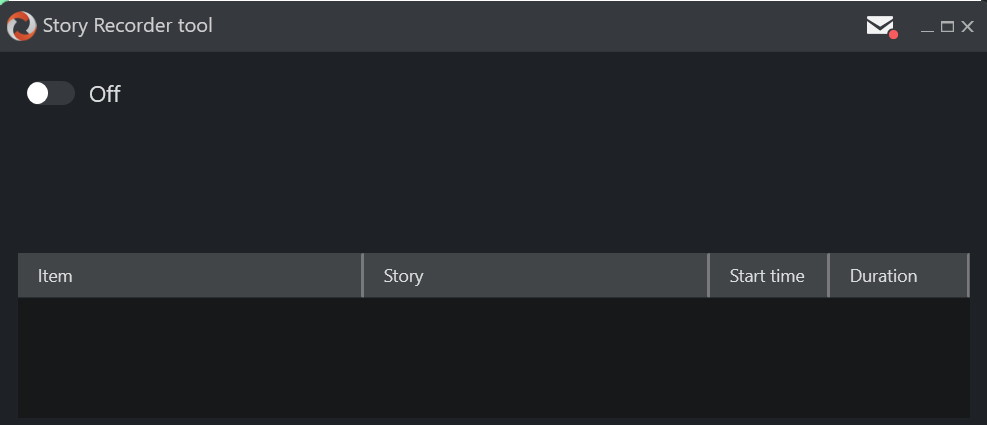
Story Recorder panel toggle: in the Viz Mosart UI, the On/Off switch at the top of the menu bar selection View > Floating windows > Story Recorder tool.
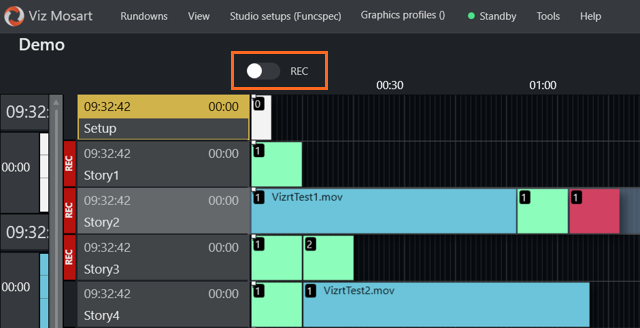
Timeline toolbar toggle: When the rundown contains stories that have been marked in the NRCS for recording, an SR toggle button (REC) appears directly in the Viz Mosart UI timeline toolbar:
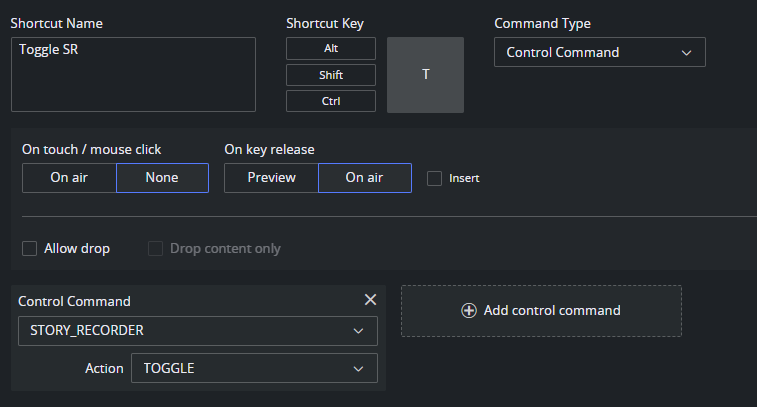
Keyboard shortcut: A configured keyboard shortcut can toggle, enable, or disable SR mode.
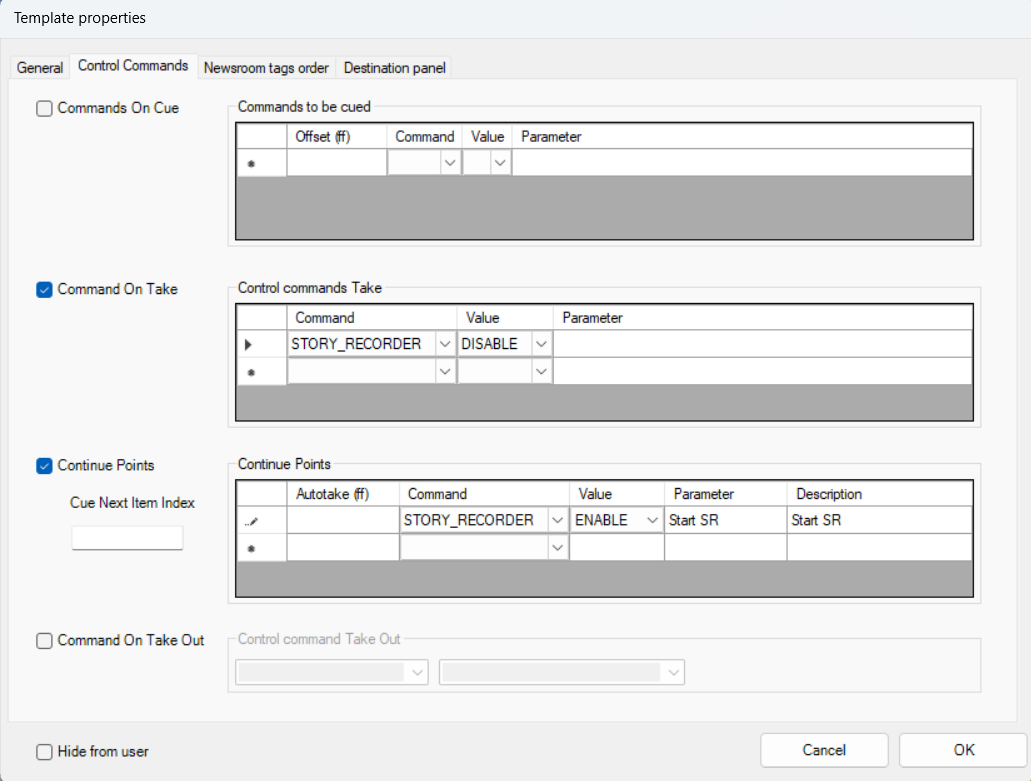
Template control command: the
STORY_RECORDERcontrol command on a template can automatically toggle, enable, or disable SR mode when the template is taken.
All four methods produce the same result. The current recording status is shown in both the Timeline toolbar and the Story Recorder panel:
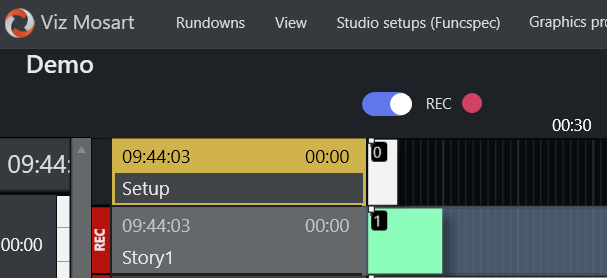
Pale red REC indicator: Story Recorder mode in the toolbar above the Timeline indicates that story recording is enabled, but recording has not yet started.
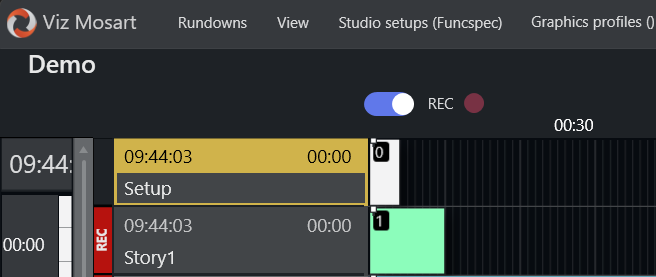
Bright red REC blinking indicator: Story Recorder is actively recording.
In the Story Recorder panel, the REC button blinks during recording.

The Timeline toolbar showing SR mode enabled (REC) and recording.
Info:
The Story Recorder panel is required for the show clip production workflow (pause, retake, broadcast).
For the story clip production workflow, the panel is not necessary.
When there are stories tagged for recording, the SR toggle and status are shown directly in the Viz Mosart timeline, together with a red REC indicator alongside the tagged stories (for example, Story1 above).
Story Recorder panel
The Story Recorder panel provides a real-time view of the EDL as it is being built during a recording session. It displays each story item and story as they are recorded, together with start times, durations, and recording status. The panel is primarily used with workflows that produce an EDL output (Vantage or Mosart format), where the operator can pause the timeline, select retake points, and resume recording. At the end of the show, the completed EDL can be broadcast to the Vantage transcoder for stitching into a final clip, or exported as a Mosart EDL file.
To display Story Recorder Panel, follow these steps:
With Viz Mosart running, from the menu bar select View > Floating windows > Story Recorder tool.
Position the Story Recorder window on your workspace.
(You can also place this window on a second screen.)(Optional) Save this workspace setup for future use:
View > Save as new workspace and enter a unique name.
Once Story Recorder mode is enabled, all media fed to PGM is continuously recorded to the video server.
Note: Continuous recording may consume considerable disk space on the video server. See Troubleshooting and Housekeeping for retention settings.
From this point on, any story items taken on air (using the standard Take Next, default F12) are recorded and displayed in the Story Recorder panel, item by item.
Info: The video server records continuously from the moment Story Recorder mode is enabled - there is no start and stopping recording at each story or item boundary. Clips are cut from this continuous recording and EDLs are generated using the frame-accurate timecodes captured by Story Recorder. A rendering or transcoding step is always required to produce the final clips, regardless of workflow.
Tip: If Story Recorder fails to start up, refer to section Troubleshooting and Housekeeping.
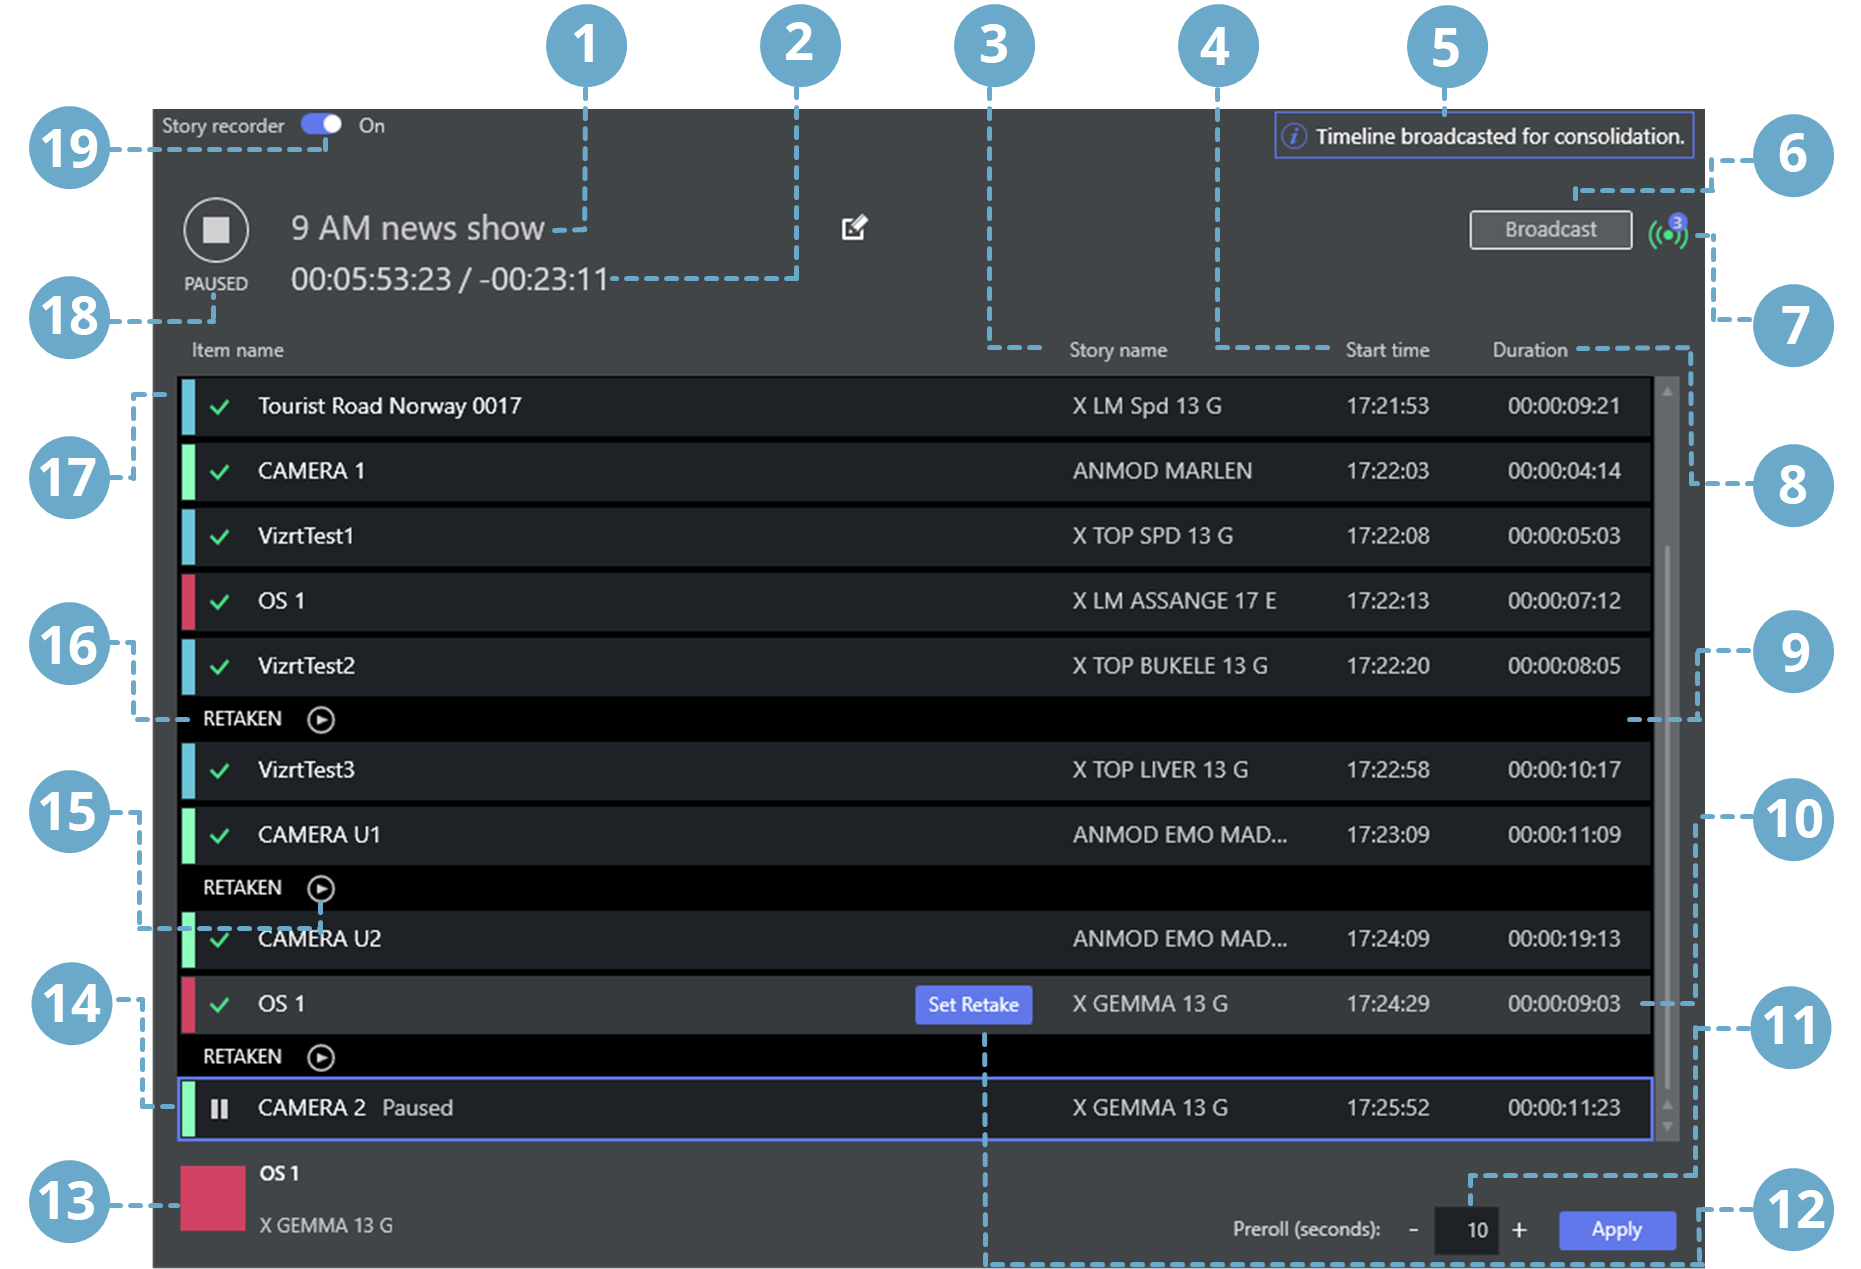
Feature | Explanation |
|---|---|
1 | Name of the final clip show and the associated EDL files: By default, this is the rundown name or provided from NRCS. The user can edit as required. |
2 | Recording Time/ Show Countdown Recording Time: When timeline is running, this is continuously growing, equal to the sum of the already recorded sections plus the duration of the current recording. When timeline is paused, this is static, equal to the sum of the recordings prior to the selected retake point. Show Countdown: Displays the difference between the planned duration as defined in NRCS and the Recording Time. |
3 | Story name: The story slug, as provided in the NRCS. |
4 | Start time: Timestamp when the item was taken to PGM (wall-time) HH:MM:SS . |
5 | Notification: Operational information and warning/errors. |
6 | Broadcast: Send the stitched show to one or several pre-configured destinations for transcoding (consolidation). |
7 | Broadcast count: Number of successful broadcasts. |
8 | Duration: Story item onair time in HH:MM:SS:FF (frame count only shown after the item is paused/ recorded). |
9 | Separator: Indicates a retake. |
10 | Selected row: The row with focus is colored gray-on-black. |
11 | Pre-roll duration: Pre-roll duration adjustment (seconds). Press Apply to set a non-default (10 seconds) value. |
12 | Retake point selector: Arbitrary retake point. This button is displayed when the row is selected and when clicked, it changes the retake point. |
13 | Pause indicator: Displays which story item is currently paused |
14 | Blue border: Retake point indicator. The item that will be taken after pause has a blue border. |
15 | Cut review player: Play button is displayed when a snippet clip around the cut point becomes available for review. |
16 | Retake marker: Indicates where an item has been retaken. |
17 | Item name: The item name, that corresponds to a Viz Mosart template and variant |
18 | Record | Pause: Story recorder record and pause button and status indicator. |
19 | Story Recorder On | Off switch. |
Show Clip Production with Pause and Retake
In this Show workflow, the entire show is recorded and a .tsedl EDL file is broadcast to a Vantage transcoder, which stitches all recorded segments into a single final clip. The operator can pause, make corrections, and resume recording from a selected retake point.
The following diagram illustrates common recording scenarios. Blue items are recorded segments; orange items indicate retake points.
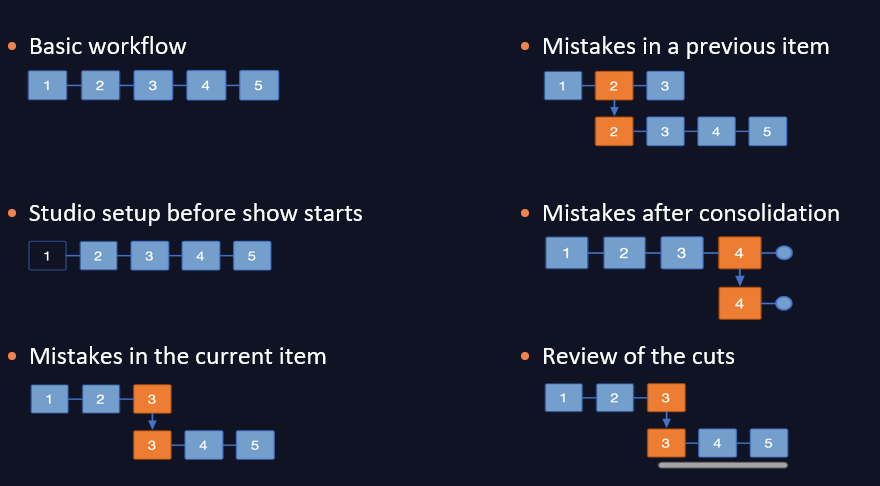
The sections below describe three common use cases for supporting error-free production and recording of a Viz Mosart-driven show.
Recording a Show as a Single Clip
This mode assumes that the entire show was made error-free and Story Recorder has captured the required scheduled performance.Pause-Fix-Retake Mode
An improvement has been identified, and the show is rolled-back to a chosen point, to take again.Broadcasting an Alternative Version of the Show
Sending the recorded stories to a publishing point, either before the show is complete, or with additional stories appended later.
Tip: For a quick guide to what is displayed in Story Recorder, refer back to the illustration The Story Recorder Panel.
Recording a Show as a Single Clip
This mode assumes that the entire show was made error-free and Story Recorder has captured the required scheduled production.
To record a show as a single clip
Ensure the rundown containing the show's story rows is loaded in Viz Mosart.
If the rundown begins with a Break template for initializing equipment, make sure this entire story is executed before enabling Story Recorded mode.
From the Story Recorder panel, switch on Story Recorder mode (described above).
After a few seconds, the REC button is red, indicating the system is ready to record your show.If Step 2 above was performed, then execute Take Next to continue with the next story item in the show (this will be the first recorded story item).
Otherwise begin the show by taking at the first story item of the show.
For each story item taken, a row is presented in the Story Recorder panel, the most recent indicated with Recording...When the show is over, an instruction in the last template of the show automatically pauses the recording (see section Automatic Pause at Show End of topic Story Recorder Mode in the Viz Mosart Administrator Guide).
If an automatic pause has not been set, click the PAUSE button in Story Recorder panel or the Pause keyboard shortcut.(Optional) Provide an alternative name for the final clip by changing the pre-populated field in the SR panel:

[IMAGE PLACEHOLDER] The editable final clip name field at the top of the Story Recorder panel.

Info: Viz Mosart pre-fills this field from the NRCS when a name is configured there, and otherwise from the rundown name. Anything you type here overrides it. See Show Clip Production Setup for how the name is configured.
Click the Broadcast button.
A confirmation message and counter indicate that the clip has been sent for stitching.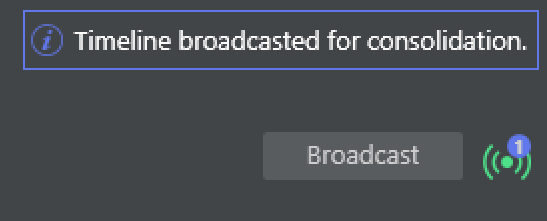
Info: The counter indicates the number of EDLs currently being stitched on the EDL transcoder.
Each time you click Broadcast, a new task is sent. See also Broadcasting an Alternative Version of the Show below.
If you accidentally order the same stitching operation multiple times (by pressing Broadcast more than once for your required recording), you can cancel the transcoding job by reviewing the job queue on the transcoder. Your System Administrator can assist with this task.
The counter is cumulative per recording session, and does not decrease once the stitching job has finished or been cancelled on the EDL transcoder side.
Disable Story Recorder with the On/Off switch at the top left of the panel.
Pause-Fix-Retake Mode
The standard use of Story Recorder is where you wish to pause an ongoing show recording, make a correction to the production, then resume from the pause.
To record a show with pause-fix-retake
Initiate recording as described in the first 4 steps of To record a show as a single clip above.
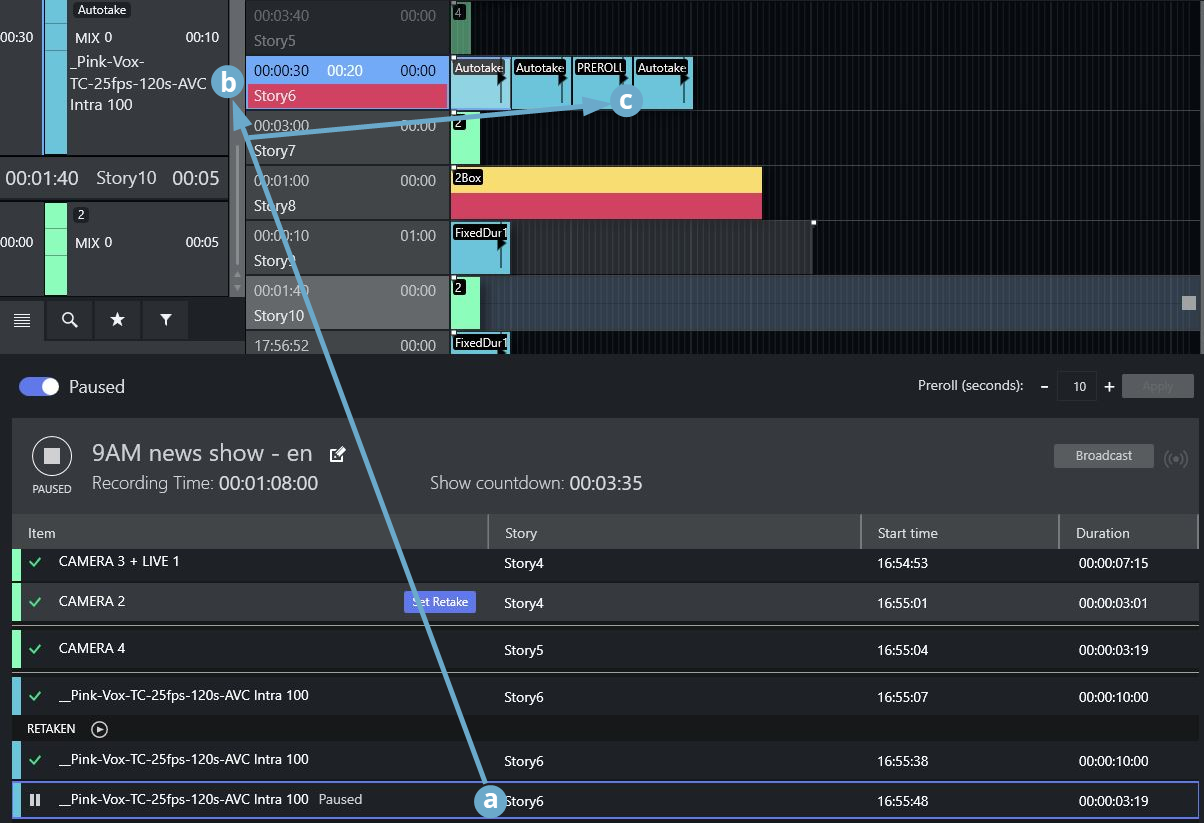
Press PAUSE to interrupt recording as required. Refer to the screenshot below:
In the Story Recorder panel, the current story item is marked as Paused (a).
In Rundown view above the Story Recorder panel, the corresponding rundown story title is also blue (b).
In the Rundown view, on the story row, a PREROLL template (c) is automatically inserted before the paused story item.
Make required changes and prepare to recommence recording, by clicking the Story Recorder panel icon, PAUSED srP.png .
A countdown timer cues for retake and recording resumes from the break point.
Continue as above till the last story line, where an information text warns that the show recording will soon be complete.
[IMAGE PLACEHOLDER] The PAUSED icon in the Story Recorder panel, with its countdown.
Reviewing the Cut
(Optional) After resuming from a pause, a snippet of the previous cut becomes available for review. The snippet appears after the configured Snippet generation delay, 15 seconds by default, and runs for the configured Snippet length, 5 seconds by default. See Show Clip Production Setup to change either setting.
Click the RETAKEN Play icon to review the snippet.
When the show is over, an instruction in the last template of the show automatically pauses the recording if so configured
(see section Automatic Pause at end of Show under the Operational Examples > Story Recorder Setup of the Mosart Administrator Guide).
Otherwise, click the PAUSE icon in the Story Recorder panel or the Pause keyboard shortcut.(Optional) provide an alternative name for the final clip by changing the pre-populated field in the Story Recorder panel:
[IMAGE PLACEHOLDER] The editable final clip name field at the top of the Story Recorder panel.

Info: Viz Mosart pre-fills this field from the NRCS when a name is configured there, and otherwise from the rundown name. Anything you type here overrides it. See Show Clip Production Setup for how the name is configured.
Click the Broadcast button.
A confirmation message and counter indicate that the clip has been sent for stitching (consolidation).
Info: The counter indicates the number of EDLs currently being stitched on the EDL transcoder.
Each time you click Broadcast, a new task is sent. See also Broadcasting an Alternative Version of the Show below.
If you accidentally order the same stitching operation multiple times (by pressing Broadcast more than once for your required recording), you can cancel the transcoding job by reviewing the job queue on the transcoder. Your System Administrator can assist with this task.
The counter is cumulative per recording session, and does not decrease once the stitching job has finished or been cancelled on the EDL transcoder side.
Rolling Back in Time at Retake
The smallest rollback is a Viz Mosart primary story item. A story row usually comprises several story items, each item defined with a Viz Mosart primary template.
So for example, if your running show is executing item three of the four primary items that make up the story, then the pause will cause a rollback to the start of item three.
A retake point is always at the start of a primary item, regardless of where the pause was made.

Note: Currently, it is not possible to replace a specific recorded story item. All the recorded story items after the retake point, including the story item set as retake point, must be re-done once the show is restarted after a pause.
Pre-roll
When you pause a story, Viz Mosart automatically inserts a pre-roll event in the story row, before your paused story item.
The pre-roll gives the equipment time to return to a known state (camera positions, graphics, media clips, fader levels), and it cues the talent to begin again. Your administrator sets the minimum duration, usually 10 to 15 seconds, long enough for the video server to be ready to record again. See Show Clip Production Setup for how that minimum is chosen.
You can configure the pre-roll time from the Story Recorder panel:

Broadcasting an Alternative Version of the Show
Broadcasting means auto-creation of a show-level EDL, from the list of story rows in the Story Recorder panel. This EDL is then fed to the EDL transcoder (Vantage) watch folder. The transcoder picks up the EDL file and initiates the job of stitching the clips (that represent the story rows), into a single, show clip. This single clip is used for playout.
You can broadcast at any time, during a paused recording, and then continue recording.
This can for example be when producing a trailer, a second language variant of the show, or when in the afternoon you want only to change the last couple of stories from the morning's recording.Similarly, you can append additional rundown (story) rows to a completed, paused show.
Use the Tools > Arrange rundowns menu, as described in the topic Arrange Rundowns.
In these scenarios, you must always create a Retake point in the story before the change or addition.
Story Clip Production and Publishing
In this workflow, stories marked for recording in the NRCS are individually recorded and produced as clips, either during a live broadcast or in an offline session. Clip production is triggered automatically - by a story boundary or by disabling Story Recorder mode. The recordings are then submitted to the configured output (TriCaster export or Mimir render job).
Info: Even when recording a single story, the clip must still be rendered from the continuous recording. The story clip is not a direct capture, it is cut using the frame-accurate in and out timecodes, subsequently rendered by the configured output.
The sections below describe three common use cases for story clip production:
Producing clips during a live broadcast
Clips are produced automatically at each story boundary while the show runs live.Recording a single story
A single story is recorded and clip production is triggered by disabling Story Recorder mode.Offline recording with stories back-to-back
Multiple stories are recorded in sequence, with the operator controlling the pace between stories using a template control command.
Stories Marked for Recording
For the story clip production workflow, stories must be tagged for recording in the NRCS before the show. Any NRCS that can provide the required metadata fields on the MOS story object can be used with this workflow. Saga and Showmaker offer built-in integration; other NRCS systems can be configured via Newsroom Settings field mapping.
See Story Recorder Setup for the NRCS metadata requirements and configuration details.
Here are how stories can be marked for recording in Showmaker:
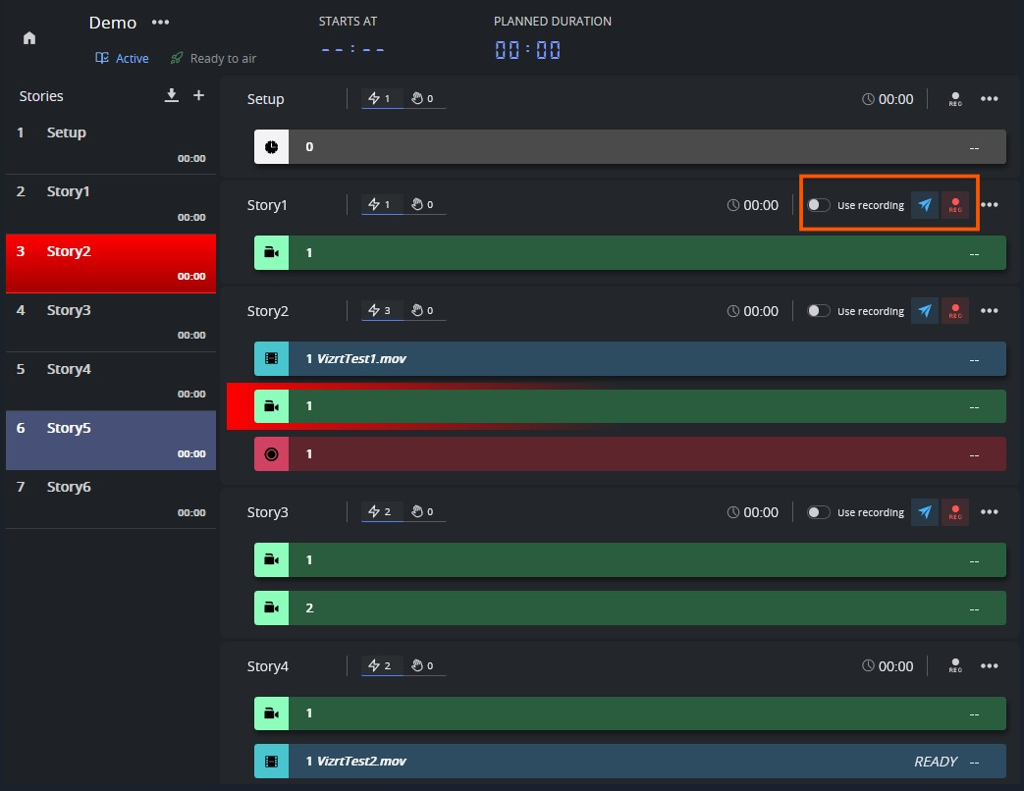
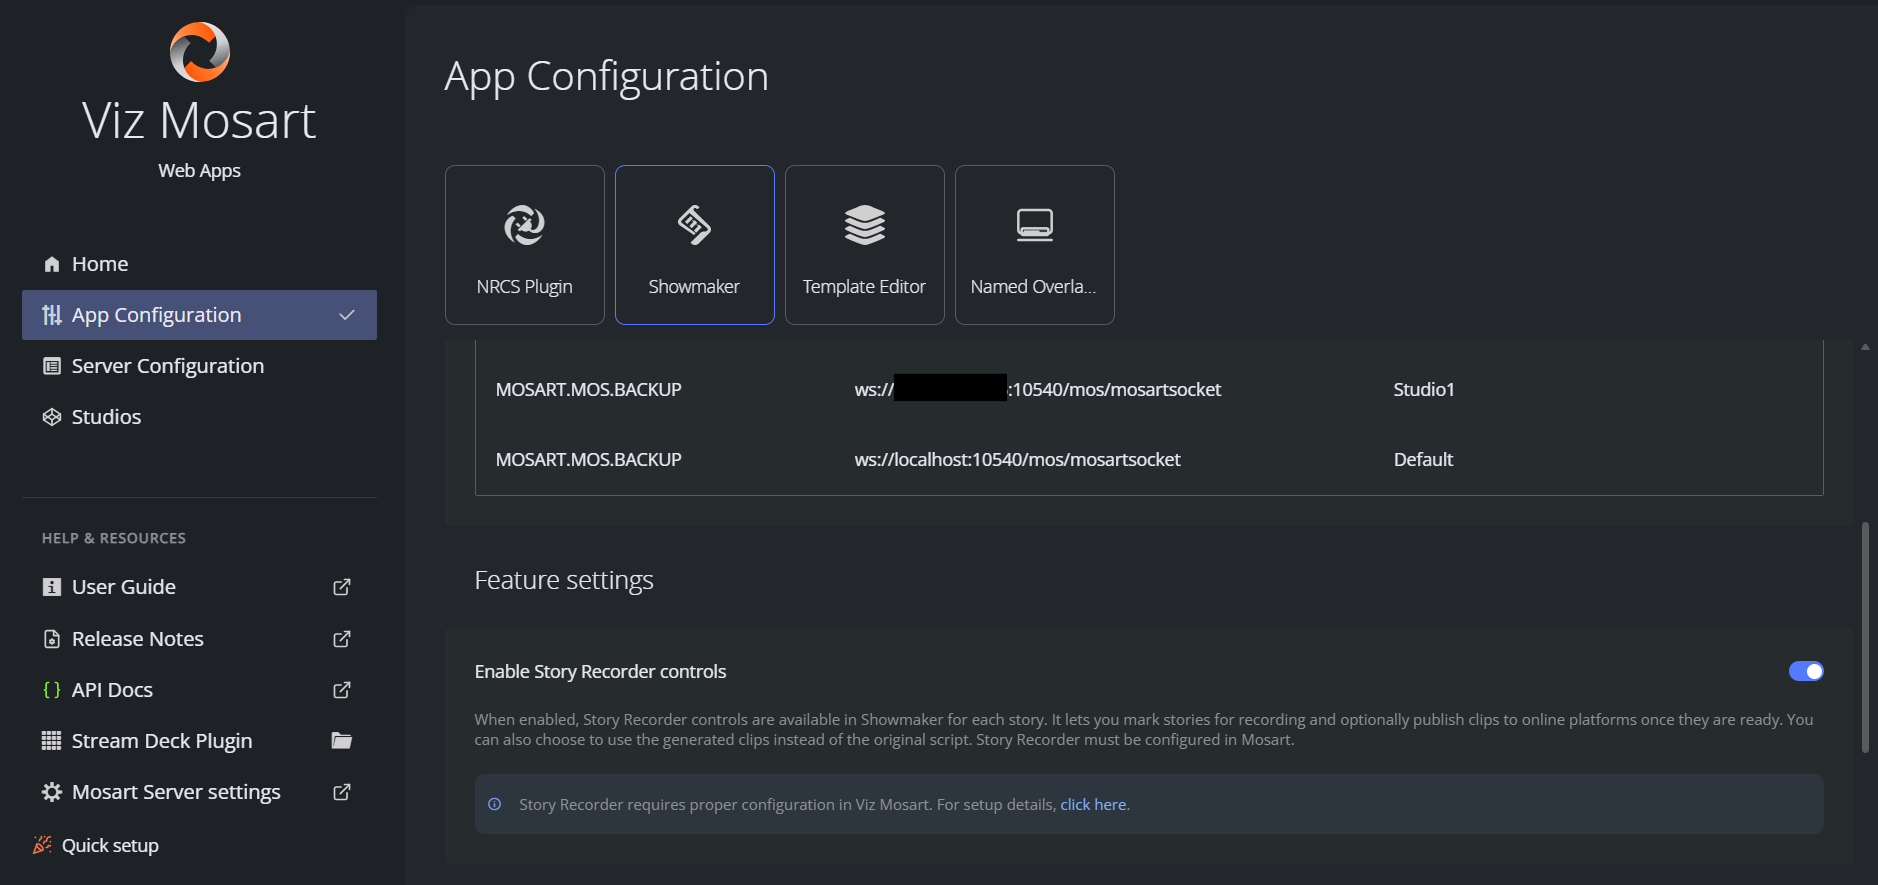
Note: To have these Story Recorder options on a story in Showmaker, you need to enable Story Recorder controls from Mosart Web Config Tool > App Configuration > Showmaker.
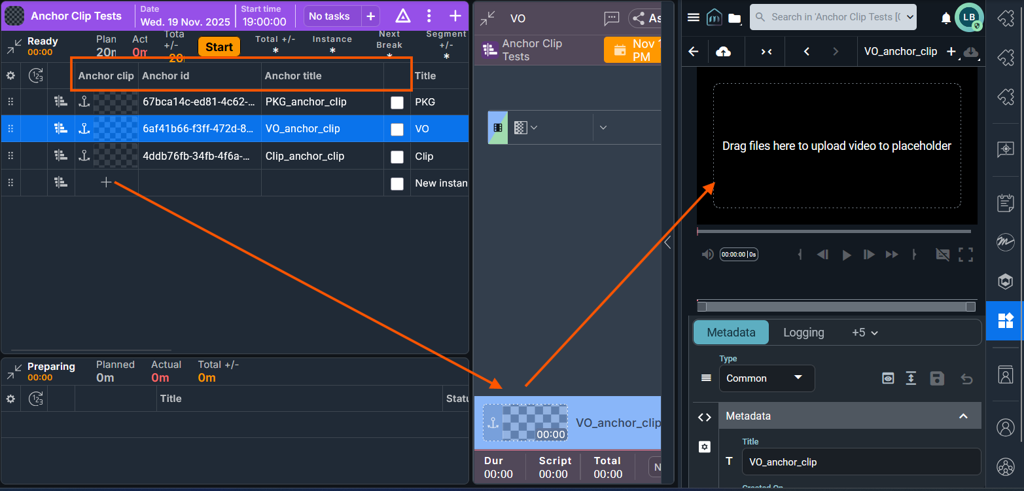
And here is a story in Saga with Anchor clip placeholders (left), each linked to a Mimir clip placeholder (right), ready to receive recorded clips from Story Recorder:
When a rundown containing tagged stories is loaded in Viz Mosart, these stories are shown with a REC indicator in the main timeline view. The Story Recorder mode toggle at the top of the timeline also indicates whether there are stories to be recorded.
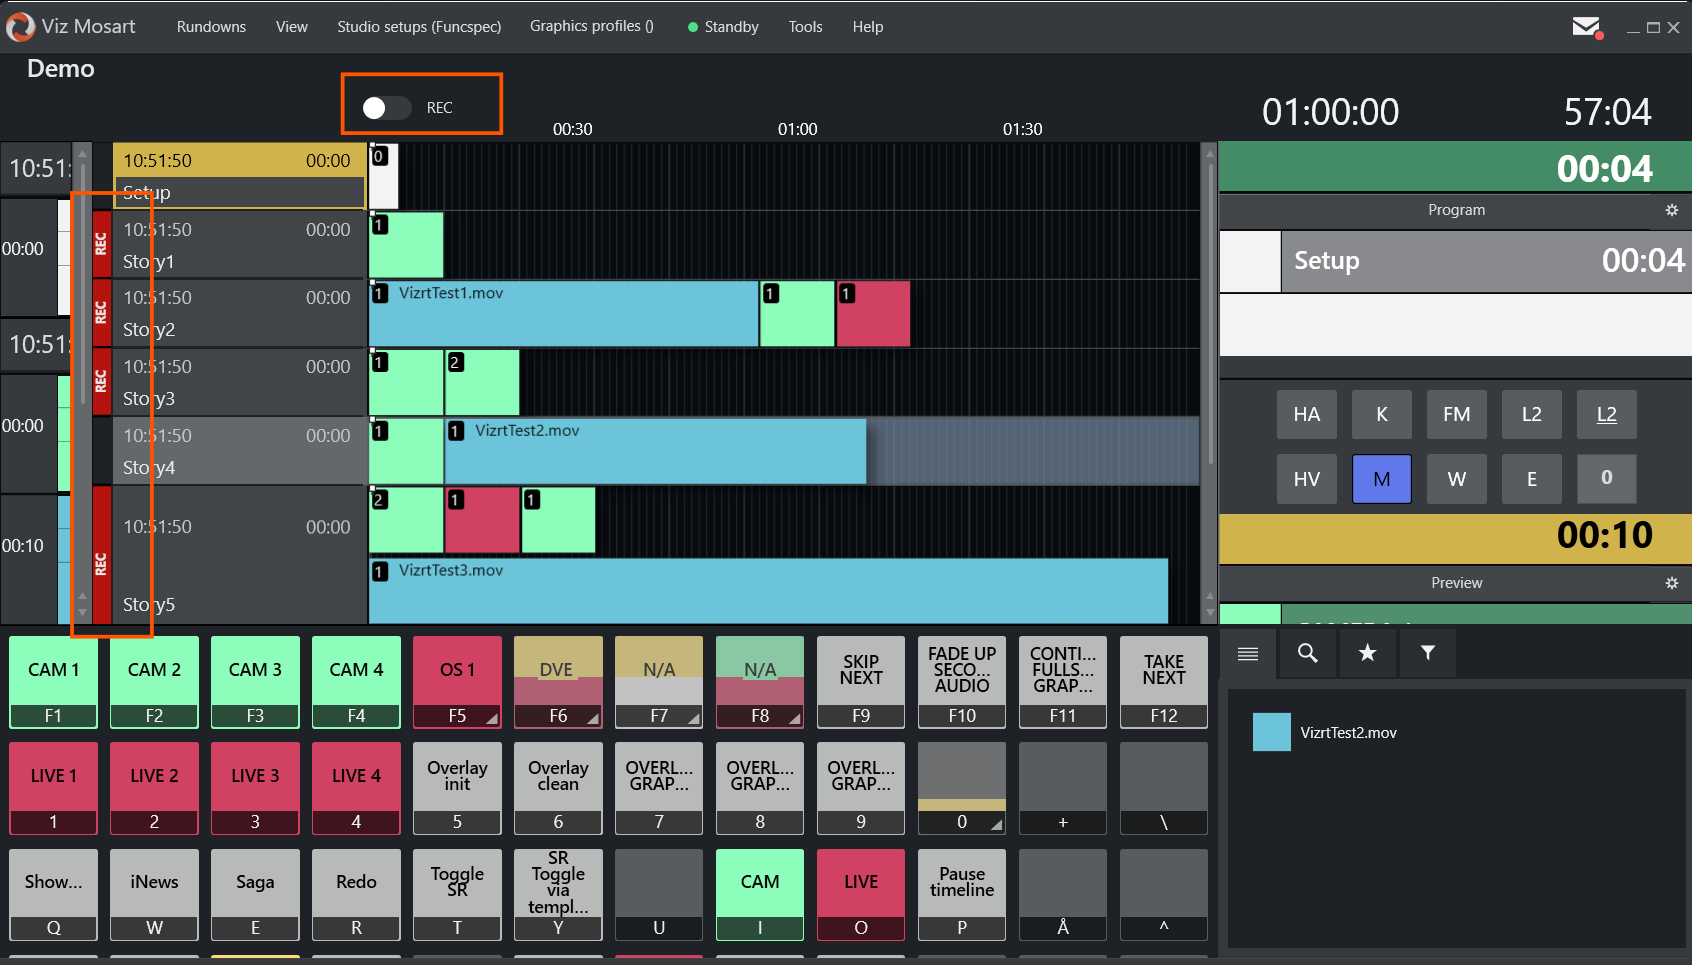
The REC indicators means that the tagged story is configured for clip production. When Story Recorder mode is enabled and a clip output (renderer/transcoder) is configured, a clip will be produced for this story. The indicator does not mean the story is currently being recorded, and no clip production occurs unless Story Recorder mode is enabled.
Clip Production Workflows
Producing clips during a live broadcast
In this use case, story clips are produced automatically as the show runs live. No manual intervention is needed, clip production is triggered at each story boundary.
In the NRCS, ensure the relevant stories are marked for recording.
Load the rundown in Viz Mosart. Verify that tagged stories show REC indicators in the timeline.
Enable Story Recorder mode (using any of the methods described in Managing a Story Recorder Session).
Run the show: Take stories as usual, with Take Next (default F12).
When the first item of a new story is taken on air, the previous story's recordings are automatically submitted for clip production.
Stories that are not marked for recording are silently skipped.
When done, disable Story Recorder mode. Any remaining recorded story is submitted for clip production automatically.
Recording a single story
In this use case, you record only one story and then stop.
In the NRCS, ensure the relevant story is marked for recording.
Load the rundown in Viz Mosart and navigate to the story. Verify the story displays a REC indicator in the timeline.
Enable Story Recorder mode.
Run the story, taking items as usual.
At the end of the story, disable Story Recorder mode. This triggers clip production for the recorded story.
Info: The story's out-point is determined by the genlock timecode at the moment the Disable command is processed. This may be a few frames after the operator's action (key press or template take), depending on system load.
Offline recording with stories back-to-back
In this use case, you record multiple stories in an offline session where the operator controls the pace between stories For example, allowing the anchor time to prepare or reposition between takes.
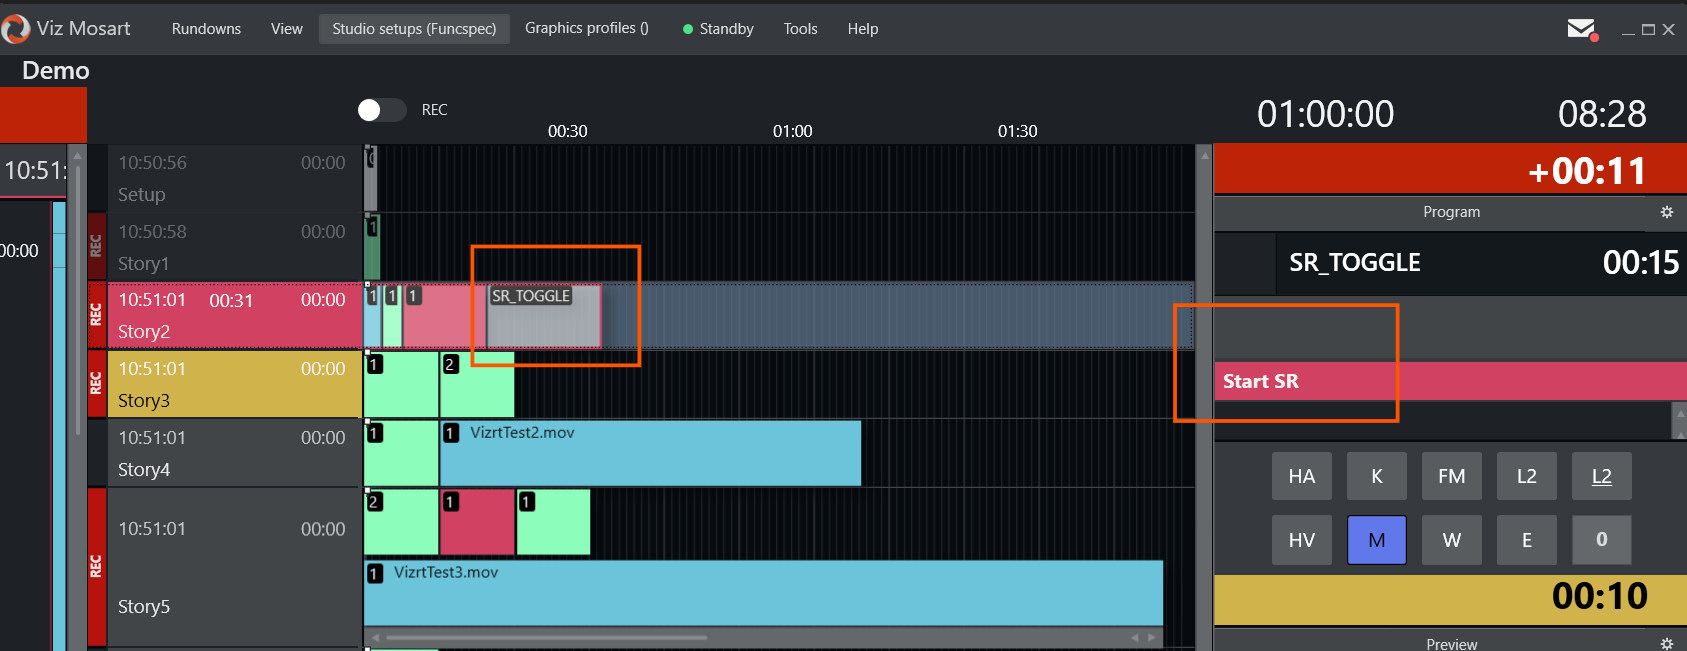
This is achieved by using a dedicated template with a STORY_RECORDER control command that toggles SR mode on and off between stories. The template is configured with:
Command On Take:
STORY_RECORDERwith valueTOGGLE(orDISABLE) . This disables SR mode when taken on air, triggering clip production for the completed story.Manual Continue Point:
STORY_RECORDERwith valueTOGGLE(orENABLE). This re-enables SR mode when the operator takes the next manual continue point.
The SR Toggle Template can be executed in two ways:
Keyboard shortcut: Configure a keyboard shortcut to take the template in Preview. The operator recalls this shortcut on the last item of each story, then takes the template on air when ready to end the story.
From the NRCS: Add the SR toggle template at the end of each story in the rundown. The template is then automatically queued as the last item of the story.
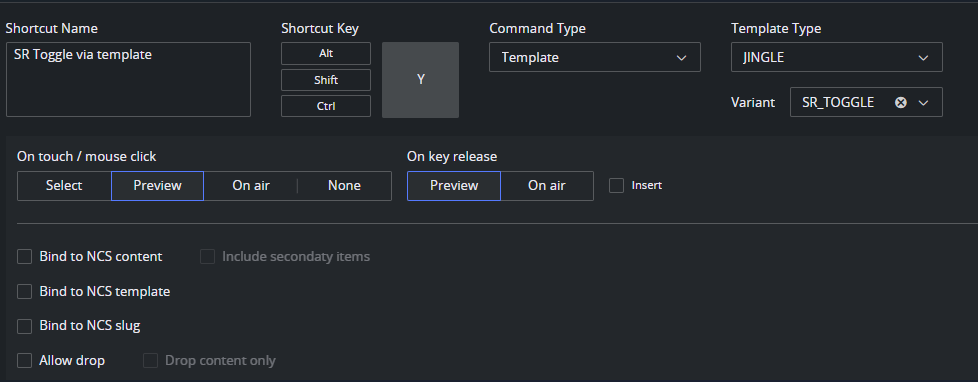
Workflow:
In the NRCS, tag the stories for recording.
Here is an example on how this can be done in Showmaker: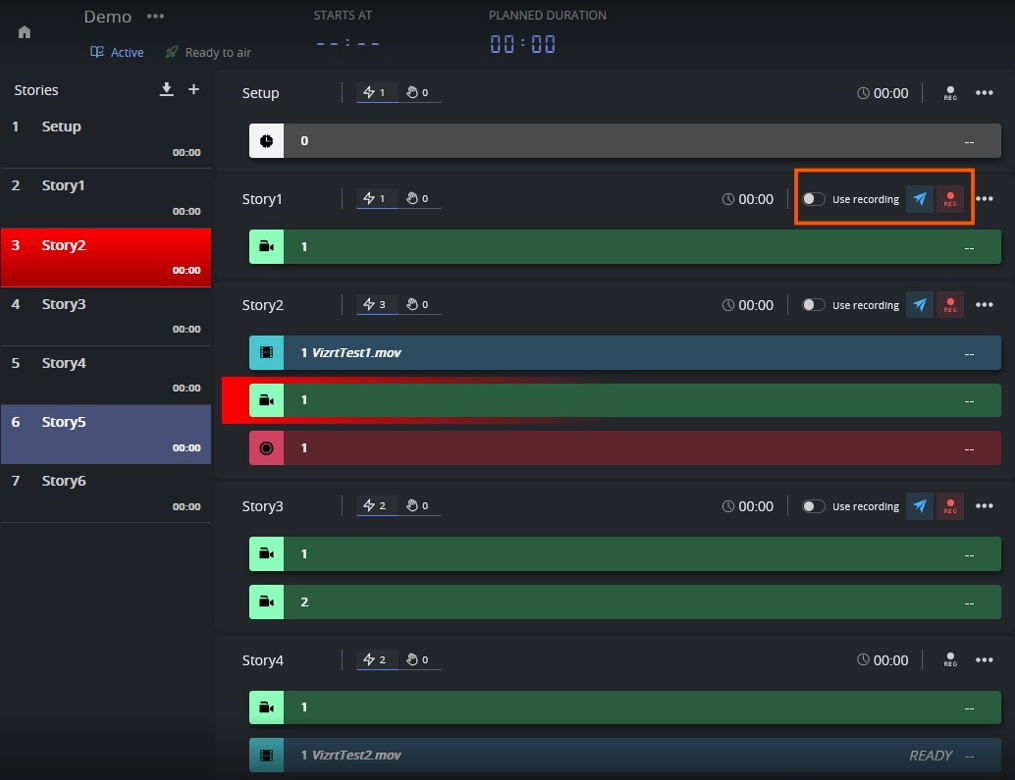
Load the rundown in Viz Mosart.
Enable Story Recorder mode and take the first story.
On the last item of a story, bring the SR Toggle Template into Preview (using its keyboard shortcut, or automatically if placed in the rundown).
When the story is finished, take the template on air. This disables SR mode and triggers clip production for the completed story.
The manual continue point is indicated in the Mosart UI.When ready to continue with the next story (for example, once the anchor has repositioned), press Take Next. This takes the continue point, re-enables SR mode, and recording resumes with the next story.
Repeat steps 4-6 for each story.
After the last story, disable Story Recorder mode to flush the final clip.
Info: The out-point of the story is determined by the genlock timecode at the moment the Disable command is processed. This may be a few frames after the operator's action (key press or template take), depending on system load.
TriCaster Clip Export
When Story Recorder is configured with a TriCaster output, completed stories are exported as clips using configured TriCaster export presets. Stories not marked for recording in the NRCS are skipped.
The clip name is based on the clip ID assigned to the story in the NRCS, with a timestamp appended for uniqueness. If the NRCS did not assign a clip ID, a name is auto-generated from the story name and recorder channel.
If the story has also been tagged in the NRCS for online publishing, the clip is published to the configured online platform (for example, YouTube) after export.
See the Viz Mosart Administrator Guide (section Operational Examples > Device-Specific Operations), for TriCaster export and publish preset configuration.
Mimir Clip Production
When Story Recorder is configured with a Mimir output, completed stories are submitted as render jobs to Mimir. Stories not marked for recording in the NRCS are skipped.
When Story Recorder mode is enabled, Mosart creates recording clip placeholders in Mimir for each configured recorder.
At story completion, a render job is submitted to Mimir using the configured preset and Kelda configuration.
The clip ID assigned to the story in the NRCS is used as the target item (Anchor clip) in Mimir.
On the first recording, the clip is rendered into the existing anchor item placeholder.
For repeated recordings of the same story, a new version is created under the same anchor item, preserving the version history.
Mimir then updates the NRCS (e.g. Saga) with the new anchor clip ID, so subsequent recordings reference the latest version.
See the Story Recorder Setup section of the Viz Mosart Administrator Guide for Mimir device, preset, and Kelda configuration.
Using Recorded Story Clips
Once a story clip is produced, it can be used in several ways:
Replace the original story
The NRCS can be configured to play the recorded clip instead of the original scripted content.
This is useful when a pre-recorded version of the story should air in place of the live segment.Reuse in other rundowns
The recorded clip is available as a regular media asset and can be inserted into any other rundown.Add graphics to a clean feed
If the clean feed (without burned-in graphics) was recorded, new graphics can be overlaid on the clip, for example for rebranding or a different-language broadcast.
Switching between original and recorded clip in the NRCS
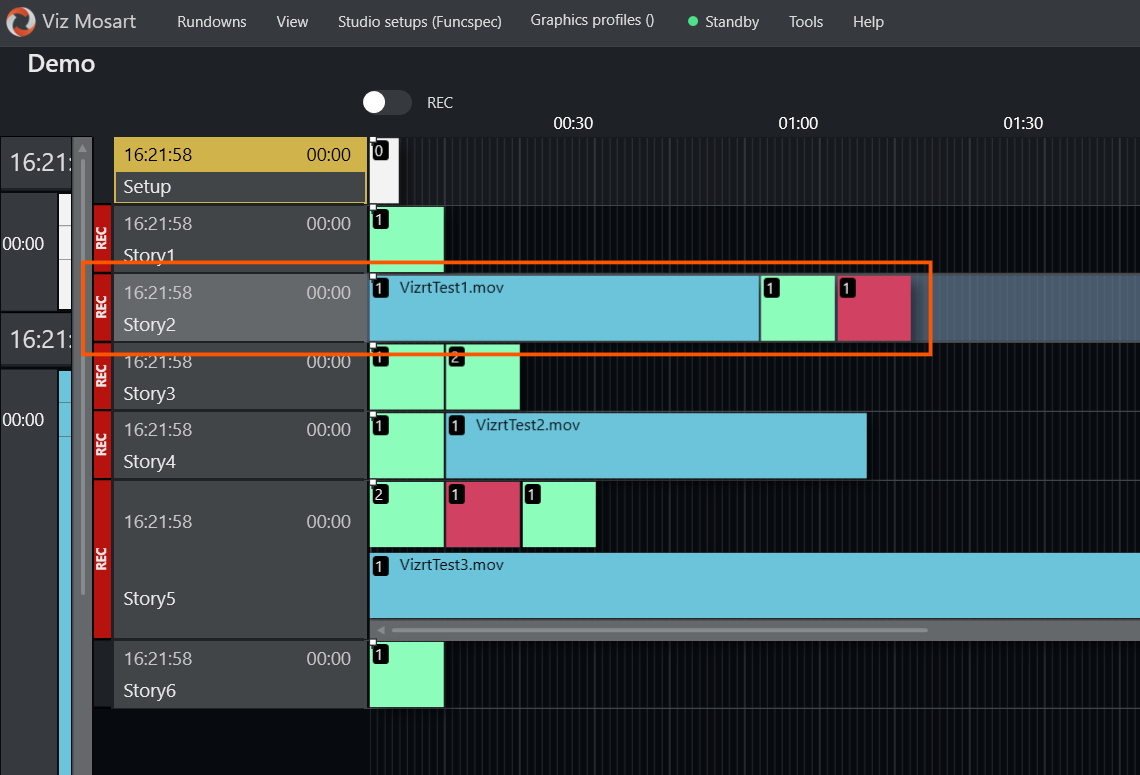
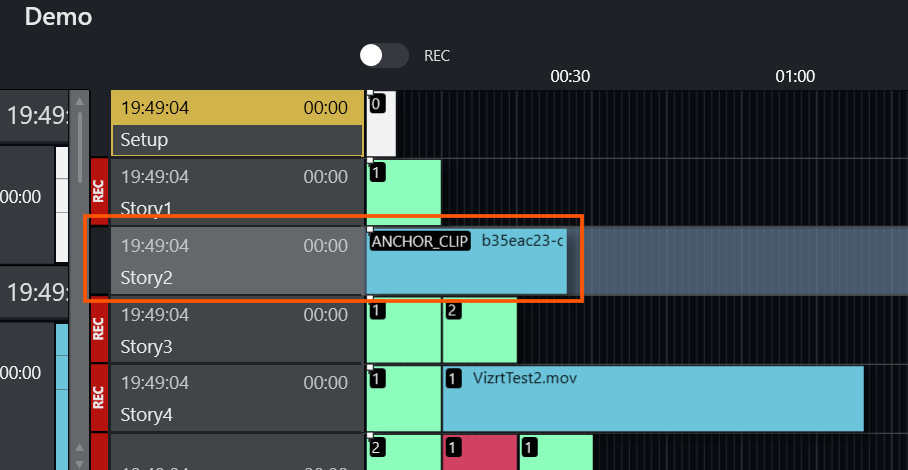
As an example of an NRCS, with Saga, the producer can choose per story whether to use the original script or the recorded clip version. When the recorded clip is selected for a story, Saga sends the clip to Viz Mosart using a template of type PACKAGE with variant ANCHOR_CLIP.
Info: This template must first be created in Viz Mosart's Template Editor before it can be used.
Timing Details
The Mosart UI has been extended with support for Story Recorder-related timing fields.
The Story Recorder panel displays the following new timing details:
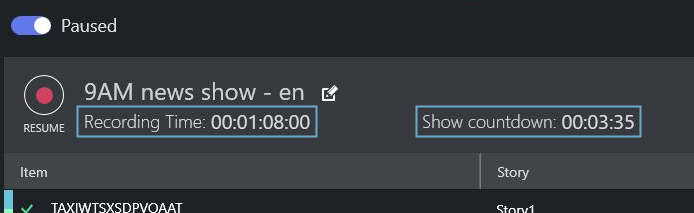
The Recording Time field starts at zero when a Story Recorder session is started, and
When the timeline is running, this counter is continuously growing, equal to the sum of the already recorded sections + the duration of the current recording.
When the timeline is paused, this counter is static, equal to the sum of the recordings prior to the selected Retake point.
The Show Countdown field displays the difference between the planned duration as defined in the NRCS and the Recording Time.
When the timeline is running, this counts down.
When the timeline is paused, this is static.
If Recording Time exceeds Show Planned Duration, then Show Countdown becomes negative and will be counting up.
The Rundown over/under field is an existing field in the Viz Mosart UI, and when Story Recorder mode is enabled, it provides an indication of the executed recordings relative to the remaining rundown and the planned duration of the rundown:
Under: indicates the number of seconds the show must be extended to meet the planned duration.
Over: indicates the number of seconds the show exceeds the planned duration.
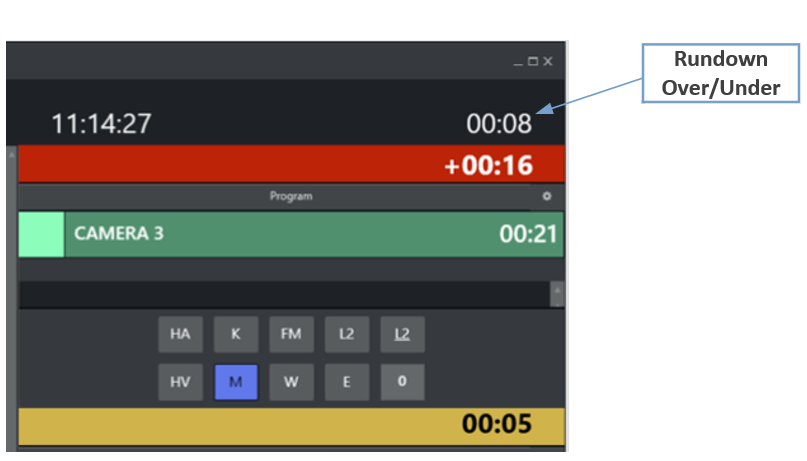
All these Story Recorder related time fields are also shown in the Mosart Timing Display and forwarded to the Plura Timing System (using the Time Request Protocol).